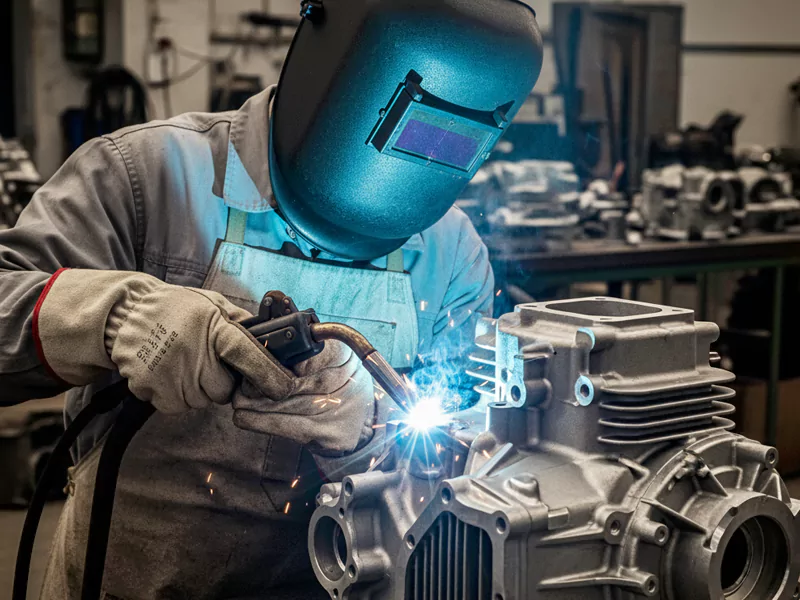
You want to learn how to weld cast aluminum the right way. Safety is very important because welding can be dangerous. You could get burned, shocked by electricity, or hurt your eyes. Welding causes about 25% of big work accidents. Thousands of workers get hurt every year. Getting ready and using good methods help you stay safe. You can also make strong welds that last a long time.
Key Takeaways
- Safety is very important when welding. Always wear safety gear like helmets, gloves, and clothes that resist heat. This helps stop injuries.
- Clean the cast aluminum well before welding. Use acetone and stainless steel brushes. These remove oil, dirt, and oxide. This makes the welds stronger.
- Preheat cast aluminum parts to about 250°F. This helps lower the chance of cracks and holes during welding.
- Pick the right filler rod for the alloy type. Use ER4043 for most cast aluminum. Use ER5356 for jobs that need more strength.
- Tack weld to keep parts in place before the main weld. This stops the parts from moving. It also keeps them lined up during welding.
- Watch the heat closely while welding. Too much heat can bend the metal. Too little heat can make weak welds.
- Check the welds for quality after you finish. Look for cracks, holes, and uneven lines. This helps make sure the weld is strong and safe.
- Use the right way to cool the welded part. Let it cool on its own. This helps stop cracks and keeps the weld strong.
Table of Contents
Welding Cast Aluminum Overview

Welding cast aluminum is harder than welding other metals. You must know how cast aluminum acts before you start welding. This part explains why welding aluminum, especially cast pieces, needs extra care and skill.
Cast Aluminum Properties
Cast aluminum is not the same as wrought aluminum. You will see these differences when you weld aluminum parts. The table below shows how cast aluminum and wrought aluminum are different:
| Property | Cast Aluminum | Wrought Aluminum |
|---|---|---|
| Tensile Strength | Lower due to defects from molding | Higher, more uniform grain structure |
| Susceptibility to Porosity | More susceptible | Less susceptible |
| Internal/External Defects | Present | Usually free of defects |
| Weldability | Challenging due to defects | Superior due to uniform properties |
Cast aluminum has lower tensile strength. It can have more porosity and shrinkage. These problems make welding harder. Cast aluminum often has inside and outside defects. If you do not get the part ready, your welds can be weak.
Tip: Always check cast aluminum for cracks or defects before welding. This helps you avoid trouble later.
The Difference Between Welding Aluminum and Cast Aluminum Welding:
| Feature | Wrought Aluminum Welding | Cast Aluminum Welding |
| Manufacturing | Mechanical deformation (rolling, extrusion, forging) | Pouring molten metal into a mold |
| Microstructure | Uniform | Often non-uniform, can be porous |
| Weldability | Generally easier | More challenging |
| Porosity | Lower | Higher |
| Brittleness | Lower | Higher (especially in certain alloys) |
| Key Challenge | Aluminum oxide layer | Aluminum oxide layer, porosity, impurities, brittleness, heat control |
| Preferred Method | TIG, MIG | Primarily TIG (for control), MIG with caution |
| Preheating | Less common, depends on alloy | Often required |
| Applications | Structural components, frames, aerospace, automotive parts | Engine blocks, manifolds, housings, decorative items |
Common Uses
Cast aluminum is used in many fields. People like it because it is light and strong enough for lots of jobs. The table below shows some common ways cast aluminum is used:
| Application Area | Description |
|---|---|
| Automotive | Used for lightweight parts like engine blocks, transmission cases, and alloy wheels. |
| Electronics | Needed for making enclosures, heat sinks, and connectors because it handles heat well. |
| Construction & Equipment | Makes fittings, brackets, and machine housings that last longer and work better. |
You might use cast aluminum when fixing cars, repairing machines, or building electronics. Knowing where cast aluminum is found helps you pick the best aluminum welding method for each job.
Process Summary
When you weld cast aluminum, you must follow careful steps. Here are the steps you should take:
- Find out which alloy you have. You need to know if it is a 3XX.0 or 5XX.0 series alloy.
- Clean and heat the part first. Cleaning gets rid of oil and dirt. Heating stops cracks from forming.
- Pick the right filler material. Use 4043 filler for 3XX.0 alloys and 5356 for 5XX.0 alloys.
- Think about how the part was made. Sand casting and die casting have different problems, like gas bubbles.
- Use the right welding technique. Change your method based on the alloy and how it was cast.
Welding aluminum, especially cast pieces, needs more work than welding other metals. Each step helps you stop problems like porosity and weak welds. If you follow these steps, you can make strong welds with your aluminum welding methods.
Safety and Equipment

You must think about welding safety before you start. The right safety gear keeps you safe from burns and eye injuries. It also protects you from bad fumes. You need to follow rules so your work is safe and good quality.
Safety Gear
Clothing and Eye Protection
Wear the right gear every time you weld cast aluminum. This gear keeps you safe from sparks, heat, and bright light. Here is what you need:
- Welding helmet: It covers your face, neck, and ears from sparks and UV rays. Pick a helmet with a tinted lens for better eye safety.
- Goggles: They keep your eyes safe from flying bits and strong light. Choose goggles with side shields for more protection.
- Heat-resistant jacket or apron: Leather jackets or aprons stop burns. Aprons let you move more easily.
- Welding gloves: Leather gloves with padding keep your hands safe from heat and sparks. Long gloves protect your arms better.
- Boots: Leather boots, especially steel-toed ones, keep your feet safe from falling things and hot metal.
- Ear protection: Use earplugs or headphones to block loud sounds.
Tip: Never wear clothes made from synthetic fabric when welding aluminum. These can melt and stick to your skin if they get hot.
Ventilation
Good ventilation is very important for welding cast aluminum. Fumes from welding can hurt your lungs. Always work where there is lots of fresh air. Use fans or fume extractors to get rid of smoke and gases. If you work in a small space, wear a respirator made for welding safety.
Note: Good ventilation helps you breathe clean air and keeps your workspace safe.
Tools Needed
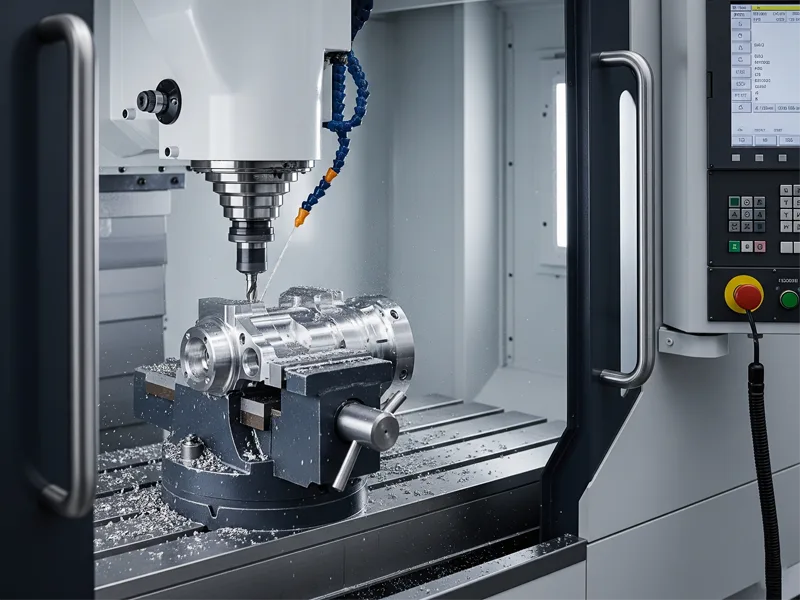
TIG Welder
TIG welding is best for welding cast aluminum. It gives you clean welds and good control. Use TIG welding for thin aluminum parts and jobs that need neat welds. MIG welding works for thicker pieces but is not as detailed.
Filler Rods
You need the right filler rods for welding aluminum. Use 4043 rods for most cast aluminum alloys. For some alloys, like the 5XX.0 series, use 5356 rods. The right rod helps stop cracks and makes your welds stronger.
Cleaning Tools
Clean parts are important for welding cast aluminum. Use stainless steel brushes, grinders, or special pads to clean off dirt, oil, and oxide. Clean parts help you avoid holes and weak welds.
Here is a table that shows common welding methods and what they are good for:
| Welding Method | Best For | Pros | Cons |
|---|---|---|---|
| TIG Welding | Thin aluminum, high-quality welds | Clean welds, precise control | Slower process, needs skill |
| MIG Welding | Thicker cast aluminum, fast jobs | Fast, good penetration | Less precise, more spatter |
| Stick Welding | Emergency, outdoor repairs | No shielding gas needed | High porosity, weak welds |
| Oxy-Fuel Welding | Small, low-cost repairs | No electricity required | Weak welds, contamination risk |
| Friction Stir Welding | Industrial, aerospace | No porosity, strong welds | Needs special equipment |
Alert: Always follow welding safety rules from groups like OSHA and AWS. These rules tell you about no-weld zones, weld maps, and repair steps for welding cast aluminum. Following these rules keeps your work safe and professional.
Step-by-Step Guide to Welding Cast Aluminum
Pressure Testing
Before welding, you need to check the cast aluminum part for hidden problems. Pressure testing helps you find issues that could make your weld weak. There are different ways to test the part:

- Leak Testing: Seal the part and add pressurized fluid. Look for leaks that show pinholes or blowholes.
- Proof Testing: Raise the pressure to see if the part can handle normal use.
- Burst Testing: Increase the pressure until the part breaks. This shows how much it can take.
Pressure testing can show common problems in cast aluminum:
- Pinholes and blowholes from trapped gas when cooling.
- Shrinkage porosity, which are tiny holes from not enough molten metal.
- Shrinkage cavities, which are bigger holes that can cause trouble.
- Hot tears or cracks from cooling too fast.
If you find any of these problems, you need to fix them before welding. This step helps you avoid weak welds and future breaks.
Tip: Always do pressure testing on important parts like engine blocks or transmission cases. Finding problems early saves time and money.
Grinding Cracks
After pressure testing, look for cracks in the part. You must get these spots ready before welding. Follow these steps:
- Clean the crack with acetone to remove oil and dirt.
- Use a stainless steel brush to take off the oxide layer. Brush in one direction for best results.
- Wipe the area with acetone again after brushing.
- Drill small holes at the ends of the crack. This stops the crack from getting bigger.
- Use a carbide burr or end mill to make a V-groove along the crack. The groove helps the weld go deeper.
- For big repairs, use grinding wheels made for aluminum. This stops contamination.
- Preheat large or thick cast parts in an oven or with a torch. Let them cool slowly to lower stress.
Good grinding and prep help you avoid new cracks while welding.
Cleaning Surface
You must clean the cast metal surface before welding. Dirt, oil, and oxide can cause porosity and weak welds. There are several ways to clean:

| Method | Pros | Cons |
|---|---|---|
| Laser Cleaning | Precise, consistent, eco-friendly | High cost, less effective on thick layers |
| Chemical Cleaning | Fast, works on many contaminants | Health risks, may etch surface |
| Mechanical Abrasion | Removes thick oxides, low cost | Can roughen surface, labor-intensive |
| Solvent Degreasing | Removes oil quickly, gentle on metal | Does not remove oxide, some solvents harm environment |
| Plasma Cleaning | Very clean, no chemicals | Expensive, not for thick contaminants |
Pick the cleaning method that fits your part and budget. Always clean the cast metal surface two times—once before grinding and once before welding. This step makes sure your weld is strong and lowers the chance of porosity.
Note: Clean surfaces help the filler rod move smoothly and stop contamination during welding.
Removing Oxide
You have to take off the oxide layer before welding. Aluminum oxide forms fast when aluminum meets air. This layer is much harder than the metal below it. Welding over oxide makes weak welds and more porosity. Clean the oxide right before you start welding.
Here are ways to remove oxide:
- Stainless Steel Brush: Use a clean stainless steel brush. Brush in one direction only. Do not use this brush on other metals. This keeps the part clean.
- Mechanical Abrasion: Use pads or wheels made for aluminum. These tools scrape off oxide but do not hurt the metal.
- Chemical Cleaners: Put a mild acid, like phosphoric acid, on the part. Rinse with clean water after using chemicals. Dry the part before welding.
- Solvent Wipe: Wipe the surface with acetone or alcohol. This step takes off oil and dirt but does not remove oxide. Always do this after brushing or abrasion.
Tip: Clean the oxide layer right before welding. If you wait, oxide will form again and make welding harder.
Here is a table that shows ways to remove oxide and their benefits:
| Method | Benefit | Drawback |
|---|---|---|
| Stainless Steel Brush | Fast and cheap | Needs cleaning often |
| Abrasive Pads | Takes off thick oxide | Can make surface rough |
| Chemical Cleaners | Cleans deeply | Needs careful use |
| Solvent Wipe | Removes oil, not oxide | Not a full solution |
Keep the surface clean and free of oxide. This helps the filler rod move well and lowers porosity. You will get welds that are stronger and cleaner.
Preheating
Preheating cast aluminum helps you make better welds. You heat the metal before welding. This step gets rid of moisture and lowers cracking. It also reduces porosity in the weld.
You need to know the right temperature for preheating. Too much heat can hurt the metal. Not enough heat will not help.
- Preheat cast aluminum up to 250°F. This drives off moisture and lowers porosity.
- Do not use high heat. High heat can make the metal weak, especially alloys like 6061 and 6063.
- For non-heat-treatable alloys, keep the temperature above 150°F for a short time. Long heating can cause stress cracks.
- If you weld parts with different thicknesses, preheat the thicker part. For example, heat a 3/8-inch casting to 200°F when joining it to a thin piece.
- Welding codes may say to hold the part between 250°F and 400°F for a set time before welding. Always check the code for your job.
Note: Keep the interpass temperature above the preheat temperature. This keeps the weld strong and stops cracks.
Here is a quick guide for preheating cast aluminum:
- Use a temperature stick or infrared thermometer to check the metal.
- Heat the part evenly. Use an oven, heat lamp, or propane torch.
- Do not overheat. Stay under the recommended temperature.
- Let the part cool slowly after welding. Fast cooling can cause cracks.
Preheating makes welding cast aluminum easier and safer. You will get welds with fewer problems and better strength. Always follow the right steps for your alloy and part size.
How to Weld Cast Aluminum: Step-by-Step Guide
Work Area Setup
Get your work area ready before you start welding. A clean space helps you work safely and avoid mistakes. Put your cast aluminum part on a strong, fireproof table. Take away anything that can catch fire or clutter the area. Keep your TIG welder, filler rods, and cleaning tools close by.
Check if your ventilation works well. Good airflow takes away bad fumes from welding aluminum. Use fans or fume extractors if you are inside. Make sure your safety gear is ready to use. Put on your welding helmet, gloves, and protective clothes.
Set up bright lights so you can see the weld spot. Good lighting helps you find problems and line up your parts. Hold the cast aluminum piece with clamps or fixtures. This stops it from moving while you weld and keeps it in the right place.
Tip: Always check your equipment settings before you start. Good setup helps you make fewer mistakes and better welds.
Tack Weld
Tack welding keeps your cast aluminum parts in place before the main weld. You make small welds at important spots to hold everything together. Tack welds stop the parts from moving or bending while you weld.
Here are ways to keep things lined up:
- Put small tack welds at corners and seams.
- Change your welding settings for short, quick welds.
- Use different tack welds, like spot or bridge tacks, for different shapes.
Check if the parts are lined up after each tack weld. If something moves, take off the tack and do it again. Tack welds should be strong enough to hold but easy to remove if you need to fix the position.
Tack welding is very important for welding cast aluminum. It keeps your parts steady and helps you get a strong, neat weld.
Main Weld Pass
The main weld pass joins your cast aluminum parts for good. You need the right welding steps and settings to make a strong weld.
TIG Welding Technique
TIG welding is the best way to weld cast aluminum. You use alternating current (AC) to clean off the oxide layer and make a solid weld. TIG welding lets you control the weld and gives cleaner results than other ways.

Here is how TIG is different from other welding:
- TIG welding uses AC to clean aluminum oxide, which is needed for weld cast aluminum.
- MIG welding can get gas contamination and needs more cleaning.
- TIG welding is harder to learn but works better for thin pieces and non-ferrous metals.
Hold the torch at a 15-degree angle. Keep the tungsten electrode close but do not touch the metal. Move slowly along the seam and add filler rod when needed. Watch for a smooth, even weld pool.
Filler Rod Selection
Picking the right filler rod makes your weld better. Match the rod to your cast aluminum alloy and what you are fixing.
| Filler Rod | Properties | Benefits | Applications |
|---|---|---|---|
| ER4043 | Aluminum-silicon alloy with ~5% silicon, enhances fluidity | Reduces cracking risk, good corrosion resistance | Ideal for 6XXX series and cast aluminum repairs |
| ER5356 | Contains 5% magnesium, high strength | Suitable for high mechanical strength applications | Common for 5XXX series and marine applications |
| ER4047 | Contains ~12% silicon, highly fluid | Reduces hot cracking risk, enhances weld appearance | Used in automotive and thin-gauge aluminum welding |
Use ER4043 for most cast aluminum fixes. Pick ER5356 for parts that need to be stronger, like marine or building parts. ER4047 is best for thin or car parts.
Heat Control
Controlling heat is very important when you weld cast aluminum. Too much heat can bend or burn the metal. Not enough heat makes weak welds.
Here are TIG welding settings to use:
| Parameter | Recommended Value |
|---|---|
| Frequency for 1/8″ | 80 Hz |
| Frequency for edge welds | 120 Hz+ |
| Frequency for 1/4″ | 40-50 Hz |
| Balance for clean alloy | 25% EP |
| Balance for old cast | 30-40% |
| Tungsten electrode type | 3/32″ 2% lanthanated or E3 |
Watch the weld pool closely. Change your speed and amperage to keep the weld even. Use a temperature stick or infrared thermometer to check the part. Do not overheat the metal. Take breaks between weld passes if needed.
Here are common mistakes and how to fix them:
| Mistake | Description | Solution |
|---|---|---|
| Porosity | Pinholes form in the weld due to lack of shielding gas. | Make sure you have enough shielding gas and clean aluminum before welding. |
| Lack of fusion | Occurs when voltage or wire feed speed is too low. | Change your equipment settings to get enough heat at the start of the weld. |
| Craters | Form at the end of a weld if not filled in, leading to stress points. | Use a crater timer or quickly trigger the gun again to fill in the crater. |
| Burn through | Excessive heat input can warp or burn through thinner materials. | Keep the voltage and speed right so you do not overheat. |
| Feeding aluminum | Difficulty in feeding aluminum wire can cause tangling (birdnesting). | Use a spool gun or push-pull system to help feed wire and stop tangling. |
Note: Always clean your cast aluminum part before welding. Cleaning and heat control help you avoid holes and weak welds.
Now you know the steps for how to weld cast aluminum. Follow this guide to make strong welds every time you work with cast aluminum parts.
Cooling
Cooling is a critical step after you finish welding cast aluminum. If you cool the part too quickly, you risk cracks and weak spots in your weld. Proper cooling helps your weld stay strong and prevents stress in the metal.
Why Controlled Cooling Matters
When you weld cast aluminum, the metal heats up fast. If you let it cool down too quickly, the sudden temperature change can cause the metal to shrink unevenly. This can lead to:
- Cracking along the weld or in the base metal
- Porosity, which means tiny holes form inside the weld
- Warping or bending of the part
You want to avoid these problems by cooling the part slowly and evenly.
How to Cool Cast Aluminum Welds
Follow these steps to cool your welded part the right way:
- Turn Off the Heat Source
After you finish the weld, remove the torch or welder from the part. Do not try to speed up cooling with water or air. - Let the Part Cool Naturally
Leave the part on the welding table. Allow it to cool at room temperature. This slow cooling helps the metal relax and prevents cracks. - Cover the Welded Area
For thick or large castings, cover the part with a welding blanket or dry sand. This keeps the heat in and slows down the cooling even more. - Check the Temperature
Use a temperature stick or infrared thermometer to monitor the part. Make sure the temperature drops slowly. If the part feels warm to the touch after 30 minutes, you are cooling at a safe rate.
Tip: Never quench cast aluminum in water or spray it with compressed air. Rapid cooling can cause thermal shock and ruin your weld.
Common Cooling Mistakes and How to Avoid Them
| Mistake | What Happens | How to Avoid |
|---|---|---|
| Quenching in water | Cracks, warping, weak welds | Always let the part air cool |
| Using fans or air jets | Uneven cooling, surface cracks | Cover the part, avoid forced air |
| Moving the part early | Stress in the weld, misalignment | Let the part rest until cool |
Signs of Proper Cooling
- The weld bead looks smooth and even.
- No new cracks appear as the part cools.
- The part stays straight and does not warp.
Note: If you see cracks or hear popping sounds as the part cools, you may have cooled it too fast. Next time, use a welding blanket or slow down the process.
Taking time to cool your cast aluminum welds properly ensures your hard work lasts. You get stronger, cleaner welds and avoid costly repairs later.
Troubleshooting Welding Cast Aluminum
Porosity Issues
Porosity happens a lot when welding cast aluminum. Small holes can show up inside the weld. These holes make the weld weak and not last long. Porosity often comes from hydrogen trapped in the weld pool. This can happen if you do not clean the part well. Moisture and oil left on the surface also cause problems.
You can lower porosity by doing these things:
- Clean the part with acetone or toluene before welding. Take off all oil, grease, and moisture.
- Degrease the part very well. Bad cleaning is a big reason for porosity.
- Use enough shielding gas. For GMAW, keep the flow at least 35 SCFH.
- Keep the gas nozzle clean from spatter. This helps the shielding gas cover the weld.
- Hold the nozzle close, about ½ to 5/8 inch away. This stops air from mixing with the shielding gas.
- Do not weld in windy places. Wind can blow away the shielding gas and cause porosity.
- Use the right gun angle. A leading angle keeps the weld pool safe.
Tip: Always check your tools before you start. Good cleaning and correct settings help you stop porosity and make stronger welds.
Cracking Problems
Cracks can show up while welding or after you finish. These cracks make the weld weak and can break the part. You need to fix cracks fast and use the right steps so they do not come back.
Do these steps to fix cracks:
- Find out what material you have. Use white vinegar to see if it is aluminum or magnesium.
- Pick the right filler metal. Use 4043 for most aluminum casting alloys.
- Clean the cracked spot with acetone. This takes away oil and dirt.
- Make a ‘V’ groove with a carbide cutter. The groove helps the filler metal fill the crack better.
- Use GTAW for repairs. GTAW gives you more control and cleaner welds.
If you want to try advanced ways for tough welds, always get the crack ready and pick the best filler metal for your alloy.
| Step | Purpose |
|---|---|
| Material check | Stops wrong filler choice |
| Filler selection | Lowers risk of new cracks |
| Cleaning | Makes weld quality better |
| Groove preparation | Lets filler go deep |
| GTAW process | Gives precise control |
Note: Take your time when fixing cracks. Careful prep makes welds stronger and last longer.
Contaminant Removal
Things like oil, grease, and oxide can mess up your weld. You must take off all contaminants before welding. If you skip this, you will get porosity, weak welds, and bad looks.
Follow these steps to clean off contaminants:
- Brush the surface with a clean stainless steel brush. Only use this brush for aluminum.
- Wipe the part with acetone or alcohol. This takes off oil and dirt.
- Use pads or wheels made for aluminum to remove thick oxide layers.
- Rinse chemical cleaners with clean water. Dry the part before welding.
- Check the part after cleaning. Look for any leftover dirt or oxide.
Tip: Clean the part right before welding. Aluminum makes oxide fast, so remove it just before you start.
Weak Welds
Weak welds can ruin your cast aluminum project. You want your welds to hold strong, look clean, and last a long time. If you notice your welds breaking, bending, or showing gaps, you need to fix the problem right away. Weak welds often come from poor technique, wrong settings, or bad preparation.
Common Causes of Weak Welds
You may see weak welds for several reasons. Here are the most frequent causes:
- Not enough cleaning before welding
- Using the wrong filler rod
- Incorrect heat settings
- Poor joint design
- Fast cooling after welding
- Low-quality cast aluminum
Tip: Always check your equipment and materials before you start. Good preparation leads to strong welds.
How to Spot Weak Welds
You can identify weak welds by looking for these signs:
| Sign | What It Means |
|---|---|
| Cracks along weld | Weld did not fuse well |
| Porosity (tiny holes) | Contaminants or bad shielding gas |
| Discoloration | Overheating or poor cleaning |
| Low penetration | Not enough heat or wrong technique |
| Brittle feel | Wrong filler or fast cooling |
If you see any of these signs, you need to take action.
Steps to Fix Weak Welds
You can fix weak welds by following these steps:
- Clean the Surface Thoroughly
Use a stainless steel brush and acetone. Remove all oil, dirt, and oxide. - Choose the Right Filler Rod
Match the rod to your alloy. Use ER4043 for most cast aluminum. Pick ER5356 for high-strength needs. - Adjust Your Welding Settings
Set the correct amperage and AC balance. Increase heat for thicker parts. Lower heat for thin sections. - Improve Joint Design
Grind a V-groove into the joint. This helps the weld penetrate deeper. - Control Cooling
Let the part cool slowly. Cover it with a welding blanket or dry sand. - Test the Weld
Tap the weld gently with a hammer. A strong weld will not crack or break.
Alert: Never rush the welding process. Take your time to set up and check each step.
Preventing Weak Welds in the Future
You can avoid weak welds by following these best practices:
- Clean every part before welding
- Use the correct filler rod for your alloy
- Set your welder to the right settings
- Preheat thick castings
- Weld slowly and steadily
- Let the part cool naturally
If you follow these steps, you will get strong, reliable welds every time you work with cast aluminum.
Note: Practice makes perfect. The more you weld, the better your results will be.
Finishing and Inspection
Cleaning Welds
When you finish welding aluminum, you need to clean the welds. Cleaning removes leftover stuff and makes the surface smooth. Let the part cool down all the way first. Use a stainless steel brush to take off slag and oxidation. If some spots are hard to clean, use a fine file or sandpaper. Always brush in one direction so you do not scratch the surface too much.
If you see any dark marks or soot, wipe the area with a clean cloth and acetone. This helps get rid of oils and dust from welding. Clean welds look better and help you find problems during inspection.
Tip: Do not use a brush that touched steel or other metals. This keeps your aluminum welds strong and stops contamination.
Inspecting Quality
You need to check your welds to make sure they are strong and safe. Start by looking at the welds closely. Look for cracks, holes, or uneven weld beads. If you find any problems, fix them before using the part.

For a better check, use different ways to inspect the welds. Here is a table that shows common ways to check cast aluminum welds:
| Inspection Method | Type | Description |
|---|---|---|
| Visual Inspection | Non-Destructive | Quick and cheap; looks for cracks or burn-through you can see. |
| Liquid Penetrant Surface Crack Inspection | Non-Destructive | Finds tiny cracks on the surface using dye. |
| Magnetic Particle Weld Inspection | Non-Destructive | Uses magnets to find problems by watching particles gather. |
| Radiographic Weld Inspection | Non-Destructive | Uses X-rays to see inside the weld and find faults. |
| Ultrasonic Weld Inspection | Non-Destructive | Uses sound waves to find problems inside the weld. |
| Macro Etch Weld Inspection | Destructive | Breaks the welded piece to study its inside and strength. |
Liquid penetrant testing helps you find small cracks you cannot see. Radiographic and ultrasonic checks help you find hidden problems inside the weld. These ways help you know your welding aluminum project is safe and strong.
Note: Pick the inspection method that fits how important your part is and your budget.
Surface Treatment
After you check the weld quality, you can add a surface treatment to protect and improve your aluminum part. Surface treatments stop corrosion, add strength, and make the part look better. Here are some common treatments you can use after welding aluminum:
- Anodizing: Makes the surface harder and stops corrosion.
- Powder Coating: Adds a tough, colorful layer that lasts.
- Electroplating: Makes the surface shiny and stronger.
- Painting: Gives color choices and protects the metal.
- Passivation: Helps stop corrosion.
- Shot Blasting: Cleans the surface and helps paint stick.
- Electrophoresis: Adds a smooth, protective layer.
- Physical Vapor Deposition (PVD): Makes a hard, pretty coating.
Some people polish or chrome plate their aluminum parts to make them shine. Polishing gives a smooth, mirror-like look. Chrome plating looks good and protects the metal from rust and wear.
Alert: Always clean and check your welds before adding any surface treatment. This helps the coating stick well and last longer.
If you follow these finishing and inspection steps, your welding aluminum project will be strong, safe, and ready to use. Careful cleaning, good inspection, and the right surface treatment help your work last and look great for years.
Welding cast aluminum needs you to follow careful steps. You must clean and get the part ready before welding. Use the right welding method for the job. Always wear safety gear like a welding mask, gloves, and leather boots. Make sure your work area is neat and has good airflow. Mark any hot parts so no one gets hurt. Check your safety steps often to stay safe. Pick the correct filler metal for your weld. Clean the weld spot again if it gets dirty. Use inverter technology to help control your welds better. Practice these skills and look at troubleshooting tips to get better results. Being safe and using good methods will help you make strong welds that last.
FAQ
TIG welding gives you the most control and cleanest results. You can use MIG welding for thicker parts, but TIG works best for repairs and precision jobs.
You must clean the part with acetone and a stainless steel brush. Remove all oil and oxide. Use enough shielding gas and keep the nozzle close to the weld.
Preheating helps you avoid cracks and porosity. You should always preheat thick or large castings. For thin parts, you may skip preheating, but it is safer to use it.
| Alloy Type | Recommended Filler Rod |
|---|---|
| 3XX.0 | ER4043 |
| 5XX.0 | ER5356 |
Pick the rod that matches your alloy for strong welds.
Grind a V-groove along the crack. Drill small holes at each end. Clean the area with acetone. Use the right filler rod and weld slowly to fill the groove.
Alert: Never cool cast aluminum welds with water. Rapid cooling causes cracks and weakens the weld. Let the part cool slowly at room temperature.
You can use visual checks, liquid penetrant, or ultrasonic testing. Look for cracks, holes, and uneven beads. Clean welds and smooth surfaces show good quality.