You can weld aluminum parts, but you must follow careful steps. This helps you get strong and good joints. Good preparation and the right tools help a lot. Aluminum is not like steel. You need to know how to weld aluminum parts. This helps you avoid weak welds. Some common problems are oxide layer, porosity, heat control, and cracking. The table below shows the most common problems:
| Challenge | Description |
|---|---|
| Oxide Layer Interference | The oxide layer on aluminum must be removed for a successful weld. |
| Porosity and Contamination | Natural porosity can trap air and moisture, causing weld defects. |
| Managing Heat Control and Warping | Quick heat absorption can cause warping and burn-through, especially on thin aluminum sheets. |
| Distortion on Thin Aluminum | Thin sheets are prone to distortion due to rapid heat expansion. |
| Cracking and Incomplete Fusion | High thermal expansion and fast cooling can lead to cracking in aluminum welds. |
Welding aluminum takes skill, patience, and a clear plan.
Key Takeaways
- Always clean aluminum parts before you weld them. Use a stainless steel brush to take off the oxide layer. Wipe the part with isopropyl alcohol. This helps make a strong bond.
- Pick the right welding method for the aluminum thickness. Use TIG welding for thin sheets. Use MIG welding for thick plates. This gives the best results.
- Watch the heat closely when you weld. Make short welds and let the metal cool between them. This stops warping and bending.
- Choose the right filler metals for the aluminum alloy. This stops cracks and makes the weld strong.
- Use pure argon gas for most aluminum welding jobs. For thick aluminum, use an argon-helium mix. This helps the weld go deeper.
- Check your welds by looking at them after you finish. Make sure the surface is smooth and even. There should be no cracks or holes. This shows good quality.
- Follow safety rules. Always wear protective gear. Make sure the area has good airflow to avoid breathing in bad fumes.
- Preheat thick aluminum parts if you need to. Keep the heat below 200°F. This stops damage and helps the weld flow better.
Table of Contents
How to Weld Aluminum Parts
Can Aluminum Be Welded?
You can weld aluminum parts if you use the right steps. Many people wonder how to weld aluminum because it is not like steel. Aluminum needs special care because of its physical properties. It heats up fast and makes a hard oxide layer. This layer can stop the weld and make the joint weak. You need to remove the oxide layer and keep the metal clean.
There are different ways to weld aluminum. TIG welding gives clean and strong welds. MIG welding works well for thick aluminum plates. Both methods help you make strong aluminum joints. Welded aluminum can sometimes be stronger than the original metal. You can get strong welds if you follow the right steps.
Here is a table that shows the main ways to weld aluminum parts in 2025:
| Welding Method | Description |
|---|---|
| Gas Metal Arc Welding (GMAW) | Uses inert gas and direct current reverse polarity; good for many thicknesses of aluminum. |
| Gas Tungsten Arc Welding (GTAW) | Uses tungsten gas; best for thin aluminum plates. |
| Shielded Carbon Arc Welding (SCAW) | Uses carbon gas to make an arc; you need to remove flux after welding. |
| Shielded Metal Arc Welding (SMAW) | Uses a coated electrode to protect the weld; makes slag you can remove. |
| Atomic Hydrogen Welding | Uses hydrogen gas to keep an arc; works like oxyacetylene welding. |
| Stud Welding | Uses special tools to weld studs; uses capacitor discharge. |
| Electron Beam Welding | Uses electrons to hit aluminum; usually done in a vacuum chamber. |
| Resistance Welding | Includes flash, seam, and spot welding; good for aluminum and its alloys. |
Pick the best method for the thickness and type of aluminum you want to weld.
Preparing to Weld Aluminum
Equipment Selection
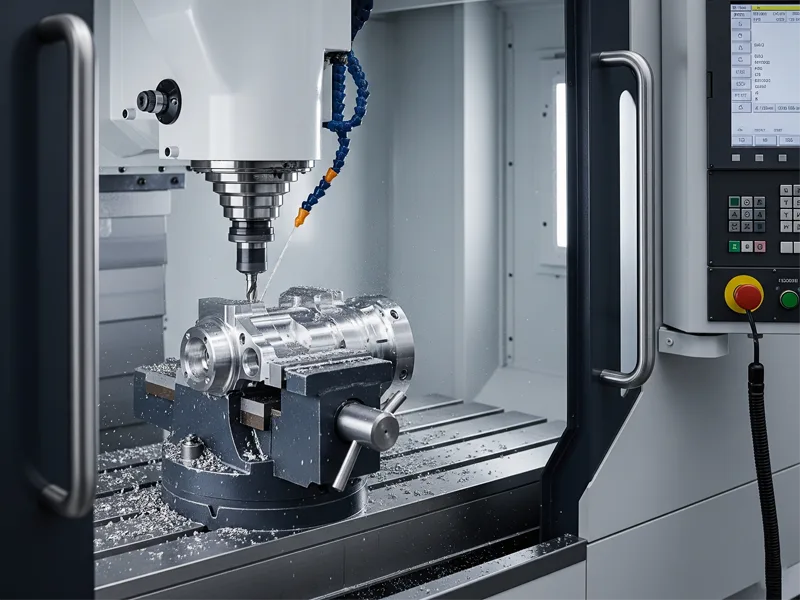
You need the right tools to weld aluminum parts. Use machines made for aluminum welding. TIG welders give you more control and cleaner welds. MIG welders are good for thick aluminum. Choose a welder that fits the thickness and alloy of your aluminum.
Tip: Always check your welder’s settings before you start. Use direct current reverse polarity for GMAW. For GTAW, use alternating current to help break up the oxide layer.
Pick the right filler metal for your aluminum alloy. This helps stop defects and cracks. Keep your filler metals and base metals dry. Let them reach room temperature before welding. This stops condensation and contamination.
Preparation Rules
Getting ready is important for strong aluminum welds. Clean the base metal before you weld aluminum parts. Use a stainless steel brush to take off the oxide layer. Wipe the weld area with isopropyl alcohol to remove oils and moisture. Clean the joints after using solvent to stop contamination.
Here are the main steps to get ready for welding aluminum:
- Use a stainless steel brush to remove the oxide layer.
- Wipe the weld area with isopropyl alcohol.
- Store aluminum in a dry place.
- Let materials reach room temperature before welding.
- Clean joints after using solvent.
Control the shielding gas too. Use pure argon or argon-helium mixes. Make sure the gas meets AWS standards, with less than 3 PPM moisture and 5 PPM oxygen. Some welders use nitrogen to save money.
Welding aluminum means you must control things like cleanliness, temperature, and gas purity. Follow these rules every time you weld aluminum parts. This guide helps you avoid problems like porosity, cracking, and incomplete fusion.
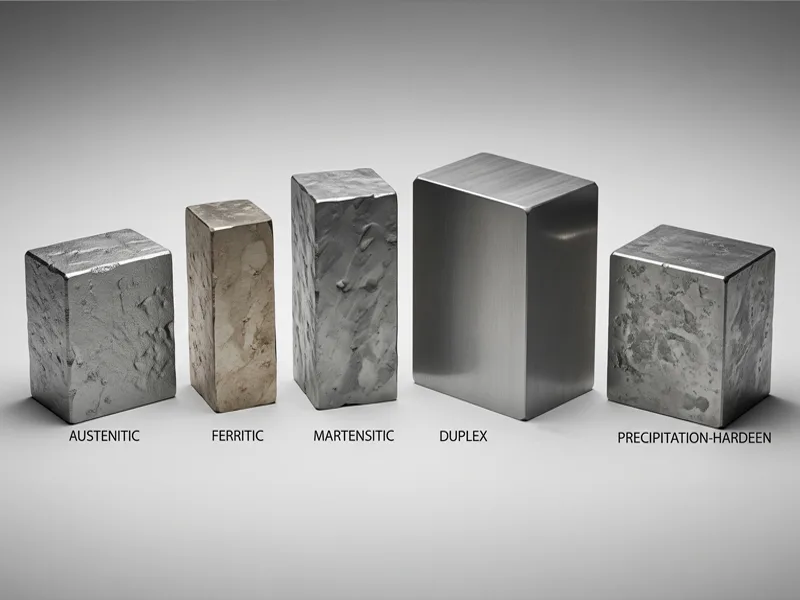
Note: Different aluminum alloys weld in different ways. For example, 1xxx and 5xxx series weld easily. 2xxx and 7xxx series need special steps. Always check the alloy series before you weld aluminum.
You can weld aluminum parts well if you follow these steps. Clean your materials, pick the right equipment, and set your machine correctly. This is how you weld aluminum parts with confidence and quality.
Types of Aluminum Welding
Physical Properties
Thermal Conductivity
Aluminum moves heat very fast. This makes welding harder than with steel.
When you weld aluminum, heat spreads quickly. It is hard to keep the weld area hot enough. You need to use more power and work faster than with steel. If you do not control the heat, the metal can burn through. Weak welds can also happen. In factories, welders change how they work because of this fast heat flow.
Oxide Layer
Aluminum gets a thin oxide layer on top. This layer melts at a much higher heat than the metal. If you do not take it off, it blocks the weld. The weld will not stick well. Always clean the surface before you weld. Use a stainless steel brush and wipe with alcohol. This helps stop holes and other problems.
- Aluminum melts at 1,221°F, which is lower than steel at 2,500°F.
- The oxide layer melts at 3,700°F, much higher than the metal, and makes welding harder.
- Aluminum spreads heat faster, so it is harder to weld than steel.
Aluminum’s low melting point and oxide layer make welding tricky. The oxide acts like a shield. You must prepare the metal well to avoid problems like holes.
Common Issues
Warping
Warping happens a lot when welding aluminum. The metal grows and shrinks fast because it moves heat quickly. Parts can bend or twist out of shape. To stop warping, clamp your pieces and use short welds. In factories, special tools hold the parts steady.
Distortion
Distortion is another problem with aluminum welding. The metal moves as it heats and cools. Thin sheets show this problem more than thick ones. Spread the heat and weld in small spots to help. Change your torch angle and speed for better results.
Porosity
Porosity means tiny holes form inside the weld. These holes make the weld weak. Moisture, oil, or the oxide layer can cause this. Always clean and store aluminum the right way. Take off the oxide layer before welding. Use the right shielding gas to protect the weld.
- Clean aluminum before welding for good results.
- Use a stainless steel brush to remove the oxide layer and stop holes.
- Store aluminum dry to keep out moisture, which makes welding harder.
Cracking
Cracking is a big problem in aluminum welding. The metal grows and shrinks fast, so cracks can form as it cools. Pick the right filler metal and preheat thick parts to help. In factories, welders watch their settings closely. They change current, voltage, and gas flow for each job.
Many problems come up when welding aluminum, especially with gas metal arc and gas tungsten arc welding. High thermal conductivity makes welding tough. Oxide layers can weaken the weld. The way you set current, voltage, and gas flow changes the weld quality. These settings are not simple. Using pulsed current and moving the torch can help fix these problems.
Welding aluminum has many challenges. But if you prepare and use the right steps, you can make strong welds.
Preparation Steps for Aluminum Welding
Cleaning Base Materials
Cleaning is the first thing you do before welding aluminum. You need to get rid of all dirt and oil. The oxide layer must also be removed. If you skip cleaning, the weld can be weak. Dirt and oil can make the weld crack or have holes. Cleaning helps stop these problems.

Oxide Removal
Aluminum makes a hard oxide layer on its surface. This layer can stop the weld from sticking. You must take it off before you start welding. Use a stainless steel wire brush that is only for aluminum. Do not use brushes that touched other metals. This can cause problems. You can also use carbide burs or hand files to break up the oxide. Some shops use special solutions to remove the oxide layer.
- Use a clean stainless steel wire brush to take off the oxide.
- Try carbide burs or hand files if the oxide is tough.
- Do not use oxy-fuel gas cutting because it can hurt the aluminum.
Degreasing
Oil and grease can make the weld weak and full of holes. You need to clean the aluminum before welding. Use acetone or other safe cleaners. Do not use cleaners with chlorine. They can leave stuff behind and hurt the weld. Wipe the metal with a clean cloth after using the cleaner.
- Clean off oil and grease with acetone or methyl ethyl ketone.
- Pick a cleaner that does not leave anything behind.
- Always clean off grease before you remove the oxide.
Safety Measures
You must be safe when welding aluminum. Hot metal and fumes can hurt you. Safety is very important when you weld aluminum.
PPE
Wear the right clothes every time you weld. Gloves keep your hands safe from burns. A welding helmet protects your eyes from bright light. Wear jackets and pants that do not catch fire. This keeps your skin safe from hot metal.
- Always wear gloves and a helmet.
- Wear flame-resistant clothes to stop burns.
Ventilation
Welding aluminum makes dangerous fumes. You need good airflow to keep the air safe. Use fume extractors in your work area. Open windows or use fans to move fumes away. Good airflow helps keep you safe from gases like ozone.
- Make sure fume extractors are working.
- Keep air moving in your welding space.
Equipment and Settings
Picking the right tools and setting them up is important. The welder and settings you use change how good your weld is.
Welder Selection
There are different welders for aluminum. TIG welders make clean welds and are good for thin metal. MIG welders are fast and easy to use. Many shops like them. Plasma welders can join both thin and thick aluminum.
| Welding Equipment | Description | Pros/Advantages | Best For |
|---|---|---|---|
| TIG Welder | Makes clean welds and is good for aluminum. | No spatter, looks nice. | Cars, planes, and art metalwork. |
| MIG Welder | Fast and clean, works well for aluminum. | Quick, easy to learn. | Shops, sheet metal, and aluminum jobs. |
| Plasma Welder | Uses plasma arcs for deep welds. | Good for thin and thick metal. | Pipes and airplane parts. |
Machine Settings
Setting your welder right is very important. The power you need depends on how thick the aluminum is. Use 1 amp for each 0.001 inch of thickness. For example, 1/8 inch thick aluminum needs about 125 amps. Thicker metal may need less power per inch. Always pick the right gas and filler metal for your job.
- Set your welder to 1 amp for each 0.001 inch of aluminum.
- Use about 125 amps for 1/8 inch thick aluminum.
- Use more amps for thicker metal, like 280 amps for 3/8 inch.
You need to focus on cleaning, safety, and setting up your welder. These steps help you get strong and good welds on aluminum.
Guide to Aluminum Welding Methods
When you start welding aluminum, you need to choose the right welding technique. TIG and MIG stand out as the most common types of aluminum welding. Each method offers unique benefits and fits different jobs. You should understand how these techniques compare before you pick one.
TIG Welding
TIG welding, also called gas tungsten arc welding, gives you the most control. You use a tungsten electrode and an inert gas shield. This technique works best when you want clean, strong welds on aluminum.

Pros and Cons
| Advantages of TIG Welding | Disadvantages of TIG Welding |
|---|---|
| Precision welds with little spatter | Needs more skill and training |
| Premium look with less polishing | Slower and more complex process |
| Strong welds on thin aluminum | Higher cost for equipment and labor |
- TIG lets you make high-quality welds that last a long time.
- You get precise control over heat and speed.
- You do not need flux, so your welds stay clean.
- TIG works well for many metals, not just aluminum.
Note: TIG welding takes more time and skill. You may need special training to master this technique.
Best Uses
You should use TIG welding for jobs that need a clean finish and high strength. This technique fits aerospace, automotive, and art projects. TIG works best for thin aluminum sheets or parts where looks matter.
MIG Welding
MIG welding, also known as gas metal arc welding, uses a wire electrode and shielding gas. This technique is popular for welding aluminum because it is fast and efficient.

Pros and Cons
- MIG welding gives you quality welds at a faster speed.
- You can use this technique for thicker aluminum parts.
- MIG is easier to learn than TIG.
- You can finish big projects quickly.
However, MIG welding may not give you the same clean look as TIG. You might see more spatter, and the welds may need extra cleaning.
| Welding Method | Weld Quality | Efficiency |
|---|---|---|
| TIG | Clean finish, high precision | Slower |
| MIG | Quality welds, faster production | Faster |
Best Uses
You should pick MIG welding for high-volume production, construction, and automotive repair. This technique works well for thicker aluminum and large projects where speed matters.
Other Techniques
You can find other welding techniques for aluminum. Each technique fits special jobs or materials.
Stick Welding
Stick welding uses a coated electrode. You can use this technique for repair work, but it is not common for aluminum because it can cause porosity.
Oxyacetylene Welding
This technique uses a flame to melt the metal. You might use it for simple repairs, but it is not the best for most aluminum jobs.
Flux-Cored Arc Welding
Flux-cored arc welding uses a special wire with flux inside. You can use this technique outdoors or in windy places, but it is less common for aluminum.
Resistance Welding
Resistance welding joins aluminum using pressure and electric current. You see this technique in factories for spot or seam welds.
Friction Stir Welding
Friction stir welding uses a spinning tool to join aluminum without melting it. This technique works well for thick plates and aerospace parts.
Laser Welding
Laser welding uses a focused beam to melt and join aluminum. You use this technique for precise, high-speed jobs in electronics or automotive work.
Tip: Always match the welding technique to your project needs. The right choice helps you get strong, clean welds every time.
Filler Metals and Shielding Gases for Aluminum Welding
Filler Metal Choices
Alloy Compatibility
You need to pick the right filler metal for aluminum. Not every filler works with every alloy. If you choose the wrong one, your weld can crack or look bad. Always check a chart before you pick a filler. This helps your welds stay strong and last longer.
Common Types
There are a few common filler metals for aluminum welding. Each one matches certain alloys and jobs. The table below shows which filler metal fits your project:
| Filler Metal | Alloy Compatibility | Notes |
|---|---|---|
| 4043 (4XXX) | 6XXX, 3XX castings | Good for crack resistance with 6XXX alloys. Not for AlMg 5XXX alloys due to brittleness. |
| 5356 (5XXX) | 5XXX, 6XXX | Best for welding 5XXX and 6XXX alloys where strength matters. |
| 5556 (5XXX) | Low Mg content alloys | Used for alloys like 5052, 5154, and 5454. |
| 5183 (5XXX) | High-strength 5XXX | Chosen for high-strength applications. |
Tip: Pick the right filler metal for your alloy. This makes your welds stronger and stops cracks.
Shielding Gas Options
Argon
Pure argon is the most used shielding gas for aluminum welding. It gives you a steady arc and clean welds. Argon keeps air away from the weld pool. This stops tiny holes and keeps your welds neat. Use pure argon for TIG welding thin aluminum.
Argon-Helium Mixes
For thick aluminum, argon-helium mixes work better. Helium adds more heat and helps weld deep. This mix makes the arc hotter and lets you weld faster. Helium costs more, but it saves time on big jobs.
Note: Shielding gases protect the weld pool from dirt and air. Without them, your welds can get holes and might break.
Consumables Quality
Always use good quality welding supplies. High-quality filler metals and gases help you get strong welds. The best materials give you:
- Strong welds that hold together well
- Clean welds with fewer mistakes
- Good results every time you weld aluminum
If you choose the right filler and good supplies, your welds will look nice and last longer. This works for any aluminum part or job.
Tips to Weld Aluminum Successfully
Preheating
Preheating is important when welding thick or cast aluminum parts. You do not always need to preheat before welding. Most aluminum alloys can be welded without extra heat. If you do preheat, keep it under 200 degrees Fahrenheit. Going hotter can hurt the metal, especially T6 temper alloys. Staying in this safe range keeps the aluminum strong.
Preheating helps stop cracks and makes the weld flow better. Use a temperature stick or an infrared thermometer to check the metal. This easy step gives you more control and better welds. If you follow these tips, your welds will be stronger and have fewer problems.
Travel Speed
Travel speed changes how much heat goes into the weld. You must control your movement for good welds. Here are some tips:
- Travel speed changes the heat in the weld.
- Moving faster puts in less heat and stops burnthrough.
- Moving slowly adds more heat, making the weld bead wide and shallow.
- Keeping a steady speed gives you the best welds.
Watch your speed when welding aluminum. If you go too slow, the metal can get too hot. If you go too fast, the weld may not go deep enough. Practice on scrap metal to find the right speed. These tips help you avoid warping and weak welds.
Torch Angle
Torch angle is important when welding aluminum. Try to keep the torch straight up and down. Aim for a 90-degree angle to the metal. Sometimes a small tilt is okay, but do not tilt too much. This helps you control the weld pool and keeps dirt out.
- Keep the torch almost straight, about 90 degrees.
- Only tilt a little if you need to.
- The right torch angle helps the weld go deeper and look better.
You get cleaner welds and fewer problems by using these tips. Good torch control is very important for welding aluminum. When you use the right preheating, travel speed, and torch angle, your welds will turn out better every time.
Distortion Control
Distortion can ruin your aluminum welds if you do not manage it. Aluminum moves and changes shape quickly when heated. You need to use smart techniques to keep your parts straight and true. Here are the most effective ways to control distortion during aluminum welding:
- Avoid Over Welding: Use only the weld size you need. Extra weld metal adds heat and increases the risk of distortion.
- Choose the Right Groove Joint: Pick a joint design that fits your part. The right groove helps you use less filler and keeps the weld area smaller.
- Switch to Intermittent Fillet Welds: Use short, spaced welds instead of one long bead. This reduces heat buildup and limits movement.
- Balance Welds to the Neutral Axis: Place welds evenly on both sides of the joint. Balanced welds help the part stay flat.
- Minimize Weld Beads: Keep your welds as small as possible. Less weld metal means less heat and less distortion.
- Choose the Right Welding Process: Pick a process that gives you good control. TIG welding often works best for thin aluminum because it uses less heat.
- Follow a Welding Sequence or Backstep: Weld in a planned order. Try the backstep method—start each weld bead away from the last one and move back toward it. This helps spread heat evenly.
- Weld the Right Way: Use steady hands and keep your speed even. Consistent technique keeps the weld pool under control.
- Preset the Components: Set up your parts with a slight offset before welding. The metal will move into place as it cools.
- Consider Using Restraints: Use clamps or jigs to hold your parts steady. Restraints stop the metal from shifting while you weld.
Tip: Always let your parts cool slowly after welding. Quick cooling can make distortion worse.
You can combine several of these methods for the best results. Practice on scrap pieces to see which techniques work best for your project.
Post-Weld Inspection
After you finish welding, you need to check your work. Inspection helps you find problems early and fix them before they cause trouble.
Visual Inspection
Start by looking at the weld with your eyes. Good welds look smooth and even. You should not see cracks, holes, or big lumps. The weld bead should blend into the base metal. If you see gray or black spots, you may have contamination. Use a flashlight to check hard-to-see areas.
- Look for smooth, even welds.
- Check for cracks, holes, or spatter.
- Make sure the weld bead is not too high or too flat.
Note: If you find a problem, fix it right away. Small defects can grow into big failures.
Cleaning Welds
Cleaning your welds is the last step. Use a stainless steel brush to remove any residue. Wipe the area with a clean cloth and isopropyl alcohol. This removes dust, oil, and any leftover oxide. Clean welds last longer and look better.
- Brush away slag or residue.
- Wipe with alcohol for a clean finish.
- Store your finished parts in a dry place.
A clean, inspected weld gives you confidence in your work. You know your aluminum parts are strong and ready for use.
Troubleshooting Aluminum Welding
Porosity Solutions
Porosity is a big problem when welding aluminum. Small holes can show up inside the weld. These holes make the weld weak and rough. You can stop porosity by doing a few easy things: Use argon or argon-helium gas mixes. These gases add heat and help hydrogen leave before the weld cools. Make sure the shielding gas covers the weld pool well. If air gets in, hydrogen can make holes. Clean the base metal very well. Take off all water, oil, and dirt before you start. Keep your tools clean and in good shape. Dirty or broken tools can bring in dirt.
Tip: Always check your gas flow and keep your work area dry. Clean tools and metal help you avoid many problems with aluminum welding.
Preventing Cracks
Cracks can ruin your weld and make it unsafe. You can stop cracks by picking the right materials and using good welding steps.
Here are some ways to help: Do not use base metals that crack easily. Some aluminum types are not good for welding. Pick a filler alloy that matches your base metal. Use a chart if you need help. Choose a filler with a melting point close to or lower than the base metal. Get the edges and root gap ready so you can add enough filler. Use filler alloys with grain refiners like titanium or zirconium. Weld fast to keep the metal from staying hot too long. Plan your welds to lower stress. Use welding and assembly steps that let the metal move as it cools. Press gently on the joint while welding to help stop cracks.
For TIG welding, fill the crater by slowly lowering the current and adding filler. For MIG welding, use the backstep method at the end instead of just letting go of the trigger.
Note: Filling the crater at the end of each weld helps stop cracks from forming as the weld cools.
Fusion Issues
Fusion problems happen when the weld does not join the parts all the way. This is another common problem with aluminum welding. You can see fusion issues if the weld looks weak or not finished. The main causes are the oxide layer, not enough heat, or bad technique. You can fix fusion problems by: Cleaning the aluminum to take off the oxide layer before welding. Turning up the amps to give enough heat for a good weld. Using the right shielding gas mix for your job. Preheating the metal if you need to help the weld flow and stick.
Remember: Good cleaning and enough heat are key to strong welds when welding aluminum.
Fixing Warping
Warping can ruin your aluminum welds. You see parts bend or twist after welding. This happens because aluminum moves heat quickly. The metal expands and shrinks fast. You need to control warping to keep your parts straight and strong.
You can fix warping by using smart techniques before, during, and after welding. Here are steps you should follow:
- Clamp Your Parts Securely
Use strong clamps or jigs to hold your aluminum pieces in place. This stops movement while you weld. You keep the parts flat and aligned. - Weld in Short Bursts
Make short welds instead of long beads. Let the metal cool between welds. This limits heat buildup and reduces warping. - Alternate Weld Locations
Move around the part as you weld. Do not weld one area all at once. Switch sides or ends to spread heat evenly. - Preset Your Components
Offset your parts slightly before welding. The metal will move into place as it cools. You can use a small gap or angle to help. - Use Backstep Welding
Start each weld away from the last one. Move back toward the previous weld. This method balances heat and controls movement. - Choose the Right Welding Sequence
Plan your welds before you start. Weld critical joints first. Finish with less important areas. This keeps the structure stable.
Tip: Always let your aluminum cool slowly after welding. Quick cooling can make warping worse.
You can also use a table to check common warping fixes:
| Problem | Solution | Benefit |
|---|---|---|
| Parts bend | Use clamps and jigs | Keeps parts straight |
| Welds twist | Alternate weld spots | Spreads heat evenly |
| Edges curl | Weld in short bursts | Limits heat buildup |
If you see warping after welding, you can fix it with gentle pressure. Use a mallet or press to straighten the part. Do not hit the metal too hard. You may crack the weld. For large bends, you can use heat and slow cooling to reshape the part.
You should always check your work after welding. Look for bends or twists. Fix problems right away. Practice these steps on scrap aluminum. You will get better results and stronger welds.
🛠️ Professional Advice: Use restraint tools and plan your welds. You will control warping and make high-quality aluminum parts.
Special Considerations for Aluminum Parts and Alloys
Thin vs. Thick Sections
Thin Part Techniques
When you work with thin aluminum, you face special challenges. The metal moves heat away very quickly. This makes it easy to burn through if you do not control the heat. You need to use the right approach for welding aluminum in thin sections.
- Use a MIG welding machine with pulse capability and a spool gun. This setup gives you steady wire feeding and better control.
- Keep your travel speed high. Moving quickly helps you avoid putting too much heat into the metal.
- Hold a short arc length. This keeps the weld focused and reduces the risk of burn-through.
- Always clean the surface before welding. Remove the oxide layer with a stainless steel brush and wipe away any oil or dirt.
- Choose pure argon as your shielding gas. This gas protects the weld pool and keeps the weld clean.
Tip: Thin aluminum needs careful heat management. Practice on scrap pieces before you start your main project.
Thick Part Techniques
Welding aluminum in thick sections requires a different strategy. Thick pieces need more heat to get full penetration. You must adjust your equipment and technique for the best results.
- Use a higher amperage setting on your welder. Thick aluminum absorbs more heat, so you need extra power.
- Try an argon-helium gas mix. Helium adds heat and helps the weld go deeper.
- Preheat the aluminum if needed. Warming the metal to around 200°F can help prevent cracking.
- Clean the surface well. Remove the oxide layer and any grease before you start welding.
- Make multiple passes if the section is very thick. This builds up the weld and ensures strength.
A table can help you compare the main points:
| Section Type | Key Technique | Shielding Gas | Special Note |
|---|---|---|---|
| Thin | Fast travel, short arc | Pure argon | Avoid burn-through |
| Thick | High amps, preheat | Argon-helium mix | Use multiple weld passes |
Cast vs. Wrought Aluminum
Cast Welding Tips
Cast aluminum often contains more impurities than wrought aluminum. These impurities can cause porosity and cracking during welding. You need to take extra care when welding aluminum castings.
- Preheat the casting to reduce the risk of cracking.
- Use a filler metal that matches the casting alloy.
- Clean the surface thoroughly to remove any oil or dirt.
- Weld slowly and allow the casting to cool gradually.
Note: Cast aluminum may need special cleaning steps. Always check for oil trapped in the pores.
Wrought Welding Tips
Wrought aluminum has a more uniform structure. It usually welds more easily than cast aluminum. You still need to prepare the surface and use the right filler metal.
- Clean the surface to remove the oxide layer.
- Use a filler metal that matches the base alloy.
- Adjust your welder settings for the thickness of the part.
- Weld at a steady pace to avoid overheating.
Dissimilar Alloys
Welding aluminum alloys that are different from each other can be tricky. Some alloys do not mix well and can form weak joints. Always check the compatibility of the alloys before you start welding. Use a filler metal that works with both types. If you are unsure, consult a compatibility chart or ask a welding expert.
Remember: The right preparation and technique make welding aluminum parts of any type possible. Always match your method to the material for the best results.
Repairing Aluminum Parts
Many industries need to fix aluminum parts often. You might find cracks, holes, or worn spots on these parts. Welding aluminum can fix these problems. First, check the part for damage. Clean off paint, oil, and the oxide layer. Use a stainless steel brush for this job. Cleaning stops dirt from getting into the weld.
Pick the best welding method for your repair. TIG welding is good for small cracks and thin spots. MIG welding works better for big repairs or thick aluminum. Always use filler metal that matches the base alloy. This helps stop weak joints and future cracks.
Here are the steps for fixing aluminum parts: 1. Look at the damaged area. Check for cracks, holes, or rust. 2. Clean the part. Take off all dirt, grease, and oxide. 3. Pick the right welding process. Use TIG for careful work or MIG for faster jobs. 4. Match the filler metal to the aluminum alloy. 5. Preheat thick parts if needed. Keep it under 200°F. 6. Weld slowly and watch the heat. Do not let the aluminum get too hot. 7. Let the part cool down slowly. Cooling too fast can make new cracks.
Tip: After welding aluminum, look at your repair. Make sure the weld is smooth and has no holes or cracks.
You can use this table to see which repair method works best:
| Repair Type | Best Welding Method | Filler Metal Choice | Notes |
|---|---|---|---|
| Small cracks | TIG | Match alloy | Use low heat |
| Large holes | MIG | Match alloy | Fill in layers |
| Worn edges | TIG or MIG | Match alloy | Build up slowly |
Good welding can make aluminum parts strong again. Try welding on scrap pieces before fixing important parts. This helps you get better and feel more sure when welding aluminum.
Automotive, Marine, Aerospace Applications
Aluminum parts are used in cars, boats, and planes. Each area uses welding aluminum for repairs and building new things. You must follow strict rules when welding in these jobs.
In cars, you weld body panels, frames, and wheels. The welds must look good and be safe. MIG welding is used for quick repairs. TIG welding is used for careful, custom work.
Boats use aluminum for hulls, decks, and rails. You need to protect welds from saltwater. Use good filler metals and shielding gases. Clean the aluminum well before welding to stop holes from forming.
Planes need the best welds. You weld fuselage panels, wings, and support parts. TIG welding is best because it is very precise. After welding aluminum, you must check the welds carefully. Use your eyes and sometimes X-rays to find hidden problems.
Note: Always follow the rules for welding aluminum in cars, boats, or planes. Safety and quality are most important.
Here is a table showing the main uses:
| Industry | Common Aluminum Parts | Preferred Welding Method | Special Considerations |
|---|---|---|---|
| Automotive | Panels, frames, wheels | MIG, TIG | Looks, strength |
| Marine | Hulls, decks, rails | MIG, TIG | Stops rust from saltwater |
| Aerospace | Fuselage, wings | TIG | Needs careful inspection |
Using the right welding aluminum methods makes cars, boats, and planes safer. Always practice and follow the best ways to weld aluminum.
You can get strong welds if you follow good steps. Always clean your aluminum parts before you start. Pick the best welding method for your project. Use good tools and supplies to make better welds. If you have problems, check your work and fix mistakes. Think about learning from experts or using trusted guides to get better at welding aluminum. You can start welding aluminum now and do a great job. 🚀
FAQ
You can weld aluminum with a MIG welder if you use a spool gun and pure argon gas. Regular MIG welders may not work well with soft aluminum wire. Always check if your welder can handle aluminum before you start.
Use a stainless steel brush that is only for aluminum. Wipe the metal with isopropyl alcohol. Take off all oil, grease, and the oxide layer. Keeping the metal clean helps stop holes and weak welds.
Aluminum cracks because it grows and shrinks fast when heated. Using the wrong filler metal or welding method makes cracks more likely. Preheat thick parts and pick the right filler to help stop cracks.
You should preheat thick or cast aluminum parts but keep it under 200°F. Preheating helps stop cracks and makes the weld flow better. Thin pieces usually do not need preheating.
Pure argon is best for most aluminum welding jobs. For thick aluminum, you can use an argon-helium mix. Shielding gas keeps the weld safe from dirt and air.
Clamp your parts tightly. Use short welds and switch where you weld. Let the metal cool between welds. These steps help you control heat and keep your parts straight.
You can weld 1xxx, 3xxx, and 5xxx series alloys easily. These alloys do not crack much and work well with common filler metals. Always check the alloy before you start welding.
Look for smooth, even welds with no cracks or holes. Use a flashlight to see hard spots. Clean the weld with a stainless steel brush and alcohol for a better finish.