When you are flaring copper tube by getting it ready first. Use a flaring tool that fits the job. Shape the end so it does not leak. Always pick the right tools for the work. Wear gloves and safety glasses to stay safe. If you do not flare copper tubing the right way, it can break. A broken connection may let gas leak out. This can happen if the tube moves when you use an appliance. Be gentle with copper tubing to keep it safe. You can make a tight fit if you are careful. Even people who are new can learn this with time. Pay close attention to each step.
Key Takeaways
- Always wear gloves and safety glasses. This keeps you safe from sharp edges and flying bits.
- Use a flaring kit with a flare form, yoke, and reamer. This helps make a strong and leak-free connection.
- Get the copper pipe ready by measuring it. Cut it with a tubing cutter. Remove rough edges to stop leaks.
- Make sure the copper tube is even with the die block before you tighten it. This helps make a smooth flare.
- Look at the flare to see if it is smooth and even. Check for cracks or splits before you finish installing.
- Test for leaks with a soap solution. This helps you find any leaks in the flare connection.
- Do not over-tighten or skip deburring. These mistakes can cause leaks and weak connections.
- Pick the right fittings for your system. Make sure they fit the pressure and temperature you need.
Table of Contents
Tools for Flare Copper Tubing
You need the right tools before you flare copper tubing. The correct equipment helps you make a strong connection that does not leak. These tools are simple to use and easy to find. You can get them at hardware stores, plumbing shops, or online.
Flaring Kit
A flaring kit is the main tool for this job. It usually has a flare form, a yoke, and a reamer. Some kits also have a tubing cutter. A good flaring tool gives you an even flare each time. This stops cracks and leaks in the copper. A flaring kit with soft handles makes your hands less tired. Better grip means you can make flares that look the same. Good control also keeps the tool from slipping and keeps you safe.
Here is a table that shows how different features of flaring tools help make a good flare:
| Feature | Impact on Quality |
|---|---|
| High Temperature Method | Stops hardening, so there are no cracks or leaks. |
| Heat by Friction | Keeps the copper soft for tight fittings. |
| 10X Faster | Makes flaring quicker and saves time. |
| Avoid Cracks and Leaks | Gives a perfect fit without breaking the copper. |
| Precision | Makes the flare the right size for easy brazing. |
| Ergonomics | Makes it easier to use and more comfortable. |
| Simplicity | Needs less setup than old-style tools. |
Reamer and Cutter
You need a reamer and a tubing cutter to get the copper ready. The cutter makes a clean, straight cut. This is important because rough cuts can cause leaks. The reamer takes out sharp bits inside the tube. These sharp bits can hurt the flare and make it weak. Always use a tubing cutter, not a hacksaw. This keeps the copper round and smooth, which is important for flaring.
Safety Gear
Safety is always important. You need gloves and safety glasses when you flare copper tubing. Gloves keep your hands safe from sharp edges and heat. Safety glasses protect your eyes from flying metal pieces. The right safety gear helps you stay safe and work better.
Tip: Check your tools before you start. Make sure they are clean and not broken. Good tools help you do the job well and make it easier.
When you use the right tools for copper pipe flaring, you get a strong and neat finish. Take your time to pick the best equipment. This step helps you make a copper connection that will not leak.
Preparing Copper Pipe for Flaring
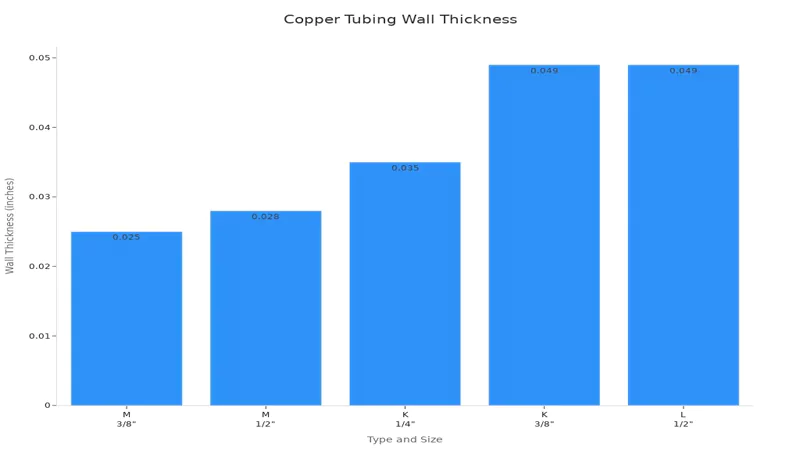
Before you start flaring, you need to prepare the copper pipe correctly. Good preparation helps you make a strong, leak-free connection. Always use soft or annealed copper tubing for flaring. Types K and L work best for most jobs. Type M is also common, but Type L is the most popular in the United States for plumbing.
Here is a quick guide to copper tubing types and wall thickness:
| Type | Size | Wall Thickness |
|---|---|---|
| M | 3/8″ | 0.025″ |
| M | 1/2″ | 0.028″ |
| K | 1/4″ | 0.035″ |
| K | 3/8″ | 0.049″ |
| L | 1/2″ | 0.049″ |
Measure and Cut
Start by measuring the length you need for your copper pipe. Use a marker to make a clear line. Always use a tubing cutter for this step. A tubing cutter gives you a straight, smooth cut. This keeps the pipe round and ready for flaring.
Using a hacksaw does not cut the copper evenly or cleanly. A hacksaw will leave ragged and uneven edges on the cut end, leading to a failed connection or future leaks.
If you work with hard copper tubing, you must anneal it before flaring. Heating the pipe with a torch and letting it cool will soften the metal. This step helps you make a proper flare without cracks.
Deburr Edges
After cutting, you will see sharp edges inside the copper pipe. These burrs can weaken the flare and cause leaks. Use a reamer or deburring tool to clean the inside and outside edges. Turn the tool gently until the pipe feels smooth. Make sure the end stays round.
- Properly clean and prep the copper tube.
- Ensure the end is deburred and round to prevent leaks.
Inspect Tubing
Check the copper pipe for dents, scratches, or bends. Damaged tubing will not flare well and may leak. Look at the cut end to make sure it is round and smooth. If you see any problems, cut a new section.
Follow these steps to prepare your copper pipe for flaring:
- Measure and cut the pipe with a tubing cutter.
- Deburr the inside and outside edges.
- Inspect the pipe for damage.
- Anneal hard copper tubing if needed.
Tip: Always follow local codes and trusted resources for copper pipe installation.
Taking time to prepare your copper pipe will help you get a tight, leak-free flare. Good preparation is the key to a strong connection.
Setting Up for Flare Copper Tube
Setting up your copper tube for flaring requires careful attention to detail. You want to make sure every step is correct before you begin the actual flaring process. This helps you achieve a uniform flare and a leak-free connection.
Insert into Flare Form
Start by preparing your copper tube for the flare form. Follow these steps to ensure a precise fit:
- Cut your copper tube using a tube cutter. This gives you a clean, straight edge.
- Use a deburring tool or abrasive cloth to remove any burrs or debris from the cut end.
- Slide the flare nut onto the copper pipe. Make sure the tapered end faces away from the end you plan to flare.
- Insert the copper pipe into the correct hole in the die block. The end of the pipe should sit flush against the block.
Tip: Always double-check that the copper pipe is flush with the die block. A flush fit helps you create a uniform flare and prevents leaks.
Secure in Clamp
Once you have inserted the copper tube into the flare form, you need to secure it in place. Tighten the wingnut closest to the copper pipe first. This holds the pipe steady and prevents movement. Next, tighten the far wingnut. This step locks the die block and keeps the copper tube from slipping during flaring.
- Use firm pressure when tightening the wingnuts.
- Avoid over-tightening, which can damage the copper tube.
- Check that the copper tube does not move or twist in the clamp.
A secure clamp ensures that the flare will form evenly. If the copper tube shifts, you may end up with a weak or uneven flare.
Align for Flaring
Proper alignment is essential for a successful flare. Place the yoke onto the die block and position it so the cone sits directly above the copper pipe. Turn the handle to move the cone toward the pipe until it is fully seated. This step shapes the copper into a flare that matches the fitting body.
Note: If the cone is not centered, the flare may be uneven. Always check the alignment before you start turning the handle.
After you finish, back the cone out and remove the yoke. Take the copper pipe out of the die block and inspect the flare. The flare should look smooth and even, with no cracks or splits.
Setting up your copper tube correctly makes the flaring process easier and more reliable. Careful preparation and alignment help you achieve a professional result every time.
Step-by-Step Instructions for Flaring Copper Pipe
Flaring copper tube takes careful work. You need to follow each step to make sure the connection does not leak. These step-by-step instructions for flaring copper pipe show you what to do from start to finish. Always wear gloves and safety glasses to keep yourself safe.
Create the Flare
You must use the right tool for copper pipe flaring. Most people use a standard flaring kit for this job. The kit has a flare form, yoke, and reamer. Here are the steps for flaring copper tubing:
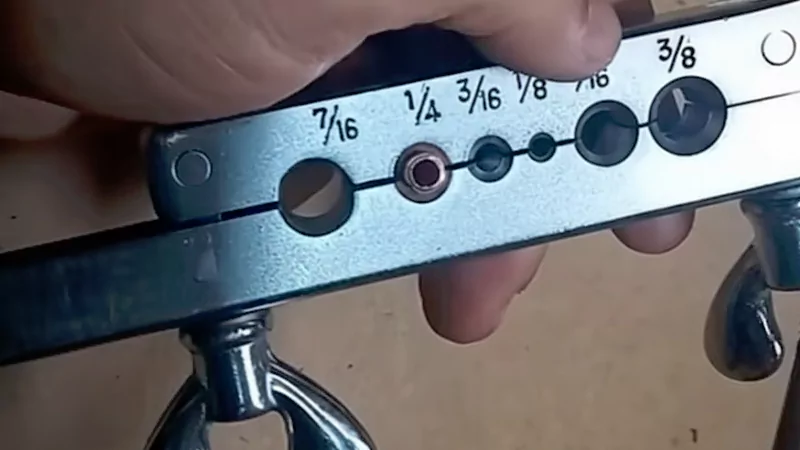
- Cut the Tubing
Use a tube cutter to cut the copper pipe. Make sure it is the right length. The cutter makes a smooth, straight edge. This step helps stop leaks in flaring copper water tubing. - Deburr the Tubing
Use a reamer on the end of the copper tube. Take out any burrs inside and outside the pipe. This keeps the tube the same size and helps make a clean flare. - Insert the Tubing into the Flare Form
Pick the right hole in the flare form for your copper tube. Leave about 1/16th inch of copper above the block. This small part is needed to make the flare. - Tighten the Nuts
Tighten the closest nut by hand first. Then tighten the other nut. This holds the copper tube in the flare form and stops it from moving. - Fit the Yoke on the Block
Put the yoke over the flare form. Make sure the slots fit the flaring block. The yoke keeps the reamer in place.
Position Flare Cone
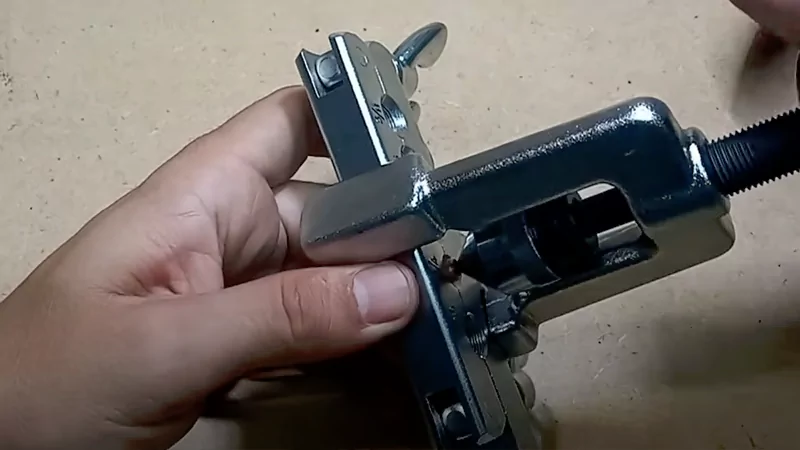
You need to center the flare cone over the copper tube. The cone should be right above the end that sticks out. This is important for making a flare that is even. If the cone is not centered, the flare will not be even and could leak.
Turn Flare Screw
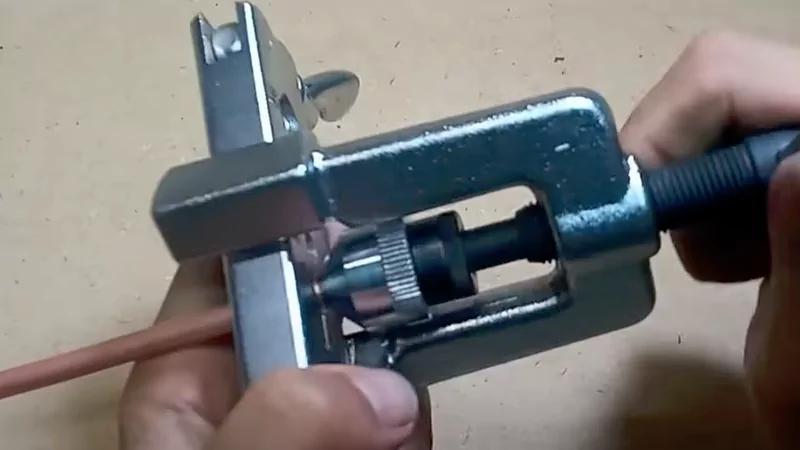
Turn the flare screw slowly. Use steady pressure on the copper tube. The cone pushes into the copper and shapes it into a 45-degree flare. Do not turn the screw too hard. Too much force can break the copper and ruin the flare. You want the flare to look smooth and cone-shaped for good copper pipe flaring.
Tip: Be careful. If you flare too much or tighten too hard, it can leak and not work well. Stop when the flare looks even and fits the fitting.
If you need a 45-degree flare, this way works for copper and brass. Many cars, fridges, and plumbing jobs use 45-degree flares. For harder metals or high-pressure jobs, use a 37-degree flare. The table below shows the differences:
| Flare Angle | Pressure Rating | Material Compatibility | Applications |
|---|---|---|---|
| 37 Degree | High-pressure | Hard metals | Hydraulic, Aerospace, Industrial |
| 45 Degree | Low-to-medium | Copper, Brass | Automotive, Refrigeration, Plumbing |
Some jobs need hammer flaring or swaging for 45-degree flares. Hammer flaring uses a special tool and a mallet to shape the copper. Swaging makes the tube end bigger so you can join it without a flare. Always check what your job needs before you pick a method.
Inspect the Flare
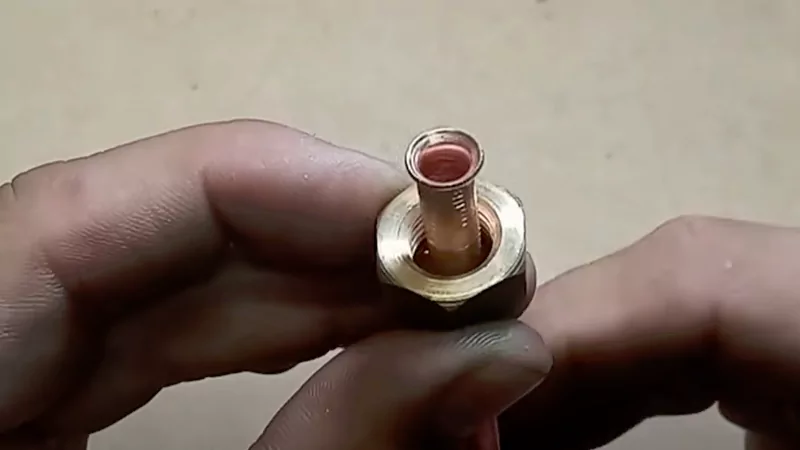
After you finish, check the flare carefully. Take the copper tube out of the flare form. Look for a flare that is smooth and even with no cracks. The flare should fit the fitting body and sit flat against it.
- Look for rough edges or uneven spots.
- Make sure the flare is not too thin or thick.
- Test the flare by putting it on the fitting and checking for air leaks.
Note: If you skip steps like reaming and deburring, the flare may not work right. Weak connections can break and leak under pressure.
You need to follow these flaring installation instructions every time you do copper pipe flaring. Good skills and the right tool help you make a strong, leak-free connection. These step-by-step instructions for flaring copper pipe help you do a better job and avoid mistakes.
Checking Flare Copper Tube Connections
After you finish flaring, you need to check your work. Careful inspection helps you avoid leaks and future problems. You want every copper connection to stay strong and safe. Use these steps to make sure your flaring job meets professional standards.
Visual Inspection
Start with a close look at your flare. Hold the copper tube up to the light. Check the flare for smoothness and even shape. You should see a cone that sits flat and wide. The flare must not have cracks, splits, or thin spots. If you see any sharp edges or uneven areas, you need to redo the flaring process.
Follow this checklist for a good visual inspection:
- The flare looks even and round.
- The flare sits flat against the fitting.
- No cracks, splits, or rough edges appear.
- The copper tube stays round and undamaged.
- The flare matches the fitting size.
Tip: Use a magnifying glass if you want to see small cracks or flaws. A good tool helps you spot problems before they cause leaks.
You should also check the flare nut. Slide it over the flare and make sure it fits snugly. The nut should not wobble or feel loose. If the nut does not fit, you may need to repeat the flaring step.
Leak Test
After you finish the visual check, you need to test for leaks. A leak test gives you confidence in your copper pipe flaring work. You can use several methods to check for leaks.
Soap Solution Method
Mix a few drops of dish soap with water. Brush or spray the solution onto the flare connection. Turn on the water or gas supply. Watch for bubbles. If you see bubbles, you have a leak. Tighten the flare nut or redo the flaring if needed.
Pressure Test
Some jobs require a pressure test. Use a pressure gauge and follow the manufacturer’s instructions. This test helps you find leaks that you cannot see with soap.
| Leak Test Method | What You Need | What to Look For |
|---|---|---|
| Soap Solution | Soap, water, brush | Bubbles at the joint |
| Pressure Test | Gauge, instructions | Drop in pressure |
Note: Always wear gloves and safety glasses when you test for leaks. Safety comes first when working with copper and flaring tools.
If you find a leak, loosen the flare nut and inspect the flare. You may need to cut the copper tube and repeat the flaring process. Never ignore a leak. Even a small leak can cause damage or safety risks.
You should always check your flaring work before you finish the job. Careful inspection and testing help you create a safe, leak-free copper connection.
Copper Pipe Flaring Mistakes to Avoid
When you work with copper and flaring, you want to avoid the most common flaring mistakes. These errors can lead to leaks, wasted materials, and even system failure. Knowing what to watch for helps you get a strong, leak-free connection every time.
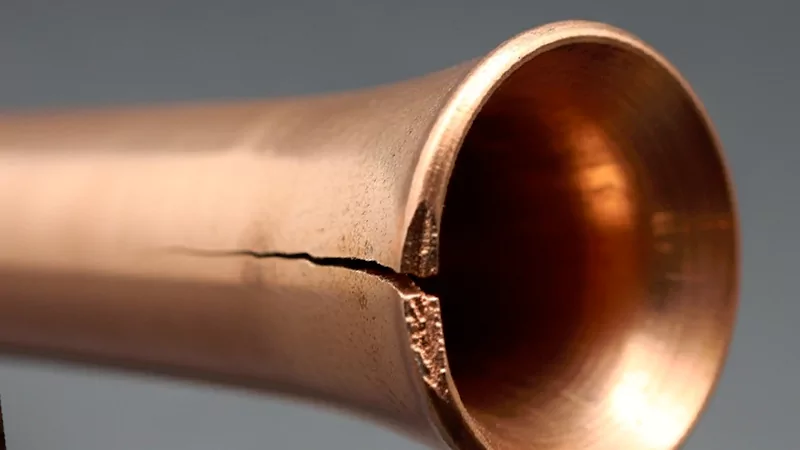
Here is a table that shows some of the most frequent mistakes in copper pipe flaring, their causes, and what can happen if you make them:
| Mistake | Causes | Consequences |
|---|---|---|
| Cracking or splitting at the end | Wrong tubing type, over-tightening, lack of lubrication, improper prep | Brittle material leading to failure |
| Uneven or off-center flares | Improper alignment, poor tool quality, uneven cuts | Poor sealing, resulting in leaks |
| Over-sized or under-sized flares | Incorrect flare size, wrong type of flare, tool issues | Connection failures and potential leaks |
| Leaking fittings after flaring | Improper seating, surface imperfections, incorrect fitting tightness | Frustration and wasted time/materials due to rework |
Over-tightening
Over-tightening is one of the most common flaring mistakes you can make. Many people think that tighter means better, but this is not true for copper flaring. When you over-tighten the flare nut, you can damage both the copper and the fitting.
- You may distort the ferrule and tubing, which leads to leaks instead of preventing them.
- Too much pressure can cause the ferrule to cut into the copper, leaving marks or even cracks.
- Stress from over-tightening can build up and cause the connection to fail, especially in high-pressure systems.
To avoid this mistake, always tighten the flare nut just enough to make a seal. Stop when you feel resistance. If you keep turning, you risk damaging the copper and the flare.
Tip: Use a wrench with care. If you feel the nut getting hard to turn, stop and check your connection.
Poor Deburring
Poor deburring is another mistake that can ruin your flaring job. After you cut the copper tube, you must remove all burrs from the inside and outside edges. Burrs can make the flare uneven and weak. They also stop the flare from sealing tightly against the fitting.
If you skip deburring, you may see leaks or cracks in your copper flaring. Always use a proper tool for this step. Turn the reamer gently until the edge feels smooth. Never rush this part of the process.
Damaged Tubing
Damaged tubing will not flare correctly. If your copper tube has dents, scratches, or bends, the flare will not form a tight seal. Even small marks can cause leaks after you finish flaring.
Check your copper before you start. Look for any signs of damage. If you find a problem, cut a new piece of tubing. Using damaged copper will only lead to more work and wasted materials.
Note: Careful inspection and preparation help you avoid these common flaring mistakes. Take your time and use the right tool for each step.
Wrong Flare Size
Choosing the wrong flare size creates major problems when you work with copper. You need to match the flare to the fitting and the tubing. If you use the wrong size, you risk leaks, weak connections, and wasted materials. You want every flare to fit perfectly for a secure seal.
When you perform flaring, measure the copper tube and the fitting carefully. The flare must cover the end of the tube without being too large or too small. If the flare is too big, it will not seat properly in the fitting. If the flare is too small, it will not create a tight seal. Both mistakes can cause leaks and system failures.
You should always check the manufacturer’s specifications for the correct flare size. Most copper pipe flaring jobs use a 45-degree flare. This angle works for plumbing, refrigeration, and automotive systems. If you use a different angle or size, the fitting may not seal. You need to use the right flaring tool for your copper tubing. Some tools have guides or markings to help you make the correct size.
Here is a simple table to help you match flare sizes to copper tube diameters:
| Copper Tube Size | Flare Diameter | Common Use |
|---|---|---|
| 1/4 inch | 3/8 inch | Refrigeration |
| 3/8 inch | 1/2 inch | Plumbing |
| 1/2 inch | 5/8 inch | Water supply lines |
Tip: Always double-check the flare diameter before you tighten the fitting. A quick measurement can save you from leaks and costly repairs.
When you make a flare, inspect it for uniformity. The flare should look smooth and even all around. If you see thin spots or uneven edges, the flare size may be wrong. You should redo the flaring process if the flare does not match the fitting.
Follow these steps to avoid wrong flare size mistakes:
- Measure the copper tube and fitting before flaring.
- Use the correct flaring tool for your tube size.
- Check the flare diameter after forming.
- Test the flare with the fitting before final installation.
If you use the wrong flare size, you may see leaks after installation. You might also notice that the fitting does not tighten properly. These signs mean you need to redo the flaring. Always aim for a perfect fit to keep your copper connections strong and leak-free.
Note: Proper flare size is critical for copper pipe flaring. Take your time and use the right tools. This step ensures your flaring work lasts and keeps your system safe.
Flare Copper Pipe Tips
Choose Right Fittings
Picking the right fittings is very important for a strong copper connection. You need to match the fitting to your system’s needs. Think about pressure, temperature, and if the pipe will move. Flare fittings are best for places with high pressure or heat. They also work well if the pipe shakes or moves a lot. Always check if the fitting material works with copper. Use copper, brass, or steel flare fittings with copper pipes. If you use a different fluid, make sure the fitting will not rust or react.
Here is a quick chart to help you pick:
| Criteria | Compression Fittings | Flare Fittings |
|---|---|---|
| Pressure and Temperature | Low to medium pressure | High-pressure, high-temperature |
| Environmental Conditions | Minimal vibration or movement | Handles vibration and movement |
| Material Compatibility | Brass, copper, plastic | Steel, brass, copper |
- Make sure the fitting works with the fluid you use.
- Use flare fittings for copper pipes in tough jobs.
- Always check the size and thread before you put it on.
Tip: Flare fittings make a metal-to-metal seal. This gives you a stronger and less leaky connection.
Use Lubricant
Lubricant makes flaring copper easier and helps stop damage. Put a little lubricant on the tube end and the tool cone. This lowers friction and helps you make a smooth flare. It also helps stop cracks or splits. Special lubricants like MASTERDRAW® G and MASTERDRAW® B4626 work well for copper. These are water-based and safe for most plumbing work.
| Lubricant Name | Description |
|---|---|
| MASTERDRAW® G | Oil that helps bend and flare copper, aluminum, and other metals |
| MASTERDRAW® B4626 | Water-based, non-chlorinated fluid for flaring and shaping copper and similar tubes |
- Use just a little lubricant so you do not leave too much inside.
- Clean the tube after flaring to get rid of extra lubricant.
Note: Lubricant helps your tool last longer and makes each flare more even.
Double-Check Work
Always check your work before you finish flaring copper pipe. Look at the flare to see if it is smooth and even. Use a deburring tool to take off any sharp edges after cutting. Clean the copper well to get rid of dirt or oil. Check the fitting for cracks or bent spots. Make sure the flare nut fits tight but do not make it too tight.
- Look at the flare and fitting for any damage.
- Test for leaks with soapy water or a pressure gauge.
- Tighten the fittings gently and do not use too much force.
- Change any tubing that looks worn out or rusty.
Tip: Checking your work and putting things together carefully helps stop leaks and keeps your copper pipes working longer.
If you want to flare copper tube well, follow each step closely. First, measure the copper tube and cut it to size. Next, use a tool to deburr and sand the end. Set up your flaring tool and press down slowly and evenly. Look at the flare to see if it is smooth. The right tools and safety gear help you make strong connections. They also keep you safe when flaring copper pipe. If the job seems hard, ask a professional for help. Practice each step so you get better and feel more sure of yourself.
If you follow rules like ASTM B88, your copper flaring will meet code and last a long time.
| Benefit | Description |
|---|---|
| Leak-Proof Connections | Metal seals lower the chance of leaks, even with high pressure or shaking. |
| High Pressure Resistance | Works well for hydraulic, pneumatic, and refrigeration systems that need strong connections. |
FAQ
You see a smooth, even flare with no cracks or splits. The flare sits flat against the fitting. You test for leaks using soapy water. If you see bubbles, you need to redo the flare.
You must anneal hard copper before flaring. Heat the tube with a torch until it glows, then let it cool. This softens the copper and prevents cracks during flaring.
You match the flare size to the tube diameter and fitting. Most plumbing jobs use a 45-degree flare. Always check the manufacturer’s chart for correct sizing.
Tip: Measure the copper tube and fitting before starting copper pipe flaring.
You use a small amount of lubricant on the tube end and tool cone. Lubricant helps you make a smooth flare and protects the copper from damage.
You match the flare size to the tube diameter and fitting. Most plumbing jobs use a 45-degree flare. Always check the manufacturer’s chart for correct sizing.
You use a small amount of lubricant on the tube end and tool cone. Lubricant helps you make a smooth flare and protects the copper from damage.
You wear gloves to protect your hands from sharp edges. You use safety glasses to shield your eyes from metal shavings. Safety gear keeps you safe during every step.
You loosen the flare nut and inspect the flare for damage. If you see cracks or uneven spots, you cut the copper and redo the flare. Always test for leaks after repairs.
| Compression Fittings | Flare Fittings |
|---|---|
| Use a sleeve | Use a cone-shaped flare |
| Lower pressure | Handle higher pressure |
| Easier to install | Need copper pipe flaring |


