You can get a strong, professional powder coat brass finish if you follow the right steps. Every step is important for how your project looks and how long it lasts. Mistakes like mixing up materials, using dirty tools, or not curing it right can cause problems and make your finish not last as long. If you have good instructions of powder coating over brass, you can avoid these problems and have a smooth brass effect finish.
Key Takeaways
- Begin with a clean surface. Take off oils and dirt with the right cleaners. This helps the powder coating stick well.
- Pick the best degreaser. Solvent-based ones work quickly. Water-based ones are better for the environment.
- Check brass parts closely before coating. Look for scratches or problems that may hurt the finish.
- Pick the right powder type. Solid powders give a classic look. Effect powders make your brass look special.
- Follow the maker’s rules for curing. The right heat and time are very important. This gives a strong and long-lasting finish.
- Be gentle with coated parts. Let them cool on their own. Do not stack them to stop damage.
- Take care of your brass powder coat often. Clean it with mild soap. Check for chips to keep it looking nice.
- Buy good powders from trusted sellers. This makes your brass powder coating last longer and look the same each time.
Table of Contents
Prep for Brass Powder Coating
Clean Surface
Remove Oils
You need to start every powder coating brass project by removing all oils from the surface. Oils can come from your hands, machines, or even the environment. If you leave any oil on the brass, the powder coating process will not work well. The powder will not stick, and the finish will not last. Use a detergent or a solvent wipe to get rid of oils, waxes, and polishing compounds. Detergents work well for most jobs. Solvent wipes can help, but sometimes rags leave behind lint or dirt. Always use clean, lint-free cloths.
Use Proper Cleaners
Choosing the right cleaner is important for surface preparation. Different cleaners work best for different types of dirt or stains. Here is a table to help you pick the right one for powder-coated brass parts:
| Cleaning Agent Type | Description | Effectiveness |
|---|---|---|
| Alkaline Cleaners | Use sodium or potassium hydroxide to break down oils and fats. | Very effective, but you must rinse well. |
| Neutral Cleaners | Use surfactants, good for light dirt. | Gentle and safe for brass. |
| Acidic Cleaners | Use acids like phosphoric or hydrochloric to remove rust. | Good for tough stains, but use with care. |
You should always rinse the brass after using any cleaner. This step keeps the surface free from leftover chemicals that could hurt the brass powder coating.
Degrease
Solvent vs. Water-Based
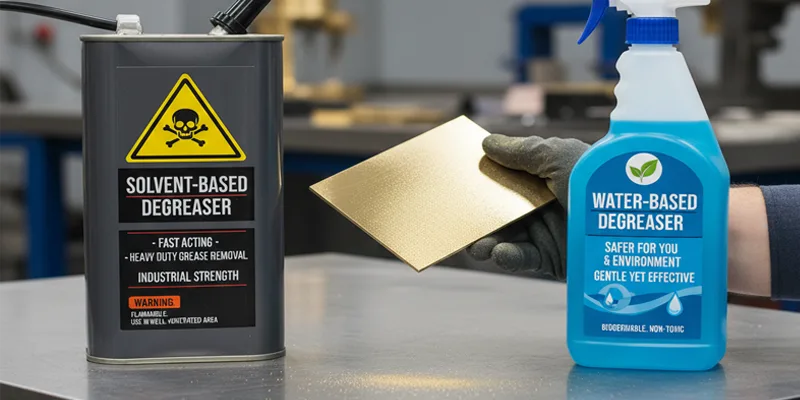
Degreasing is a key part of surface preparation. You can use solvent-based or water-based degreasers. Solvent-based degreasers work fast and remove heavy grease. Water-based degreasers are safer for you and the environment. Both types help make sure the powder coating brass sticks well. Pick the one that fits your needs and always follow the instructions on the label.
Rinse and Dry
After degreasing, rinse the brass with clean water. This step removes any leftover cleaner. Dry the brass right away. If you leave water on the surface, it can cause spots or rust. Use a clean towel or air dry the parts. Make sure the brass is completely dry before you move to the next step in the powder coating process.
Tip: Always check for water spots or streaks. These can cause problems with the brass powder coating later.
Abrade Surface
Grit Choice
Abrasive cleaning is a big part of surface preparation for powder-coated brass parts. You need to roughen the surface so the powder sticks better. You can use sandpaper, sandblasting, or media blasting. The grit you choose matters. Fine grit gives a smooth finish. Coarse grit makes a rougher surface for better adhesion. For most brass powder coating jobs, medium grit works best.
Manual or Mechanical
You can abrade the surface by hand or with machines. Manual sanding works for small or detailed parts. Mechanical methods like sandblasting are faster for large or many powder-coated brass parts. Both ways help remove old coatings, rust, and tiny flaws. Always wear safety gear when you sand or blast brass.
Good surface preparation makes the powder coating brass last longer and look better. If you skip these steps, the powder may peel or chip.
Inspect Before Coating
You need to inspect every brass substrate before you start the powder coating process. Careful inspection helps you catch problems early. If you skip this step, you might miss defects that can ruin the brass powder coating. Good surface preparation means you check for scratches, dents, or leftover dirt. You want each piece to look perfect before you move forward.
Start by looking at the brass under bright light. Use your eyes and your hands. Feel for rough spots or bumps. Sometimes, you find tiny cracks or pits. These flaws can stop the powder coating brass from sticking well. If you see any problems, fix them before you continue. You might need to sand, clean, or even replace the part.
AFI Industrial Co., Ltd. uses strict quality control to make sure powder-coated brass parts meet high standards. You can follow a similar system. Here is a table that shows different levels of inspection you can use for surface preparation:
| Quality Control Level | Description |
|---|---|
| Level 2 | Pre-inspection for defects, handling of ‘bad brass’, and written inspection reports required. |
| Level 3 | Pre-inspect for flaws, notify manager of defects, and ensure no ‘bad brass’ is present. |
| Level 4 | Strict inspection with no acceptance of defects in any area, and re-inspection of all parts. |
| Level 5 | Zero defects required, with parts returned to customer if flaws are found. |
You can choose the level that fits your project. If you want the best results, aim for Level 4 or Level 5. These levels make sure every powder-coated brass part looks great and lasts a long time.
Tip: Always keep a record of your inspections. Write down what you find and what you fix. This helps you track your surface preparation and makes your brass powder coating more reliable.
When you finish inspecting, you know your brass is ready for the powder coating process. Careful inspection protects your work and helps you avoid problems later. You get a smooth, strong finish that stands up to wear and tear. If you want powder coating brass to last, never skip this step.
Choose Brass Powder
Brass Powder Coating Types
Solid vs. Effect Powders
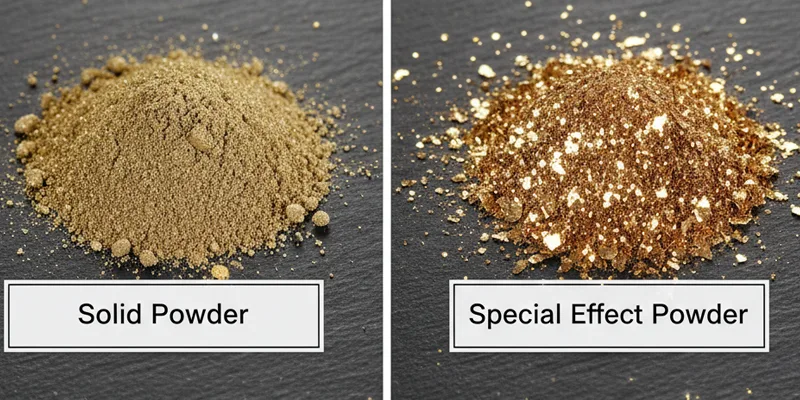
You have many choices when you select powder coating brass for your project. Solid powders give you a classic, even look. These powders work well if you want powder-coated brass parts with a smooth finish. Effect powders add something special. You can create unique looks, like antique or modern styles. Some effect powders include flecks or shimmer, which make your brass powder coating stand out. You should think about the final appearance and how you want your powder-coated brass parts to look.
Tip: Use solid powders for a simple, clean finish. Try effect powders if you want your powder coating brass to have more character.
Metallic Options
Metallic powders let you create a true brass look. These powders contain tiny metal particles. When you use metallic powder coating brass, you get a finish that shines and looks like real brass. You can choose from different shades, from bright gold to deep bronze. Metallic options work well for powder-coated brass parts that need to look high-end or decorative. You should check if the metallic powder fits your powder coating process and matches your design.
Color and Finish
Brass Tones
You can pick from many brass tones for your powder-coated brass parts. Some powders give you a yellow-gold color, while others look more like antique brass. The powder coating process lets you match the tone to your project. You should look at samples before you decide. The right brass powder coating makes your parts look just how you want.
Gloss or Matte
Finish matters for powder coating brass. Gloss finishes shine and reflect light. Matte finishes look soft and smooth. You can choose gloss if you want your powder-coated brass parts to stand out. Matte works well for a subtle, modern look. The powder coating process gives you control over the finish. You should think about where you will use the parts and how you want them to look.
- Powder coating brass offers finishes like satin, metallic, gloss, and clear.
- You can adjust the texture for antique or modern styles.
- The finish you choose affects both appearance and durability.
Durability Ratings
UV and Scratch Resistance
You want powder-coated brass parts to last. Durability ratings help you pick the right brass powder coating. Some powders resist UV light, so they do not fade outside. Others resist scratches and chemicals. You should check the ratings before you buy. The powder coating process makes brass powder coating strong, but the right powder gives extra protection.
| Feature | Rating/Description |
|---|---|
| Appearance | Smooth |
| Gloss | 85 – 95 @ 60 |
| Standard Durability | Yes |
| Exterior Durability | Yes |
| Chemical Resistance | Excellent |
| Salt Spray Resistance | 1000 hours pass (ASTM B-117) |
| Humidity Resistance | 1000 hours pass (ASTM D-1735) |
| Recommended Bake | 10 Minutes @ 375F Metal Temperature |
You should always match the powder coating brass to your needs. If you need powder-coated brass parts for outdoor use, pick powders with high UV and corrosion resistance. For indoor use, focus on appearance and scratch resistance.
Source Quality Powders
You want your powder coating brass to last long and look nice. The powder’s quality is very important. Always buy powders from trusted suppliers. These suppliers test their powders and check for quality. AFI Industrial Co., Ltd. has many powder coating choices. You can pick colors, textures, and how the powder works. This helps you get the best powder for your brass parts.
When you choose a supplier, see how they test their powders. Good suppliers check for gloss, sticking power, weather damage, and rust protection. These tests show if the powder will protect your brass and keep it looking new. Ask for details about their quality checks. Reliable suppliers follow the best rules in the industry. They test for color, shine, flexibility, and chemical safety. This means your powder coating brass will last through daily use and tough weather.
Tip: Always ask for a sample or a test report before you buy a lot of powder. This helps you see how the powder works on your brass parts.
You should also check how the supplier looks at raw materials. The powder and the coating must be the same quality every time. This keeps your powder-coated brass parts looking the same in every batch. If you see changes in color or finish, the powder may not be right for your project. The powder coating process needs good materials to work well.
Here is a simple checklist to help you pick good powders for powder coating brass:
- Check for supplier certificates and awards.
- Ask about their tests for shine, sticking, and rust protection.
- Request samples or small batches to try first.
- Look for the same color and texture in every batch.
- Make sure the supplier helps you and answers your questions.
| Supplier Feature | Why It Matters |
|---|---|
| Rigorous Testing | Makes sure the powder lasts and looks good |
| Quality Control Reports | Shows the powder works well |
| Custom Options | Lets you match the powder to your project |
| Consistent Batches | Keeps powder-coated brass parts the same |
| Technical Support | Helps you fix problems fast |
You want your powder coating brass to last for many years. Picking the right supplier and powder helps you avoid fading, chipping, or weak sticking. AFI Industrial Co., Ltd. uses strong tests and strict checks. This gives you trust in every batch of powder-coated brass parts. When you follow these steps, you get a tough, nice finish that can handle wear and weather.
Apply Powder Coat Brass
Equipment Setup
Spray Gun Settings
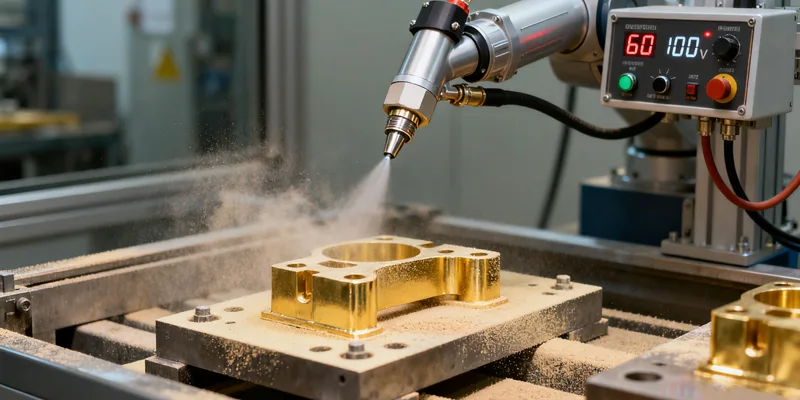
You need the right equipment to get a smooth brass powder coat. Start with a high-quality powder spray gun. Adjust the voltage between 60 and 100 kV. This range helps the powder stick to the brass. Set the current so you get a steady flow. Use a gun with a fine nozzle for detailed work. If you want even coverage, keep the gun about 6 to 8 inches from the surface. Move your hand slowly and evenly. Do not rush. If you go too fast, you miss spots. If you go too slow, you get clumps.
Tip: Test your spray gun on a scrap piece first. This helps you check the settings and see how the powder flows.
Here is a quick checklist for spray gun setup:
- Check voltage and current settings.
- Use a clean, dry nozzle.
- Keep the gun at the right distance.
- Test on a sample before starting.
Grounding and Safety
Grounding is very important in powder coating. You must connect the brass part to a solid ground. This step lets the charged powder stick well. If you skip grounding, the powder falls off or looks uneven. Use a grounding rod or clamp. Check the connection before you start. Good grounding also keeps you safe from electric shock.
Wear safety gear every time you powder coat. Put on gloves, goggles, and a mask. Powder particles can irritate your skin and lungs. Make sure your workspace has good airflow. If you use machines, keep loose clothing away from moving parts.
Note: Always check your equipment for damage before you begin. Replace worn wires or broken clamps right away.
Apply Powder
Even Coverage
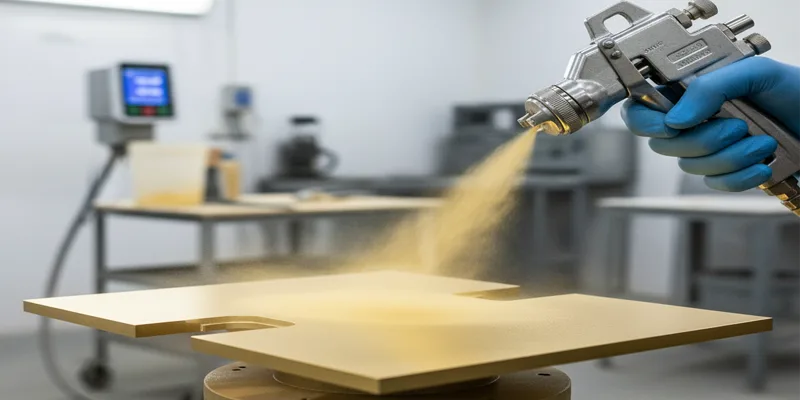
You want your brass powder coat to look smooth and last long. Start by applying thin, even layers. Hold the spray gun steady. Move in straight lines across the brass. Overlap each pass a little. This method helps you avoid streaks and missed spots. If you see powder building up, stop and adjust your flow rate.
Electrostatic spraying technology from AFI Industrial Co., Ltd. helps you get even coverage. The charged powder wraps around the brass. This effect coats hard-to-reach areas and complex shapes. You save time and use less powder. The finish looks uniform and professional.
| Step | What to Do |
|---|---|
| Start with light coat | Apply a thin layer first |
| Overlap passes | Cover each area twice |
| Check for gaps | Look for missed spots |
| Adjust flow rate | Fix if powder builds up |
Layering Techniques
Layering gives your brass powder coat extra strength and shine. Apply the first layer and let it settle. Check for thin spots. Add a second layer if needed. Use transparent golden or brass powder over a super chrome base for a rich brass look. This method creates depth and a true metallic finish.
You can use different powders for special effects. Try a clear coat on top for extra protection. Always let each layer settle before adding the next. Do not rush. If you stack layers too quickly, you get bubbles or rough spots.
Tip: Measure the film thickness after each layer. Use a gauge to check. The right thickness makes your brass powder coat last longer.
Avoid Flaws
Prevent Clumping
Clumping ruins the look of your brass powder coat. You can stop clumping by keeping the powder dry. Store powder in a cool, dry place. Shake the powder before loading it into the gun. Clean the spray gun often. If you see clumps, stop and clean the nozzle.
Apply thin layers. Thick coats cause clumps and uneven spots. Adjust the gun’s flow rate if you notice powder building up. Always check the powder’s quality before you start.
Control Humidity
Humidity affects powder coating. High humidity makes powder stick together and causes flaws. Keep your workspace between 65°F and 75°F. Use a dehumidifier if needed. Check the air before you start. If the air feels damp, wait until it dries out.
Note: Low humidity helps the powder flow smoothly and stick better. You get a stronger, smoother brass powder coat.
By following these steps, you set up your equipment, apply powder evenly, and avoid common flaws. You get a brass powder coat that looks great and lasts for years. AFI Industrial Co., Ltd. uses these methods to deliver top-quality finishes every time.
Troubleshoot
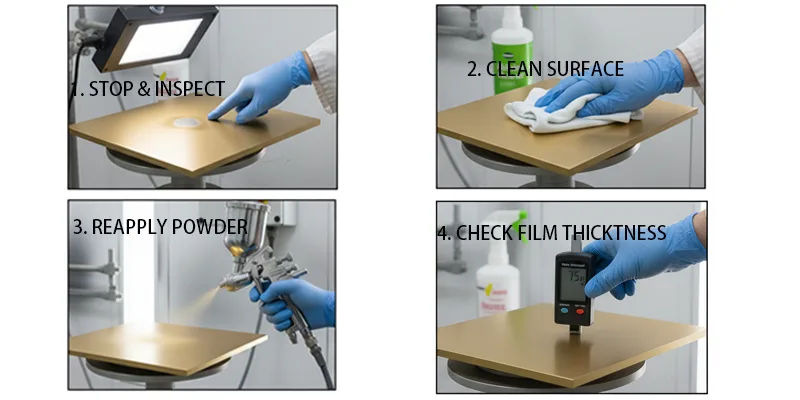
Fix Thin Spots
Thin spots can make your brass powder coat look uneven and weak. You want every part to have a strong, even layer. If you see thin spots, you can fix them before curing. Start by checking the part under bright light. Look for areas where the metal shows through or the color looks lighter.
Here are steps you can follow to fix thin spots:
- Stop and Inspect: Pause your work and check the whole part. Use your hands and eyes to find any thin areas.
- Clean the Surface: Dust or oil can cause powder to miss spots. Wipe the area with a clean, lint-free cloth. If needed, use a spray washer and an alkaline cleaner to remove dirt, wax, or rust inhibitors.
- Reapply Powder: Hold your spray gun at the right distance. Spray a light, even coat over the thin spot. Overlap your passes to blend the new powder with the old layer.
- Check Film Thickness: Use a film thickness gauge if you have one. The right thickness helps your brass powder coat last longer.
Tip: Always check for thin spots before curing. It is easier to fix them when the powder is still loose.
Address Contamination
Contamination can ruin the look and strength of your brass powder coat. Dust, oils, or other particles can cause bumps, fish eyes, or peeling. You want a clean surface for the best results.
To address contamination, follow these steps:
- Clean Thoroughly: Make sure the brass part is free from dust, oils, and dirt. Use a spray washer and an alkaline cleaner to remove all organic soils and waxes.
- Inspect Before Coating: Look closely at the surface. If you see any spots or particles, clean them off right away.
- Control Your Workspace: Keep your coating area clean. Wipe down surfaces and tools before you start. Wear gloves to avoid leaving fingerprints.
- Remove and Recoat: If you find contamination after spraying, gently blow off the loose powder with clean, dry air. Clean the area again, then reapply the powder.
If you skip cleaning, you risk poor adhesion. Contaminants can cause the powder to flake or peel later.
A clean, well-prepared surface helps you avoid most problems. Careful inspection and cleaning give you a smooth, durable brass powder coat every time.
Cure Brass Powder Coating
Set Temperature and Time
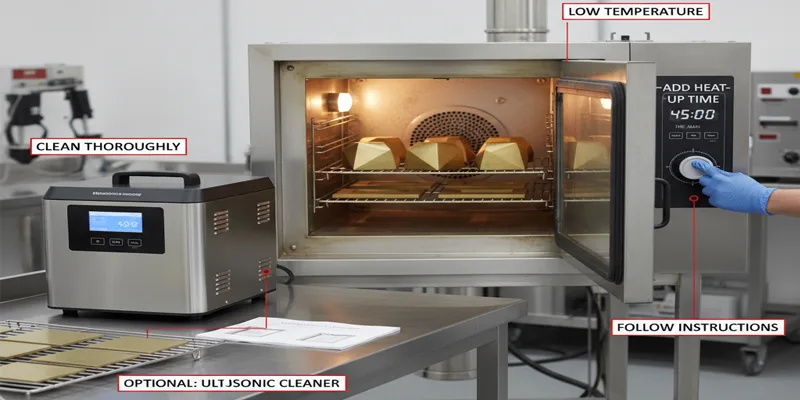
Manufacturer Guidelines
You should always follow the instructions from the manufacturer. These directions help you get a strong brass powder coating. If you do not follow them, you might get holes or weak spots. Most manufacturers say to use a lower temperature for brass. This helps stop problems and keeps the coating smooth. You need to count the time it takes for brass to heat up. Add this to your total curing time. Cleaning brass before coating is very important. If you have an ultrasonic cleaner, use it for the best cleaning.
- Use a lower temperature so you do not get holes.
- Add the time it takes to heat up to your curing time.
- Clean brass well before coating, and use ultrasonic cleaning if you can.
Adjust for Size
The size and thickness of brass parts change how you set temperature and time. Big or thick pieces need more time to heat up. You might need to pre-heat brass between 176°C and 232°C. Pre-heating helps the powder spread and gives a smoother finish. It also gets rid of water and dirt. This step helps the powder stick better and lowers the chance of bubbles or holes.
- Pre-heat brass to help powder spread and look smooth.
- Remove water and dirt for better sticking.
- Lower the chance of holes and bubbles.
Oven Setup
Convection vs. Infrared
You can use different ovens to cure brass powder coating. Each oven has good points. The table below shows how they are different:
| Feature | Convection Ovens | Infrared Ovens |
|---|---|---|
| Heat Transfer Method | Uses hot air to heat | Uses direct heat on the product |
| Curing Process | Heats from outside in, takes longer | Heats from inside out, much faster |
| Ideal Use | Good for small jobs because it is slower | Good for big jobs because it is faster |
| Cost | Usually costs less to buy | Costs more because it is quicker |
| Temperature Control | Electric ovens have less change in temperature | Needs careful setup for even heating |
| Limitations | Takes more time to cure | Part shapes can change how well it cures |
Convection ovens are good for small projects. Infrared ovens work faster and are better for big batches. Pick the oven that fits your job size.
Monitor Temperature
You need to watch the oven temperature closely. Use a good thermometer or a digital controller. Keep the temperature steady the whole time. If the temperature changes, the coating may not cure right. Always make sure the oven is hot enough before you start timing.
Check Cure
Visual and Physical Tests
After curing, you need to check if the brass powder coating is done. Use your eyes and some simple tests. These checks help you see if the coating is strong and looks good.
| Test Name | Description |
|---|---|
| Mandrel Bend | Bend a coated piece. The coating should not crack. |
| Impact Test | Drop a ball on the coating. It should not break. |
| Salt Spray Test | Spray mist on it. Check if it resists rust. |
| MEK Rub Test | Rub MEK on the surface. The coating should stay strong. |
| Color Match | Compare color to a sample. It should look the same. |
| Gloss Test | Check how shiny it is. The shine should be right. |
| Coating Thickness Test | Measure thickness. It should be the right amount. |
Signs of Under/Over Cure
You need to look for signs that the powder coating is not cured right. These problems can make the coating weak or look bad.
- If it does not stick well, it may peel or flake.
- If it is under-cured, it will not resist rust or scratches.
- If it is over-cured, it can break or chip easily.
- Too much heat can make it less shiny and look dull.
If you see these problems, change your curing steps. Good curing gives you a strong and lasting brass powder coat.
Cool and Handle
After you finish curing your brass powder coat, you need to cool and handle the parts with care. This step protects your hard work and keeps the finish strong and beautiful.
Let the Brass Cool Naturally
You should let the brass cool down inside the oven or in a clean, dust-free area. Do not rush this step. If you move the parts too soon, you can cause the coating to crack or warp. Sudden changes in temperature can also make the finish dull or weak. Always wait until the brass reaches room temperature before you touch or stack the pieces.
Tip: Place the coated parts on a metal rack or a clean, heat-resistant surface. This helps air flow around the parts and cools them evenly.
Handle with Care
Once the brass cools, you need to handle it gently. The powder coat may look hard, but it can still scratch or dent if you are not careful. Use clean gloves to pick up the parts. This keeps fingerprints and oils off the fresh finish. Avoid stacking or bumping the pieces together. If you need to move many parts, use soft padding or cloth between them.
Inspect for Damage
Check each part for chips, scratches, or marks. Look at the surface under good light. If you see any flaws, you can fix small chips with a touch-up kit. For bigger problems, you may need to recoat the part. Careful inspection now saves you time and trouble later.
| Step | What You Should Do |
|---|---|
| Cool Down | Let parts reach room temperature slowly |
| Use Gloves | Prevent fingerprints and oil stains |
| Avoid Stacking | Use padding if you must stack parts |
| Inspect Surfaces | Check for chips, scratches, or marks |
Follow AFI Industrial Co., Ltd. Standards
AFI Industrial Co., Ltd. uses strict handling and cooling steps to keep powder-coated brass parts in top shape. You can follow these best practices at home or in your shop. Careful cooling and handling help your brass powder coat resist wear, corrosion, and fading.
Note: Never rush the cooling process. Patience here leads to a longer-lasting, professional finish.
By cooling and handling your brass powder-coated parts the right way, you protect your investment and ensure a flawless, durable result every time.
Finish and Maintain
Inspect Finish
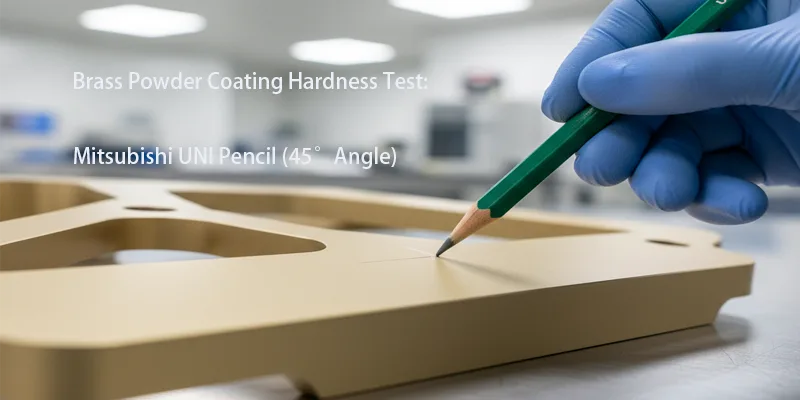
Spot Imperfections
You want your brass powder coat to look perfect. Start by checking the surface under a bright 40W fluorescent light. Look for any peeling, sagging, or scratches. Run your hand over the surface to feel for bumps or rough spots. Make sure the coating is even and covers the whole part. The surface should be clean and free from dust or other particles.
You can use special tools to check the quality:
- Use a Mitsubishi “UNI” pencil at a 45-degree angle to test hardness.
- Try a tungsten carbide grid knife and 3M 600 grade tape for adhesion.
- Measure the coating thickness with a digital gauge. Aim for 60 to 120 micrometers.
Here is a table of common inspection methods:
| Inspection Method | Description |
|---|---|
| Dry Film Thickness Measurement | Use a digital gauge to check the thickness. This affects how strong and smooth the finish is. |
| Cross Hatch Adhesion Testing | Cut a grid into the coating and use tape to check how well it sticks. |
| Pencil Hardness Test | Use a pencil to see if the coating resists scratches and marks. |
Tip: Always check for uniform color and strong adhesion. These signs show your powder coat will last.
Touch-Up
If you find small flaws, you can fix them before they get worse. For tiny chips or scratches, use a touch-up kit made for powder-coated brass. Clean the area first with a soft cloth. Apply the touch-up paint in thin layers. Let each layer dry before adding more. For bigger problems, you may need to sand the spot and recoat it. Always follow the instructions on your touch-up kit.
Protect Finish
Clear Coats
You can make your brass powder coat last longer by adding a clear coat. Clear coatings protect against scratches, UV rays, and moisture. Some people use durable clear coatings applied by e-coat. Others try acrylic urethane coatings from trusted suppliers. You can also use a clear powder coat as an extra shield. These layers keep your brass looking shiny and new.
Environmental Factors
Think about where you will use your brass parts. Outdoor pieces face sun, rain, and pollution. Indoor parts may face dust or cleaning chemicals. Protect your finish by choosing the right clear coat for your environment. Store brass items in dry places. Avoid harsh cleaners or rough handling.
Clean and Maintain
Safe Products
Keep your brass powder coat clean with mild soap and water. Use a soft cloth or sponge. Stay away from harsh chemicals that can damage the coating. Never use steel wool or rough pads. These can scratch the surface.
Routine Care
Regular care keeps your brass looking its best. Wipe the surface often to remove dust. After cleaning, you can apply a gentle wax to keep the shine. Check your brass parts for damage every few months. Fix small chips or scratches right away. This stops bigger problems before they start.
Regular inspection and gentle cleaning help your brass powder coat stay strong and beautiful for years.
Check Durability
You want your brass powder coat to last a long time. Checking durability helps you see if it can handle daily use. You can do simple tests at home or use professional ones for better results.
First, look at your brass parts closely. Check for scratches, chips, or faded spots. If you see damage, your powder coat might need more protection. Press your thumb gently on the surface. If it feels hard and smooth, that is good. If it dents or flakes, you may need to fix your process.
Labs use special tests to see how strong brass powder coating is. These tests show how your finish will last over time. Here is a table with common durability tests:
| Test Type | Purpose |
|---|---|
| Accelerated Weathering Tests | Check if it resists UV and keeps its look. |
| Salt Spray Testing | See how well it protects against rust. |
| Impact Resistance Testing | Test how it holds up to hits. |
| Abrasion Resistance Testing | See if it stands up to rubbing and wear. |
| Custom Testing Protocols | Copy real-life use to predict how long it lasts. |
You can try some of these tests at home. Rub a soft cloth over the surface many times to check for wear. Tap the brass with a small tool to test if it cracks. If the coating stays smooth, it passes the test.
AFI Industrial Co., Ltd. uses advanced machines to test every batch. Their team checks for high impact, bending, and weather damage. These tests make sure your brass powder coat can handle stress and outdoor use.
You can also do these easy checks:
- Bend a coated piece to see if it cracks.
- Press a sticker on the surface and pull it off to test how well it sticks.
- Leave a coated part outside for a few weeks to see if the color fades.
Tip: Check durability often to catch problems early. Fix small issues before they get worse.
If you want the best results, keep notes on your tests. Write down the date, what you did, and what you found. This helps you see how your brass powder coat does over time. You can compare results and make your process better.
Testing durability helps you trust your brass powder coating. You know it will stand up to wear, weather, and daily use. When you follow these steps, you protect your brass parts and keep them looking great for years.
You can get a strong brass powder coat if you do each step right. Clean the brass well before you start. Good cleaning and surface prep help a lot. Pick the best powder for your project. Put the powder on in thin, even layers. Cure the brass the right way to make it tough. Take care of your brass so it stays shiny and new. The table below shows what each step does for your finish:
| Step | Description |
|---|---|
| Cleaning | Take off dirt, oils, wax, and grime so the brass is clean. |
| Shot-Blasting | Remove rust and other stuff on the surface so powder sticks better. |
| Etching or Phosphating | Use chemicals to help powder stick and stop rust. |
| Primer Application | Add a primer layer if you need more sticking power. |
If you do every step with care, your brass powder coat will look great and last a long time.
FAQ
Brass powder coating is a process where you spray a dry powder onto brass parts. You heat the parts so the powder melts and forms a strong, protective layer. This finish looks smooth and lasts a long time.
You should wash brass with a mild detergent or an alkaline cleaner. Rinse with clean water and dry the part completely. Use a lint-free cloth to avoid leaving dirt or fibers.
Yes, you can use powder coating for outdoor brass. Pick powders with high UV and corrosion resistance. These powders help your brass stay bright and strong in sun and rain.
You need a powder spray gun, a grounding clamp, and a curing oven. Safety gear like gloves and masks protects you from powder dust. Use a film thickness gauge to check your work.
You can use a touch-up kit made for powder-coated surfaces. Clean the damaged area first. Apply the touch-up paint in thin layers and let each layer dry before adding more.
Humidity can make powder clump and stick unevenly. You should keep your workspace dry and use a dehumidifier if needed. Dry air helps the powder coat look smooth and last longer.
You can bend the coated part to check for cracks. Rub the surface with a soft cloth to see if it wears off. Labs use salt spray and impact tests for more detailed results.


