You anodize aluminum by getting the metal ready first. Then you use an electrolyte bath. Next, you add electricity to make a strong oxide layer. To start diy anodizing, you need these things:
- Aluminum parts
- Sulfuric acid (electrolyte)
- Distilled water
- Power supply
- Lead cathode
- Plastic container
- Safety gear: gloves, goggles, apron
Always work where air moves well. Follow Anodizing Steps and Safety. Careful setup helps the anodizing go well. It also keeps you safe from harm.
Key Takeaways
- Always wear safety gear like gloves, goggles, and an apron. This keeps you safe when using chemicals and electricity.
- Clean and deoxidize aluminum very well before anodizing. This helps make a strong and even oxide layer.
- Set up the electrolyte bath with care. Mix sulfuric acid with distilled water slowly. Make sure to control the temperature.
- Use the right voltage and current for your anodizing type. Watch the process closely to stop any defects.
- Rinse aluminum parts well after each step. Use clean distilled or deionized water. This stops stains and weak coatings.
- Add color by dyeing the anodized aluminum. Seal it with hot water or nickel acetate to protect the finish.
- Keep detailed notes of your process. Write down times, temperatures, and settings. This helps you repeat good results and fix problems.
- Take care of anodized aluminum by cleaning it gently. Store it the right way to keep its strength and look.
Table of Contents
Materials & Safety
Materials Needed
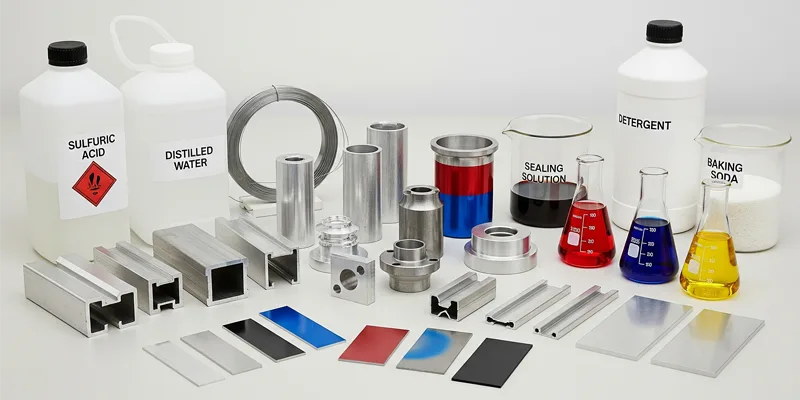
You need the right things to anodize aluminum. First, gather these items:
- Aluminum parts or sheets
- Sulfuric acid (battery acid is okay for small jobs)
- Distilled water
- Aluminum wire to hang the parts
- Cleaning agents like dish soap or degreaser
- Baking soda to clean up acid spills
- Dye if you want to add color
- Sealing solution like boiling water or nickel acetate
Only use pure aluminum or the right alloys. Bad metals can mess up the oxide layer. Always check your aluminum before starting.
Equipment List
You need special tools to anodize aluminum well. Here is a table to help you get ready:
| Equipment | Purpose |
|---|---|
| Plastic container | Holds the electrolyte bath |
| Power supply | Gives steady electrical current |
| Lead cathode | Works as the negative electrode |
| Aluminum wire | Holds aluminum parts in the bath |
| Thermometer | Checks bath temperature |
| Timer | Counts how long you anodize |
| Stirring rod | Mixes the electrolyte solution |
| Measuring cup | Measures chemicals and water |
Set up your workspace where air moves well. This helps keep you safe from fumes and other dangers.
Safety Gear
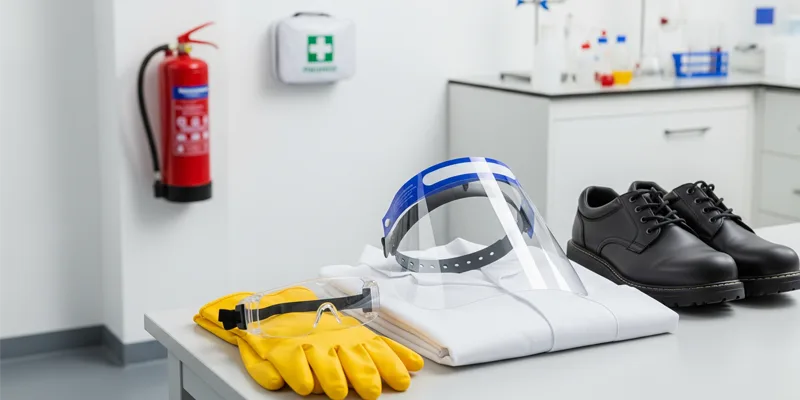
Wear safety gear every time you use chemicals and electricity. The right gear keeps you safe from splashes, fumes, and shocks. You need these items:
- Chemical-resistant gloves
- Safety goggles
- Apron or lab coat
- Face shield for extra safety
- Closed-toe shoes
Tip: Keep a first aid kit and fire extinguisher close by. Work where air moves well so you do not breathe bad fumes. Always follow safety steps when anodizing aluminum.
Follow all safety rules. Good safety gear and planning help you stay safe and finish your anodizing project.
Safety Tips
When you anodize aluminum, you handle chemicals and electricity. You must protect yourself and your workspace. Follow these tips to keep your project safe and successful.
- Work in a ventilated area
Choose a space with good airflow. Open windows or use a fan to move fumes away from your face. Never work in a closed room. Sulfuric acid produces fumes that can harm your lungs. - Prepare your workspace before starting
Remove clutter from your workbench. Keep only the tools and materials you need. Place a spill tray under your containers to catch drips. Store chemicals in labeled bottles away from children and pets. - Wear your protective gear at all times
Put on gloves, goggles, and an apron before you touch any chemicals. If you use a face shield, make sure it fits well. Closed-toe shoes protect your feet from spills. Do not wear loose clothing that could catch on equipment. - Handle chemicals with care
Pour sulfuric acid slowly into water, never the other way around. This prevents splashing and heat buildup. If you spill acid, sprinkle baking soda on the area to neutralize it. Clean up spills right away. - Check your electrical setup
Inspect wires and connections before you turn on the power supply. Make sure your hands are dry when you handle electrical equipment. Use insulated tools if possible. Set the power supply to the correct voltage for your project. - Keep emergency supplies nearby
Place a first aid kit and fire extinguisher within reach. Know where your nearest sink or eyewash station is. If acid gets on your skin, rinse with water for at least 15 minutes. If you feel dizzy or sick, stop working and get fresh air. - Follow AFI’s process standards
AFI Industrial Co., Ltd. recommends checking your equipment before each use. Test your bath temperature and solution strength. Record your process steps in a notebook. This helps you spot problems early and keeps your results consistent.
Tip: Always read the labels on your chemicals and equipment. If you do not understand a warning, ask for help or look up the information before you start.
You must stay alert and focused during every step. Do not rush. Take breaks if you feel tired. Careful preparation and attention to detail help you avoid accidents and produce high-quality anodized aluminum.
Surface Prep
Cleaning
You have to clean aluminum before anodizing. Cleaning gets rid of oil, grease, dirt, and fingerprints. These things can stop a strong oxide layer from forming. If you skip cleaning or use the wrong cleaner, you might get streaks or weak coatings.
First, soak aluminum in an alkaline soak cleaner. This cleaner breaks down oil, buffing stuff, and dirt. It keeps dissolved aluminum in the liquid, so you do not get sludge. You can use a liquid cleaner with surfactants for better cleaning and less foam. If the grime is tough, ultrasonic cleaning helps remove tiny bits and lubricants.
Here is a table that shows good cleaning agents for aluminum:
| Cleaning Agent Type | Key Characteristics | Effectiveness for Aluminum Preparation Before Anodizing |
|---|---|---|
| Alkaline Soak Cleaner | Stable pH, alkali parts, surfactants, lasts long, low foam, holds dissolved aluminum | Best for removing many kinds of dirt and getting aluminum ready for anodizing. |
| Acid Cleaner | Phosphoric acid base, removes oxides, activates surface, quick cleaning | Good as a second cleaner to get rid of tough oxides and make the surface active, but not as good at holding dirt. |
After cleaning, rinse aluminum with distilled water to wash off cleaner. Do not touch cleaned aluminum with bare hands. Use gloves to keep it clean.
Tip: Always look for dirt or streaks before moving on. Clean aluminum gives better anodizing results.
Deoxidizing
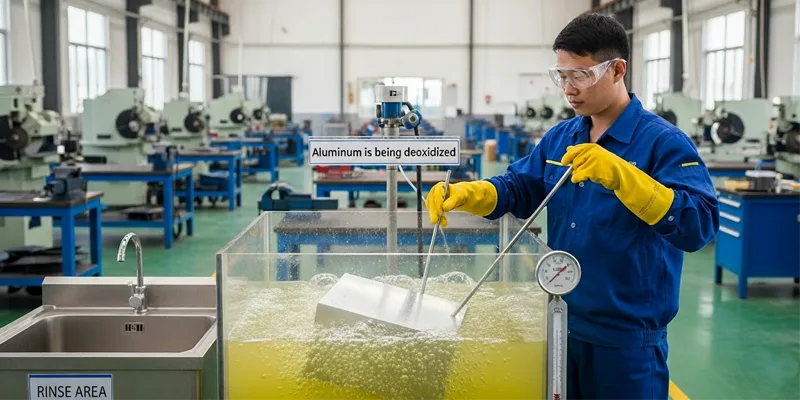
You need to deoxidize aluminum to take off the natural oxide layer. This step gets the metal ready for anodizing. Use an acid solution, usually nitric acid, to dissolve oxides. Nitric acid works fast and is safe for the environment.
For rough or cast surfaces, use a strong deoxidizer with hydrofluoric acid. This kind removes silica and makes the surface matte. Always deoxidize right before anodizing to keep aluminum active.
Follow these steps to deoxidize:
- Put aluminum in an acid-resistant tank.
- Watch the temperature, because reactions go faster as it gets hotter.
- Stir the solution so it covers everything.
- Rinse aluminum after deoxidizing.
Wear gloves and goggles when using acids. Never skip deoxidizing, or the coating may not stick well.
Rinsing
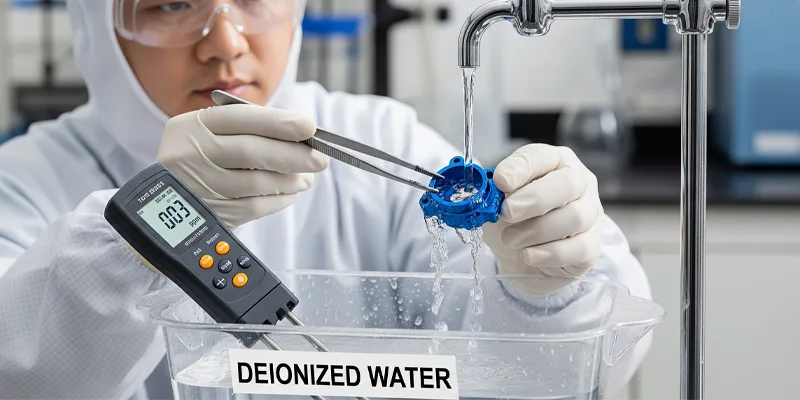
Rinsing is very important after cleaning and deoxidizing. Use water with low dissolved solids, less than 200 ppm. Deionized water is best because it stops spots and dirt. Check the water with a TDS meter and change it often.
Good rinsing keeps aluminum free from stuff that causes streaks or bad anodizing. For special uses, use water with conductivity below 5 µmS. Clean water helps the bath last longer and makes the coating better.
Note: Bad rinsing is a common mistake. Always rinse after each step to avoid problems and get a smooth finish.
Prep Tips
Getting aluminum ready for anodizing needs careful steps. The surface must be clean and active. Nothing should block the oxide layer. These tips help you get better results and avoid mistakes.
1. Inspect Your Aluminum
Look at your aluminum before you begin. Check for dents, scratches, or marks. If you find damage, sand or polish it. Smooth surfaces give a nicer finish. Use a bright light to see small flaws.
2. Use Fresh Cleaning Solutions
Old cleaners do not work well. Make new cleaner each time you start. Dirty cleaner leaves marks and streaks. Always use a cup or scale to measure chemicals.
3. Avoid Touching Cleaned Parts
Do not touch aluminum after cleaning it. Oil from your hands can stop anodizing. Use gloves or tweezers to move parts. Put cleaned pieces on a cloth with no lint.
4. Rinse Between Every Step
Rinse aluminum after each step. Use distilled or deionized water. Tap water can leave spots from minerals. Change rinse water often to keep it clean.
5. Keep Tools and Workspace Clean
Wipe your workspace before you start. Wash your tools with water and dry them. Dust and dirt can stick to aluminum and ruin the finish. Store chemicals in labeled bottles away from your work area.
6. Monitor Temperature Closely
Temperature changes how cleaning and deoxidizing work. Use a thermometer to check your solutions. Most cleaning baths work best between 120°F and 140°F. Deoxidizing solutions should stay below 100°F. High heat can hurt aluminum.
7. Record Your Process
Write down each step in a notebook. Note the time, temperature, and chemicals you use. This helps you repeat good results and fix problems. Professionals at AFI Industrial Co., Ltd. use logs for quality control.
8. Use Proper Hanging Methods
Hang aluminum parts with aluminum wire. Make sure the wire touches the part tightly. Loose wires can cause uneven coatings. Do not use copper or steel wire because it can mess up the bath.
9. Test Small Pieces First
Try new cleaners or steps on a small piece first. This lets you see how the metal reacts. You can change your method before working on big parts.
10. Stay Patient and Focused
Take your time with every step. Rushing can cause mistakes. If you get tired, take a break. Careful prep gives you a strong and even anodized layer.
💡 Tip: Always check your setup before you start anodizing. Good prep saves time and stops costly mistakes.
Use these prep tips each time you anodize aluminum. Careful work at the start gives you strong and professional results.
Anodizing Steps and Safety
Electrolyte Bath
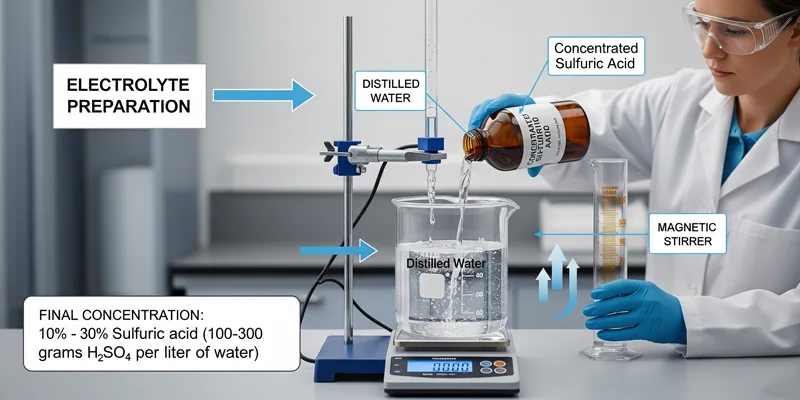
First, you set up the anodizing bath. Mix sulfuric acid with distilled water. Measure the acid very carefully. Most baths use 10% to 30% acid. That means 100 to 300 grams per liter of water. For hard anodizing, use 168 grams per liter. This amount helps make a strong oxide layer.
Pour acid into water slowly. Never pour water into acid. This keeps you safe and stops splashing. Use a plastic container for the acid and aluminum parts. Check the temperature with a thermometer. For regular anodizing, keep it between 68°F and 72°F. For hard anodizing, lower it to about −4.5°C. Cold baths help make thicker coatings.
Always wear gloves, goggles, and an apron when you use acids. Work in a place with good airflow. If you spill acid, clean it with baking soda right away.
Setting up the bath takes time. Mix the solution well and check the temperature often. Good prep helps you get a smooth oxide layer.
Power Setup
Set up your power supply before you start. The power supply sends electricity through the bath. This builds the oxide layer. Attach the aluminum part to the positive terminal. Attach the lead cathode to the negative terminal. Make sure the cathode does not touch the aluminum.
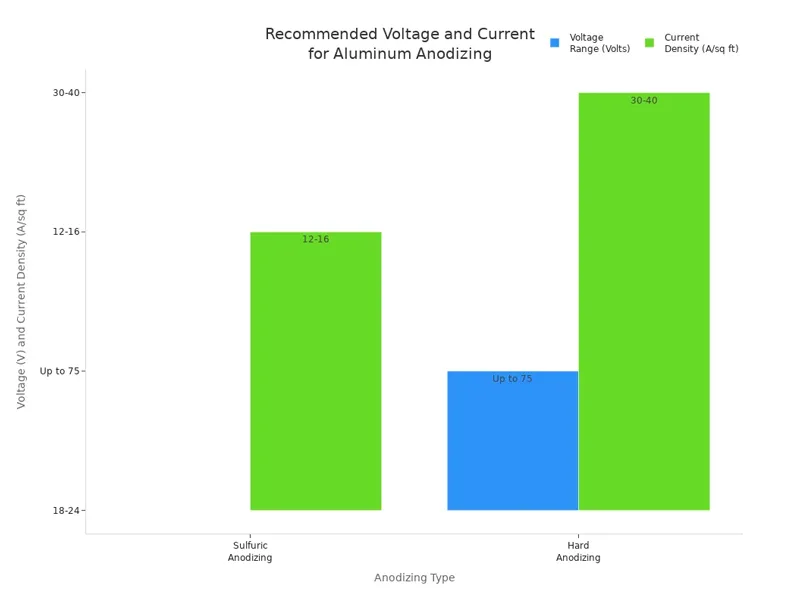
Control the process by changing voltage and current. For regular anodizing, use 18 to 24 volts. Use 12 to 16 amps per square foot. For hard anodizing, use up to 75 volts. Use 30 to 40 amps per square foot. Match the current to the size of your aluminum part.
Use constant current density for best results. As the oxide layer grows, resistance goes up. The voltage rises if you keep the current steady. This helps you know coating thickness and time. Use the Rule of 720 to find out how long to anodize. Multiply the thickness you want by 720. Divide by the amps per square foot.
| Anodizing Type | Voltage Range (Volts) | Current Density (Amps/sq ft) | Typical Coating Thickness (mils) | Notes |
|---|---|---|---|---|
| Sulfuric Anodizing | 18–24 | 12–16 | Up to 1 | Most common, normal conditions |
| Hard Anodizing | Up to 75 | 30–40 | 0.5–4 | Lower temp, higher voltage/current, dense |
Tip: Always check wires and connections before turning on the power. Use insulated tools and keep your hands dry. Take your time with setup. Careful work stops accidents and gives a good finish.
Anodizing Aluminum
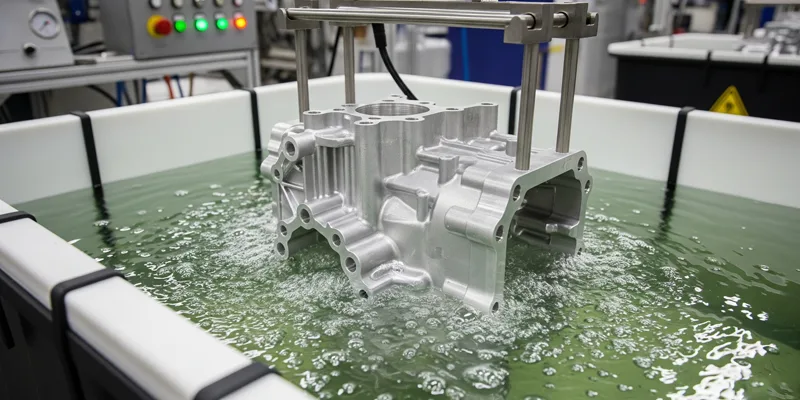
Start anodizing by putting the aluminum part in the bath. Turn on the power supply. Electricity moves from the anode to the cathode. Oxygen forms on the surface. The oxygen reacts with aluminum and makes a tough oxide layer.
Watch these things during anodizing:
- Make sure all electrical contacts are tight and clean. Loose contacts can cause bad coatings or burn marks.
- Racks should hold aluminum parts with enough space. Leave at least 6 inches between parts. This lets the solution move well and stops gas from getting trapped.
- Watch the bath temperature and current density. High temperature or too much current can make the coating soft or burned. Low values make thin or weak coatings.
- Write down the anodizing time and details in a notebook. This helps you repeat good results and fix problems.
Train yourself to check contacts, rack loading, and settings. Careful monitoring gives you strong and even coatings.
When you finish, turn off the power before you take out the part. Rinse the part with distilled water to wash off acid. For extra safety, dip the part in baking soda solution. This neutralizes any acid left. Rinse again with distilled water.
Follow each step carefully. Good control helps you avoid mistakes and get professional results. AFI Industrial Co., Ltd. uses these steps for high-quality aluminum anodization.
Monitoring
You need to watch each step while anodizing. This helps you get a strong and even oxide layer. If you pay close attention, you can find problems early. This keeps your work good. There are many things you should check during anodizing and safety steps.
First, check the bath temperature often. Use a thermometer to see if it changes. If the bath gets too hot, the oxide layer can turn soft or uneven. If it gets too cold, the coating might be thin or break easily. Change the temperature if you need to. Keep it in the right range.
Next, watch the electrical current and voltage. Look at the power supply display to see the numbers. If the numbers change fast, check your wires and make sure the aluminum part is tight. Write down the current and voltage in your notebook. This helps you do the same thing next time and fix problems.
Look at the aluminum part while it is in the bath. You should see bubbles all over the surface. If you see dark spots, lines, or places with no bubbles, stop and check your setup. Bubbles that are not even can mean bad contact or dirt.
Check how long each step takes. Use a timer to see how long the part stays in the bath. Follow the time needed for the coating you want. If you leave it in too long, the layer can get too thick and break. If you take it out too soon, the coating can be weak.
Write down everything you see. Note the temperature, current, voltage, and time. Write down any problems and how you fixed them. People at AFI Industrial Co., Ltd. keep good notes to make sure every batch is the same.
Tip: Stay focused when you monitor the process. Small changes can change the final result. Careful watching helps you make high-quality anodized aluminum every time.
Rinsing After Anodizing
When you finish anodizing, rinse the aluminum part right away. Rinsing takes off acid and stops more reactions. Use distilled water for the first rinse. Hold the part under running water or dip it in a clean container. Make sure you wash every part, even corners and holes.
For extra safety, make a baking soda solution. Dip the part in this for a few seconds. Baking soda gets rid of any acid left on the part. Rinse the part again with distilled water to wash off all the baking soda and acid.
Look at the part for any marks or spots. If you see white marks or lines, rinse again until it looks clean. Do not touch the part with your bare hands after rinsing. Use gloves or clean tongs to move it to the next step.
Good rinsing keeps the oxide layer safe and gets the part ready for coloring or sealing. AFI Industrial Co., Ltd. uses special rinsing and very clean water for the best results. You can get great results if you follow these anodizing and safety steps.
Note: Always use clean water for rinsing. Dirty water can leave stains and make the coating weak. Careful rinsing is very important in anodizing.
Coloring & Sealing
Dyeing
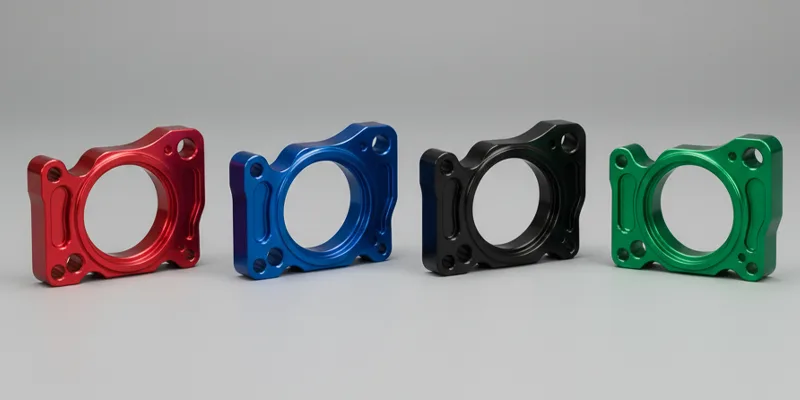
When you finish anodizing, you can add color. Dyeing is the most common way to do this. The oxide layer has tiny holes. These holes soak up dye and let you make many colors. Organic dyes work best for Type II anodizing. They give you lots of choices like red, blue, black, and green. You can also use other methods for special effects. These include electrolytic coloring, integral coloring, and interference coloring.
Here is a table that shows the main ways to color anodized aluminum:
| Coloring Method | Description | Dye/Metal Used | Color Range |
|---|---|---|---|
| Dye | Put part in dye liquid. Dye goes into tiny holes. | Organic dyes | Many colors |
| Electrolytic Coloring | Put part in metal salt bath. Electricity puts metal salts in holes. | Tin, Cobalt, Nickel, Copper | Bronze to black |
| Integral Coloring | Color and anodize in one step using organic acid bath. | Organic acids | Bronze and black |
| Interference Coloring | Change holes so light makes colors. | N/A | Blue, green, yellow, red |
To dye your aluminum, put it in a dye bath after rinsing. Keep the temperature and time the same for even color. If you want a special color, mix dyes or ask for help to match it.
Tip: Test a small piece first to see the color before you dye the whole part.
Sealing Methods
Sealing is the last step. It closes the holes in the oxide layer. This keeps the dye inside and helps stop rust. The most common way is with hot water. Put your colored aluminum in hot deionized water. The water should be almost boiling. The best temperature is between 87°C and 99°C. Most experts say 95–99°C works best. This heat makes the holes close and traps the dye.
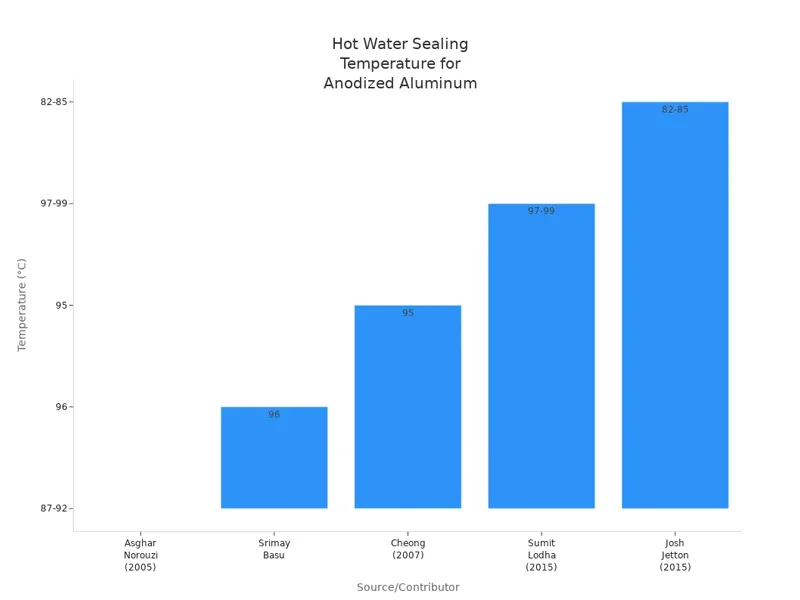
You can also use nickel acetate sealing for extra strength. This is good if your part needs to last in tough places. Always seal for the right amount of time. Usually, seal for 2.5–3 minutes for each micron of oxide thickness.
Note: Good sealing stops fading and keeps your aluminum looking nice for a long time.
Final Rinse
After sealing, rinse your aluminum part one last time. Use clean distilled water to wash off any leftover chemicals. This step gets rid of residue and stops water spots. Use gloves or tongs so you do not leave fingerprints. Let the part dry in the air on a clean surface.
A good final rinse gives your anodized aluminum a smooth finish. It also gets your part ready for use or more work.
💡 Always check your part after the last rinse. Make sure the color is even and the surface looks clear and sealed.
Troubleshooting
Common Issues
When you work with anodized aluminum, you might have problems. Knowing these problems helps you fix mistakes early. This can save your project. Here are some issues you might see when you do diy anodizing:
- Pits: Small holes can show up from bad aluminum, dirty tanks, or not cleaning well.
- Etch Non-Uniformity: The surface can look uneven if the metal is not good or if chemicals are wrong.
- Color Non-Uniformity: The color can look patchy if you do not rinse enough, if the dye bath is dirty, or if the coating is not the same thickness.
- Burning: Burned spots can happen if the alloy has too much copper, if the electrical contact is bad, or if the bath is too hot.
- Coating Adhesion Problems: The anodized layer might not stick if there are metal bits or if you stop the process too soon.
- Accumulated Gas: Gas can get stuck in small spaces and make thin spots or uneven color.
- Black Spots: These can show up if the temperature changes while anodizing.
- Powdering: A white powder can form if you run the process too long or too hot.
- Short Circuit: If parts touch or wires fall, you might see the metal dissolve or burn.
- Milky White Film: The film can look cloudy if it has impurities.
- Fingerprints: Touching the anodized film can leave marks.
- Poor Corrosion Resistance: Too much acid or metal ions in the bath can make the layer weak.
- Yellowing: Iron or silicon in the metal can make the surface look yellow.
Tip: Always check your anodized aluminum after every step. Early checks help you find problems before they get worse.
Fixes
You can fix most problems by working carefully and using good habits. Try these steps to get better results with anodized aluminum:
1. Clean aluminum parts well before etching. This takes off dirt and oil that can make spots or patterns.
2. Control acid and voltage during anodizing. Keeping them steady helps you avoid uneven coatings.
3. Etch less if you see uneven color. Some alloys need less etching to look good.
4. Use the right de-oxidizing and desmutting after etching. This gets the surface ready for a strong anodized layer.
5. Keep parts wet between steps. If they dry, you can get marks or stains.
6. Use racks that hold parts tight and give good electrical contact. This keeps the current even and stops thin or burned spots.
7. Stir the bath gently. Moving the solution helps keep the coating even.
8. Check coating thickness often. This helps you find thin or thick spots early.
9. Keep temperature and stirring steady. Changes can make the results uneven.
Note: Write down what you do each time you anodize. Good notes help you repeat good results and fix mistakes faster.
Tips for Anodized Aluminum
You want your anodized aluminum to last and look nice. Use these tips to take care of your anodized projects:
- Clean anodized aluminum with mild soap and water. Do not use rough sponges or strong cleaners that can scratch the surface.
- Check your anodized parts often for scratches, chips, or fading. Fix small problems early to keep the layer strong.
- Keep anodized aluminum away from strong sunlight, salt water, and harsh chemicals. These things can fade or damage the anodized layer.
- Dry your anodized aluminum after cleaning to stop water spots.
- Store anodized parts in a dry, cool place to stop corrosion.
💡 Gentle cleaning and regular care help your anodized aluminum stay strong and look good for a long time.
Applications & Quality
Uses of Anodized Aluminum
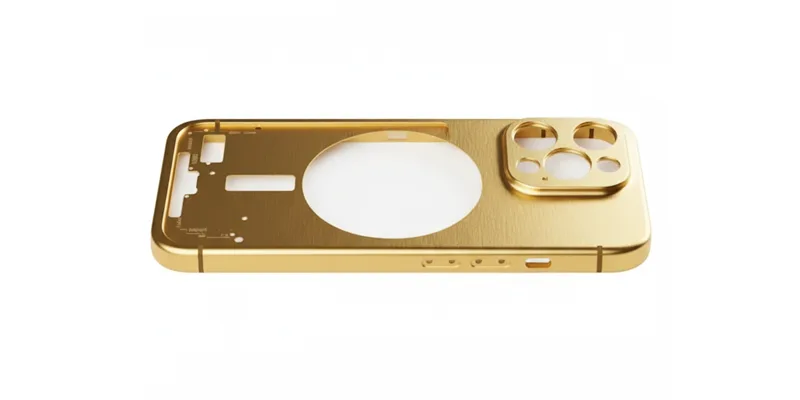
Anodized aluminum is used in many fields. It is strong and lasts a long time. The surface does not scratch or rust easily. This makes it good for many jobs and looks nice too.
Some common uses for anodized aluminum are:
- Aerospace: It is used for wing panels, fuselage parts, landing gear, and engine parts. The oxide layer keeps these safe from bad weather and heavy use.
- Architecture: Builders use it for building fronts, window frames, doors, railings, and decorations. The coating protects against sun, rain, and dirt. Buildings stay looking new.
- Automotive: Car makers use it for wheels, trim, engine parts, and inside the car. It is light and strong. It stops rust and helps cars last longer.
- Electronics: You see it in phone cases, heat sinks, and connectors. The coating stops electricity from leaking and helps with heat.
- Industrial Equipment: Factories use it for rollers, pumps, valves, and cylinders. The hard surface does not wear out fast. Machines work better and last longer.
- Consumer Goods: It is in cookware, kitchen tools, bikes, golf clubs, and cameras. The surface does not react with food. It does not scratch and comes in many colors.
Anodized aluminum looks good and works well. You can count on it for things that need to last and look nice.
Quality Assurance
Every anodized part should be high quality. AFI Industrial Co., Ltd. checks each piece with special tests. This makes sure the anodized aluminum is strong and looks good. You can trust that these products pass tests for strength and how they look.
Here are some main tests for anodized aluminum:
| Test Type | Purpose | How It Helps You |
|---|---|---|
| Film Thickness | Measures oxide layer | Makes sure protection and color are even |
| Sealing Quality | Checks weather resistance | Shows it will last a long time |
| Electrical Conductivity | Checks if the alloy is pure | Makes sure heat and electricity flow |
| Hardness Testing | Checks how tough the surface is | Protects from scratches and dents |
| Impact and Fatigue Tests | Checks how strong and tough it is | Tells how long it will last |
There are also new tests, like impedance measurement. These give quick and correct results for thickness and sealing. These tests help you get good anodized aluminum for cars, planes, and electronics.
AFI checks all their test tools to make sure they are right. They use standards from Boeing and NIST. You can feel sure that every batch meets or beats what the industry needs.
When you pick AFI for anodizing, you get more than a nice finish. You get quality you can trust and check.
You need to be safe and ready before working with aluminum. Always put on your safety gear. Make sure your workspace has fresh air. Be careful when you use chemicals. If you follow all the steps, your finish will be strong and bright. It will last a long time.
- Anodized aluminum gives you these lasting benefits:
- It resists rust and scratches very well.
- The colors stay bright and do not fade.
- It is easy to clean and needs little care.
- The surface is safe for the environment and not toxic.
If you want to make a lot or need special work, AFI Industrial Co., Ltd. can help. They use new technology and check quality to give you good results.
FAQ
You get the best results with pure aluminum or alloys like 6061 and 5052. These alloys form strong, even oxide layers. Always check your alloy before starting.
You can anodize aluminum at home if you follow safety steps. Wear gloves, goggles, and an apron. Work in a space with good airflow. Keep emergency supplies nearby.
You pick a dye based on the color you want and the type of anodizing. Organic dyes work well for most projects. Test a small piece first to check the color.
You see patchy layers when you do not clean or rinse aluminum well. Uneven electrical contact or bath temperature can also cause this. Always check your setup before starting.
You choose thickness based on your needs. Most decorative anodizing uses 0.5–1 mil. Hard anodizing can go up to 4 mils. Use a thickness gauge for accuracy.
You sprinkle baking soda on the spill to neutralize the acid. Clean the area with water. Wear gloves and goggles. Keep a spill kit ready before you start.
You can fix some mistakes by stripping the oxide layer and starting again. Use a caustic soda bath to remove the coating. Rinse and repeat the process with better prep.
You clean anodized aluminum with mild soap and water. Avoid rough sponges and strong chemicals. Dry the surface after cleaning. Store parts in a cool, dry place.


