Every stainless steel part needs passivation treatment to stop rust. If you’re wondering what is passivation of stainless steel, it is a process that helps the part last longer. Passivation uses acid to treat the metal, which removes iron particles from the surface and strengthens the protective layer known as chromium oxide. This layer is essential as it helps the surface fight rust, and the chemical film it creates blocks corrosion. Passivation not only makes parts look clean but also means you will need to fix them less often. To summarize what is passivation of stainless steel, it helps by:
- Taking away contamination from the surface
- Making a chemical shield against rust
- Helping your product last longer
- Cutting down on maintenance needs
Key Takeaways
- Passivation is very important for stainless steel parts. It helps stop rust and makes them last longer. The process takes away dirt and makes the chromium oxide layer stronger. This layer protects the metal. Doing passivation often means you do not need to fix things as much. It also keeps equipment looking nice and clean. Always wash stainless steel parts before passivation. This helps you get the best results. Different industries have their own rules for passivation. These rules help keep things safe and good quality. You may need to do passivation again if you see rust spots. Other signs are a dull look or water not spreading evenly in tests. Using food-safe acids like citric acid is safe for food and drink machines. Check and take care of stainless steel parts often. This helps you avoid expensive fixes and keeps them working well for a long time.
Table of Contents
What Is Passivation of Stainless Steel
Definition
You might ask, what is passivation of stainless steel? Passivation is a chemical process that helps stainless steel fight rust. When you use acid on stainless steel, it takes away free iron and other things from the surface. This lets a thin layer of chromium and nickel oxides form. The layer works like a shield and stops water and air from causing rust. Passivation helps your stainless steel parts last longer.
Passivation does more than just clean the metal. It changes how the metal reacts to things around it. You get a stronger part that can handle hard jobs. New stainless steel parts need passivation because they often have leftover stuff from when they were made. If you skip passivation, your parts may not fight rust as well.
Purpose
Passivation is used for a few big reasons. The main reason is to stop stainless steel from rusting. When you ask, what is passivation of stainless steel, you find out it makes a shield that blocks water and air. This shield keeps your parts safe and strong.
Here is a table that shows the main goals of passivation for stainless steel parts:
| Objective/Standard | Description |
|---|---|
| Corrosion Prevention | Passivation makes a shield that stops rust by making stainless steel not react with water and air. |
| Industry Standards | ASTM A967/A967M and ASTM A380/A380M give rules for passivation, including cleaning steps. |
| Enhanced Longevity | Passivated stainless steel lasts longer and needs less fixing in many jobs. |
You can see that passivation helps your parts last longer and meet important rules. You also do not have to fix or replace them as much.
Passivation vs. Cleaning
You might think cleaning and passivation are the same, but they are not. Cleaning takes away dirt, oil, and simple things from the surface. Passivation does more. It takes away free iron and brings back the protective chromium oxide layer. You need both steps for the best results.
Here is a table that compares the two processes:
| Process | Purpose | Steps Involved |
|---|---|---|
| Passivation | Makes stainless steel better at fighting rust by taking away free iron and bringing back the shield | 1. Clean the surface 2. Take away free iron 3. Bring back chromium oxide layer |
| Standard Cleaning | Takes away dirt, oils, and simple things from the surface | 1. Use cleaning solution 2. Rinse with water |
- Passivation is for fighting rust.
- Standard cleaning is for taking away dirt.
- Passivation comes after cleaning to work best.
When you ask, what is passivation of stainless steel, you learn it is a special step that protects your parts from rust, not just a simple cleaning. You should use passivation if you want your stainless steel to stay strong and look nice for a long time.
Tip: Always clean your stainless steel parts before you start passivation. This helps the chemical process work better and gives you the best shield.
Now you know what is passivation of stainless steel, why you need it, and how it is different from just cleaning. You can keep your parts safe and make them last longer by using the right steps.
Why Passivation Is Necessary

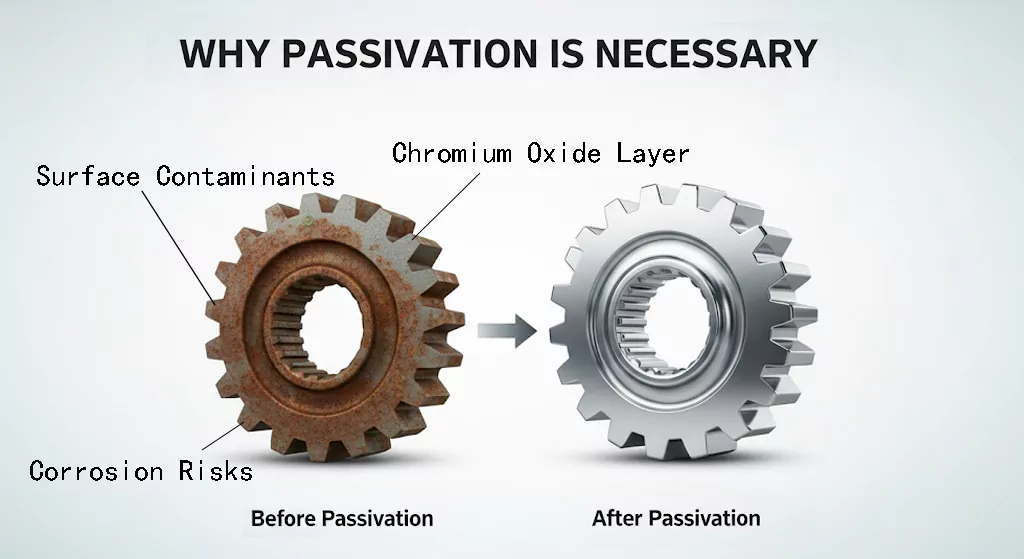
Surface Contaminants
After making or shaping stainless steel, you can find many things on the surface. These things are called contaminants. If you do not take them off, they can cause trouble. Some examples are:
- Embedded iron particles
- Sulfide inclusions
- Heat tint
- Arc strikes
- Grind marks
- Weld spatter
- Scratches
- Organic contamination
- Electropolish frosting
These contaminants stick to the metal and make it weaker. If you leave them, rust can start and hurt your stainless steel parts. Passivation helps get rid of these bad things and gives your parts a fresh start.
The way your stainless steel looks also changes how well it fights rust. Here is a table that shows how different finishes affect rust resistance:
| Surface Finish Type | Effect on Corrosion Resistance |
|---|---|
| Mill Finish | Has more spots for rust to start, so it is not as strong. |
| Polished Finish | Has fewer places for rust, so it is better at fighting rust. |
| Electropolished Finish | Easier to clean and keeps away more bad stuff, so it is even stronger. |
Passivation works best when the surface is very clean. You take away iron and other bits, so the stainless steel can make a strong shield.
Chromium Oxide Layer
Your stainless steel needs a good chromium oxide layer to stay safe. This layer is like a thin coat that blocks water and air. It stops rust from forming and keeps your parts safe. The chromium oxide layer is special because it can fix itself. If it gets scratched, it grows back fast when there is oxygen.
Here is what the chromium oxide layer does for you:
- Makes a thin wall that stops rust and keeps the metal safe.
- Fixes itself fast if it gets hurt.
- Helps your stainless steel last longer, especially in the 200-300 series.
Passivation helps make this protective layer thicker and stronger. When you treat the metal, you take away iron and other bad things. This lets the chromium-rich layer grow better. The process uses acid to clean off dirt and an oxidizer to help the layer form. You get a surface that fights rust and stays strong in hard places.
Corrosion Risks
If you skip passivation, you can have many problems. Stainless steel can get rust spots in just a few weeks. People may complain or ask for new parts. Iron left on the metal can start rust, and untreated stainless steel can show rust in only 30 days. Pitting corrosion can happen if the protective layer is weak or broken.
Passivation is needed because it takes away iron and other things that start rust. You keep your parts safe from rust and keep them strong. If you do not use passivation, you might have to fix or change your parts much sooner.
Tip: Always use passivation after making or shaping your parts. This stops rust and keeps your stainless steel strong and safe.
The Passivation Process

Chemical Reactions
When you start the passivation process, you help your stainless steel parts build a strong shield. The main goal is to create a protective chromium oxide layer on the surface. You do this by using acids like nitric acid or citric acid. These acids react with the metal in a few important ways:
- The acid removes any iron or other contaminants from the surface.
- Nitric acid reacts with chromium in the steel to form a dense chromium oxide layer.
- The chromium in the steel interacts with oxygen in the solution, which helps build the protective layer.
- This new layer blocks water and air, so your stainless steel resists rust and lasts longer.
You need this chemical reaction to make sure your parts stay strong and safe. Without it, your stainless steel can rust quickly.
Process Steps
You can follow a few simple steps to complete the passivation process. Each step helps your equipment stay clean and protected. Here is a common way to do it:
- Clean the Surface
Remove all grease, oils, and dirt from your stainless steel. Use an alkaline cleaner to make sure nothing is left behind. - Rinse with Water
Wash the part with clean water to get rid of any leftover cleaner. - Apply Acid Solution
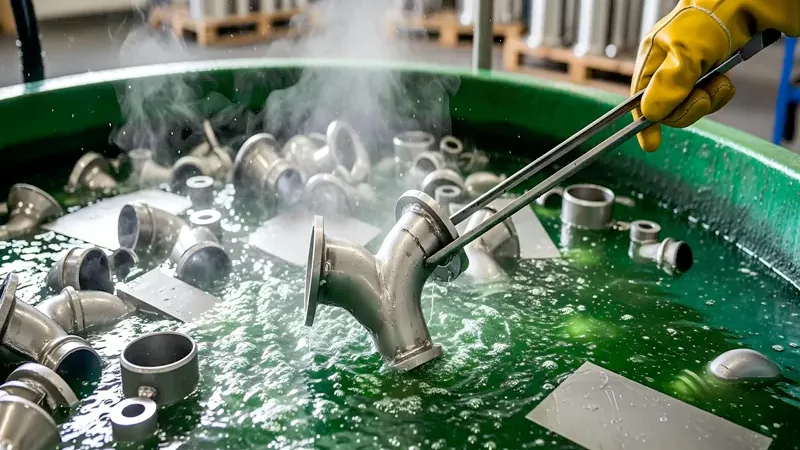
Submerge the part in a bath of citric acid or nitric acid. This step removes iron and helps the chromium oxide layer form. - Rinse Again
Rinse the part with water to remove any acid left on the surface. - Second Water Rinse
Give the part another rinse to make sure it is completely clean. - Air Dry
Let the part dry in the air. This prevents water spots and keeps the surface pure.
Note: Always rinse your parts well after each step. This keeps chemicals from staying on the surface and causing problems later.
You can see that each step in the process helps your stainless steel fight rust. Testing the surface after passivation makes sure the process worked well.
New vs. Used Equipment
You need to treat new and used equipment a little differently during passivation processes. For new equipment, you must clean it well and use acid to remove any free iron or leftover contaminants from making or shaping the part. This step is important for building the first protective layer.
Used equipment may need re-passivation. Over time, the protective layer can wear down, especially if the equipment faces harsh chemicals or lots of use. Re-passivation restores the chromium oxide layer and keeps your equipment safe from rust.
You can use nitric acid for new equipment, but citric acid is becoming more popular. Citric acid is safer and works well for many types of stainless steel. It is also a good choice for food and beverage equipment because it is less toxic.
Tip: Always check your equipment before and after passivation. This helps you spot any problems early and keeps your parts working their best.
Benefits of Passivation
Corrosion Resistance
You want your brewing equipment to last a long time. Passivation helps make your stainless steel parts stronger against rust. When you treat brewery tanks with acid, you take away iron particles. This brings back the protective surface. The process makes a thin, clear film that blocks water and air. This film keeps the metal safe. Your equipment gets better at fighting rust, even in tough places.
Studies show passivation really helps. Passivated surfaces rust much less than regular machine finishes. If you use both electropolishing and passivation, your tanks get even stronger. They can resist rust hundreds of times better than untreated tanks. You will worry less about rust and can focus more on making good drinks.
Tip: Always passivate your brewing equipment after you install or fix it. This easy step protects your equipment and helps your brewery work well.
Appearance
You want your brewery to look clean and nice. Passivation gives your equipment a bright, shiny finish. The process takes away iron and other bad stuff. Your stainless steel looks spotless. This is important if customers or inspectors visit. A clean look shows you care about safety and quality.
Passivation also stops ugly rust spots and stains. When you keep your tanks clean and passivated, your brewery looks its best. Many breweries use passivation for both protection and good looks.
| Benefit | How Passivation Helps Your Brewery |
|---|---|
| Clean Finish | Takes away stains and marks |
| Bright Appearance | Makes tanks look shiny and new |
| Professional Look | Impresses people who visit |
Structural Integrity
You need your brewing equipment to stay strong and last long. Passivation helps your tanks and parts keep their strength. When you remove bad stuff and build a protective layer, you stop rust from hurting the metal. Your equipment keeps its shape and strength for many years.
Passivation does more than stop rust. It helps your tanks fight damage from the environment. You do not have to worry about leaks or breaks. Clean surfaces help your equipment work better and last longer. You can trust your brewery equipment to last through many uses.
- Passivation makes your tanks better at fighting rust.
- The protective layer keeps the metal safe from harm.
- Clean surfaces help your equipment work well and last longer.
Note: Passivate your brewery tanks often to keep them in great shape. You will save money on repairs and keep your brewing safe and smooth.
Industry Standards
You want your stainless steel passivated parts to be top quality. Industry standards help you reach this goal. These rules tell you how to treat and test your parts. They also show you how to care for stainless steel. Standards keep your parts safe and strong.
Many companies use stainless steel in their work. Food, medical, and aerospace companies all need strong equipment. Standards help you follow the right steps. You use these rules to stop rust and damage.
There are three main standards for passivation. Each one gives you clear steps to follow. The table below shows how they are different:
| Standard | Description |
|---|---|
| ASTM A380 | This standard tells you how to clean, remove scale, and passivate stainless steel. It gives you steps for each part of the process. |
| ASTM A967 | This standard explains how to use nitric or citric acid for passivation. It also talks about safety and how to get rid of chemicals. |
| AMS 2700 | This standard is for aerospace parts. It gives extra steps for getting the surface ready, passivating, and testing stainless steel. |
ASTM A380 helps you clean and get your parts ready. It tells you how to take off dirt and iron. ASTM A967 is about the chemicals you use. It explains how to use acids safely. AMS 2700 is for aerospace parts. It gives more steps for testing and checking your parts.
You need to follow these standards to avoid problems. If you miss a step, your parts can rust or break. Standards also help you show your work to inspectors and customers. You can prove your equipment meets tough rules.
Tip: Always pick the standard that matches your job. Food and drink companies use ASTM A967. Aerospace companies use AMS 2700. The right standard helps you pass checks and keep your equipment safe.
When you meet industry standards, you feel sure about your work. Your stainless steel parts will last longer. You also save money by avoiding repairs or recalls. Using passivation and following the rules gives you the best results.
Verifying Passivation
After you treat your stainless steel parts, you need to check your work. Verifying passivation helps you know your equipment will stay strong and not rust. You can use different tests and inspections to make sure the surface is clean and protected.

Testing Methods
There are many ways to test if your stainless steel is ready. Each test looks for different problems on the surface. Here is a table that shows some good testing methods:
| Testing Method | Description | Advantages | Limitations |
|---|---|---|---|
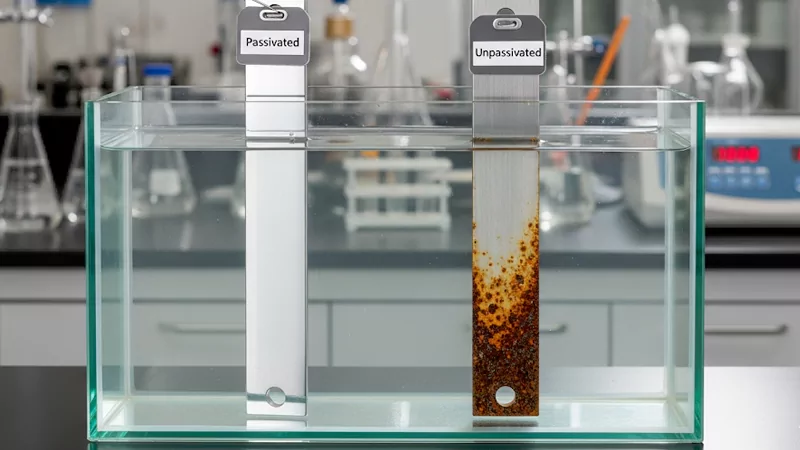
| Water Immersion Test | Checks how well stainless steel resists rust in water. | Easy, cheap, does not hurt the part. | Only uses your eyes, may miss tiny problems. |
| Copper Sulfate Test | Finds free iron on the surface to see if passivation worked. | Fast, good for finding surface iron. | Can hurt the part, only finds free iron. |
| High-Humidity Test | Checks rust resistance in wet air. | Acts like real life, does not hurt the part. | Needs special tools, takes a long time. |
| X-Ray Photoelectron Spectroscopy (XPS) | Looks at what elements are on the surface. | Very exact, shows how thick the shield is. | Costs a lot, needs special tools. |
| Auger Electron Spectroscopy (AES) | Looks at thin layers for dirt and strength. | Very detailed, finds tiny problems. | Expensive, needs skilled workers. |
| Electrochemical Testing | Checks rust resistance by using electricity. | Gives numbers to show how well it works. | Needs fancy tools and experts. |
Water Break Test
You can use the water break test to see if the surface is clean. Rinse the stainless steel part with clean water. If the water spreads out in a smooth sheet, there is no oil or dirt. This means the part is ready for passivation or has been treated well. If you see water beads or breaks, you need to clean the part again.
Tip: The water break test is fast and simple. It helps you find oil or grease that could stop the shield from forming.
Copper Sulfate Test
The copper sulfate test helps you find free iron on the surface. Put copper sulfate solution on the stainless steel. If you see a copper-colored stain, there is free iron. This means the part did not get fully passivated. If there is no stain, the surface is clean and safe. This test is good for finding iron, but it can hurt the part, so be careful.
Visual Inspection
Always look at your stainless steel parts after you treat them. Visual inspection helps you find big problems like rust, stains, or dirt. You can see if the surface looks clean and shiny. This step is quick and does not need special tools.
But visual inspection cannot find every problem. You might miss thin oil or leftover chemicals that can stop passivation from working. You also cannot see inside small spaces or tight corners. That is why you should use visual checks with other tests.
Note: Use both visual inspection and other tests to make sure your stainless steel parts are safe. This helps you find problems early and keep your equipment strong.
Maintenance and Frequency
How Often
You need to know how often to treat your stainless steel parts. The right schedule depends on many things. If you work in food processing, you should plan maintenance every 1–2 years. Chemical handling calls for more frequent checks, usually every 6 months to 1 year. The table below shows common intervals for different industries:
| Application | Maintenance Interval |
|---|---|
| Food Processing | Every 1–2 years |
| Chemical Handling | Every 6 months to 1 year |
Several factors can change how often you need to treat your parts. Here is a list to help you decide:
- A dirty surface from machining can stop the protective layer from forming.
- Cleaning methods may weaken the coating.
- Frequent use wears down the protective layer faster.
- Extreme heat can break down the coating quickly.
- The way you use your parts, such as scratching or abrasion, affects how long the layer lasts.
- Physical damage from cleaners or tools can harm the surface.
If you work in a high-risk place, like chemical processing, you need to treat your parts more often. These places have harsh conditions that can damage stainless steel quickly. In low-risk places, you can wait longer between treatments.
Tip: Always check your maintenance schedule based on how and where you use your parts. This helps you keep everything safe and working well.
Signs for Re-Passivation
You should look for signs that tell you when to treat your parts again. Here are some things to watch for:
- Rust spots or stains on the surface
- Dull or faded appearance
- Scratches or marks from tools
- Loss of shine or smoothness
- Water does not spread evenly during the water break test
- Copper stains after the copper sulfate test
If you see any of these signs, you should plan to treat your parts soon. Regular checks help you catch problems early.
Note: If you notice rust or stains, do not wait. Treat your parts right away to stop damage from spreading.
Post-Treatment Care
After you treat your stainless steel, you need to care for it the right way. Start by cleaning the parts to remove any leftover dirt or oil. Use alkaline cleaners like sodium hydroxide to get rid of oils and foreign materials. Rinse the parts several times with clean water to make sure all chemicals are gone. Let the parts air dry and watch for any new contamination.
Here is a simple list for best care after treatment:
- Clean the parts to remove all contaminants.
- Apply acid treatment to help the protective layer form.
- Rinse thoroughly with water.
- Allow the parts to air dry.
- Use alkaline cleaners for tough dirt.
- Rinse more than once to keep the surface clean.
- Monitor drying to prevent new contamination.
Tip: Good care after treatment helps your parts stay strong and last longer. Always follow these steps to keep your stainless steel in top shape.
You help your stainless steel parts by keeping them clean. Treating them often takes away bad stuff and makes a strong oxide layer. This stops damage and keeps your equipment safe.
- Your parts last longer.
- You spend less on fixing things.
- Surfaces stay shiny and neat.
- You follow safety rules.
| Benefit | Description |
|---|---|
| Improved durability | Parts work well for a long time. |
| Lower costs | You fix and replace less often. |
| Better appearance | Surfaces look bright and even. |
You can ask experts like Astro Pak or Diversey for help. Start now to keep your equipment strong and safe.
FAQ
Passivation helps stainless steel fight rust. It takes iron off the surface. Then it makes a chromium oxide layer. This layer keeps your equipment strong. It also helps it stay clean.
You might see rust spots or stains. The surface can look dull. Water may not spread out smoothly in the water break test. These signs mean you should treat your parts again.
No, household cleaners only clean dirt and oil. They do not make the protective layer. Passivation uses special acid for real protection.
Yes, passivation is safe if you use food-grade acids like citric acid. This process keeps your equipment clean. It also removes harmful contaminants.
Passivation usually takes 30 minutes to 2 hours. The time depends on part size and acid type.
Most stainless steel grades need passivation, especially the 200 and 300 series. Some high-chromium grades may need it less often. Passivation always helps stop rust.
You can passivate small parts at home with citric acid. Always wear gloves and eye protection. For big or important equipment, ask a professional for help.
If you skip passivation, stainless steel can rust faster. The surface gets weak. You may need to fix or replace parts sooner.


