Surface roughness measurement helps you see if a surface is smooth or rough. This is important because it changes how products work and last. It also affects how good they look. Smoother surfaces can lower friction. They can also help things last longer. Many industries need good checks to make sure parts are made well.
Understanding the importance of surface roughness can help you make better products and help them perform better.
Key Takeaways
- Surface roughness tells us if a surface is smooth or rough. It affects how well parts work and how long they last.
- Ra and Rz are common ways to measure surface roughness. Each one gives different information about the surface.
- Pick the right way to measure based on the part’s material and shape. Think about what the part needs to do. Use stylus profilometers for hard surfaces. Use optical methods for soft or delicate surfaces.
- You must prepare samples the right way. Tools need to be set up correctly to get good measurements.
- Real-time and in-process tools find problems early. They help make products better without stopping work.
- Things like shaking, heat, and tool pressure can change results. These things should be controlled for good measurements.
- Reports should use industry rules and the right numbers. This helps teams understand results and keep quality high.
- Training and practice help people get better at measuring. Automated tools help lower mistakes and make work easier.
Table of Contents
Surface Roughness Basics

What Is Surface Roughness
Surface roughness means there are tiny bumps and dips on a material. These small bumps and dips happen when people cut, grind, or polish things. Surface roughness is one part of surface texture. Surface texture also has waviness and flaws. Engineers use surface roughness to talk about how smooth or rough something is. Measuring surface roughness means looking at the small details. These details change how two surfaces touch and move. Surface profile texture shows these details in a line or area scan.
Surface roughness is not just about how something looks. It is important for how parts work together. Smoother surfaces can lower friction. Rougher surfaces can help coatings stick better.
Here is a table that explains some common words:
| Term | Definition | Key Points / Significance |
|---|---|---|
| Surface Texture | All the bumps and dips on a surface. | Has roughness, waviness, and flaws. |
| Surface Roughness | Small, close bumps from making the part. | Measured by surface roughness parameters like Ra and Rz. |
| Surface Finish | How good the surface looks and feels. | Has roughness, coating, and defects. |
Why Surface Roughness Matters
Surface roughness is important because it changes how products work. If a surface is too rough, it can wear out faster. It can also make more friction and not last as long. In cars, planes, and medical tools, surface roughness helps make things safer. It also makes them work better. Surface finish changes how well parts seal and stop leaks. It also helps stop rust and keeps oil in place. In food and medicine, smooth surfaces are easier to clean. They also help keep things safe and clean.
- Surface roughness changes how strong a part is. It can help with fatigue resistance and fracture resistance.
- Surface roughness parameters like Ra and Rz are shown in engineering drawings to check quality.
- Testing and controlling surface roughness saves money. It helps stop failures and lowers energy use.
- Surface finish changes how well coatings stick and how seals work.
Key Parameters
When you measure surface roughness, you use different parameters. Each parameter tells you something special about the surface.
Ra
Ra means average surface roughness. You find Ra by adding up the height differences from the mean line. Then you divide by the number of points. Ra gives a simple idea of how rough a surface is. Many industries use Ra because it is easy to compare. But Ra does not show very high or low spots. It might miss some important details.
Rz
Rz is another way to measure surface roughness. Rz looks at the average height between the five tallest peaks and five lowest valleys. Rz is better at finding scratches or deep marks than Ra. You use Rz when you need to check sealing surfaces or tight fits.
Ry
Ry is the maximum peak-to-valley height difference of a part’s surface profile within a selected sampling length. It focuses on extreme values, rather than average values like Ra. As an important complementary parameter to surface roughness, Ry provides critical information about local extreme surface characteristics, making it indispensable in many applications that place special demands on surface integrity and functionality.
Other Parameters
There are other parameters to help you understand the surface finish. Rq is like Ra but reacts more to peaks and valleys. Rt shows the total height from the highest peak to the lowest valley. Rsk tells if the surface has more peaks or more valleys. Rmr shows how much material is above a certain depth. This is important for parts that carry weight. Waviness and lay are surface texture parameters. They show bigger patterns and directions on the surface.
Tip: Always check which surface roughness parameters your industry needs. Using the right parameters helps you get good and useful results.
Impact on Product Performance
When you look at how products work, surface roughness plays a big role. It changes how parts touch, move, and last. If you want your products to work well, you need to control surface roughness and surface finish. These factors decide if a part will last long or wear out quickly.
In the automotive industry, surface roughness affects many parts. For example, engine parts, gears, and brake systems all need the right surface finish. If the surface is too rough, you get more friction. This can make engines less fuel efficient. It can also cause parts to wear out faster. When you polish engine piston rings, you can reduce wear by up to 30%. This means your car parts last longer and work better.
Surface roughness is also important in aerospace. Turbine blades and engine casings need a smooth surface finish. If you control surface roughness, you help planes use less fuel and lower maintenance costs. A rough surface can cause more drag and make engines work harder. When you add special coatings to bearing surfaces, you reduce friction and wear. This makes planes safer and more reliable.
You also see the impact of surface roughness in cnc machining. When you use cnc machining to make parts, you can control the surface finish very closely. This helps you meet strict standards in industries like aerospace and automotive. If you do not control surface roughness, you might see cracks or weak spots. These can start at rough areas and grow over time, causing parts to fail.
Surface roughness also changes how parts resist corrosion. Smoother surfaces have fewer places for rust to start. This is very important for cars and planes that face harsh weather. A good surface finish helps coatings stick better and protects the metal underneath.
Tip: Always check the surface roughness and surface finish of your parts. This helps you avoid problems like early wear, cracks, or rust. It also helps your products last longer and work better.
Surface Roughness Measurement Methods
There are many types of measurement techniques for surface roughness. You can use contact, non-contact, or comparative methods. Each method uses special tools and has its own strengths. Some methods work better for certain jobs. International standards like DIN EN ISO 21920 and ISO 25178 help people compare results and keep quality high.
Contact Methods
Contact methods use a tool that touches the surface. The most common tool is called a stylus profilometer.

Stylus Profilometers
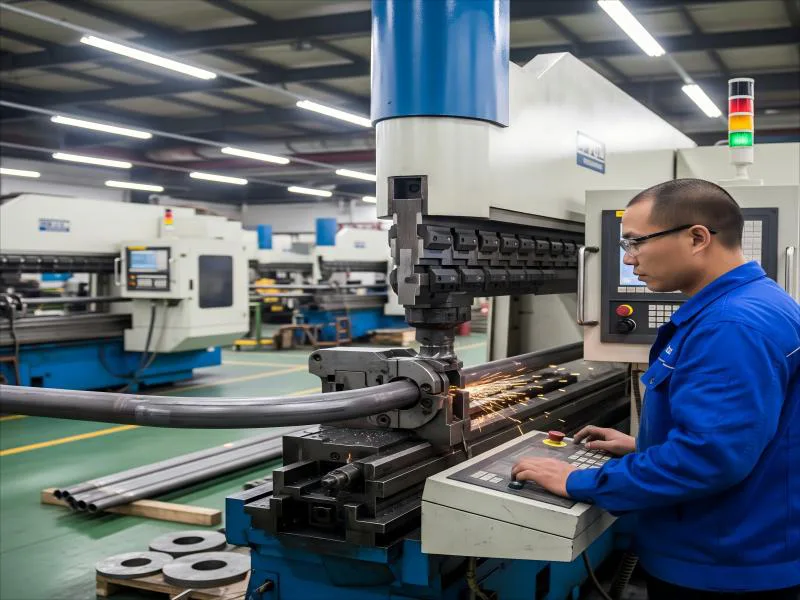
Stylus profilometry is the main contact method. It uses a diamond-tipped stylus that moves across the surface. The stylus records small bumps and dips as it goes. This method gives results you can trust. Many industries like cars, planes, electronics, and medical devices use it.
Principles
Stylus profilometry works by tracing the surface with a diamond stylus. The stylus moves at a steady speed. It records up and down movements as it goes. You get a 2D picture of the roughness. This method does not care if the surface is shiny or dirty.
Advantages
Stylus profilometry gives very accurate data. You can measure long distances and see wave patterns. The tool works on many surfaces, even oily or dirty ones. You do not need to worry about how shiny the surface is. Stylus profilometry costs less than many optical methods. You can use it in busy factories.
Limitations
Stylus profilometry only gives you 2D data. The size of the stylus tip limits what you can see. You cannot use it on soft or sticky surfaces. The stylus might scratch soft materials. You need to change the stylus tip after a while. Setting up the sample and stylus takes time and care.
Applications
You use stylus profilometry for gears, metal parts, bearings, and tools. It helps check surface roughness in cnc machining. You can measure shapes that optical tools cannot reach.
Tip: Stylus profilometry works best for hard surfaces and 2D profiles. If you need 3D data or want to measure soft things, try non-contact methods.
Non-Contact Methods

Non-contact methods use light or waves. They do not touch the surface. These include optical profilometry, interferometry, confocal microscopy, laser scanning, and atomic force microscopy.
Optical Interferometry
Optical profilometry uses light to measure roughness. You get 3D data very fast. This method works well for smooth surfaces. It can show very tiny details.
Confocal Microscopy
Confocal microscopy uses laser light to scan the surface. You get clear 3D images. This method works well for small, steep, or colored surfaces. It gives you colorful pictures and lots of detail.
Laser Scanning
Laser scanning uses a laser beam to map the surface. You get fast results and sharp images. Laser scanning works well for tricky shapes and steep angles. You do not need to get the sample ready.
Atomic Force Microscopy
Atomic force microscopy uses a tiny probe to scan the surface. You get very fine details. This method is good for samples with tall and deep features. It is slow and best for research or very smooth surfaces.
Advantages
Optical profilometry and other non-contact methods do not hurt the surface. You can measure soft, sticky, or fragile things. You get quick results and 3D data. These methods are good for checking quality in cars, medicine, and electronics.
Limitations
Non-contact methods can have trouble with rough or shiny surfaces. Some tools do not show height well at low zoom. You need a clear view of the surface. The equipment costs more and needs careful setup.
Applications
You use optical profilometry for metal parts, coatings, and electronics. Confocal microscopy helps with medical devices and biology samples. Laser scanning is used in cars and planes. Atomic force microscopy is used in research labs.

Comparative Methods
Comparative methods let you compare a surface to a known standard. You use reference standards or replica tape.
Reference Standards
Reference standards are plates or samples with known roughness. You look at your part under a microscope or by touch. You compare it to the standard. This method is simple and quick. It works best for rough or medium surfaces.
Replica Tape
Replica tape is a sticky foam tape. You press it onto the surface. The tape picks up the surface shape. You measure the tape with a micrometer. Replica tape works well on curved surfaces and in the field. It gives you a copy you can keep.
| Aspect | Benefits | Drawbacks |
|---|---|---|
| Ruggedness | Strong and good for field use | N/A |
| Cost | Not expensive to start | N/A |
| Repeatability | Gives similar results each time | N/A |
| Physical Replica | Keeps a copy of the surface for later | Needs manual or digital correction |
| Sampling Area | Checks a big area at once, bigger than stylus methods | Each tape grade only works for a certain range |
| Surface Types | Good for curved surfaces | Not as accurate at the ends of each tape grade |
| Additional Data | Can give extra info like peak count and 3D maps at low cost | Needs correction steps or digital help; manual ways take time |
| Accuracy | Matches other methods when used right | Less accurate at the edges of tape grades; foam can change shape |
| Standards | Accepted by ASTM, ISO, NACE, and AS standards | Data can be hard to understand without digital help |
| Instrumentation | New electronic tools can make results better and easier | Simple micrometers can make mistakes without digital help |
Applications
You use comparative methods in workshops and field checks. Replica tape is popular for pipelines, ship hulls, and big metal surfaces. Reference standards help train workers and check roughness in production.
Note: Comparative methods are quick and easy. They help you check surface roughness when you do not need very exact results.
In-Process Measurement
In-process measurement lets you check surface roughness during making. You do not have to stop the machine or take out the part. This helps you find problems early and keep things working well.

Real-Time Monitoring
Real-time monitoring means you watch surface roughness as it happens. New surface roughness checkers use smart technology. These tools give you quick feedback. They use live data, wireless signals, and automatic surface checks. Some tools have different ways to measure for different jobs. You get results faster and more accurate. These features help you make fast choices and keep control.
Some systems use sensors to watch cutting force, vibration, or sound. These sensors work while milling. If you mix these signals with artificial intelligence, you can guess surface roughness very well. Some methods can guess right up to 95% of the time. They keep mistakes as low as 6.7%. If you add tool wear data, you can guess even better.
A new optical method uses light to measure roughness on moving parts. It is called the dark:bright ratio. This way does not touch the part. It works well for grinding. It matches old roughness results and works at speeds up to 0.107 meters per second. The setup is easy and fits in busy factories.
Real-time monitoring helps you find problems fast. You can fix things before they cause waste or bad parts.
Applications
You can use in-process measurement in many jobs. It works in cars, planes, and metalworking. You can check engine parts, gears, and medical tools while making them. This way saves time and money. You do not have to stop work to check quality. You can use it for research too. Quick feedback helps you make better products.
Area and Profiling Techniques
Area and profiling techniques help you learn about surface roughness in different ways. You can pick the best way for your needs.
Area Measurement
Area measurement looks at a big part of the surface at once. You do not need to touch the surface. Tools like photogrammetry and smartphone LiDAR scan the area and make a 3D map. You get clear data and can see small bumps and dips over a wide space. This works well for big, rough, or hard-to-reach surfaces. You can use it outside or in the lab.
Profiling Measurement
Profiling measurement checks the surface along one line or path. You might use a pin profiler or a stylus. This way gives you a close look at the surface along that line. It is simple and good for small parts or checking one spot. Profiling can change the surface a little because the tool touches it.
Microscopy Techniques
Microscopy techniques use strong microscopes to look at the surface. You can see tiny details. Some microscopes use light, lasers, or atomic force. These ways help you study small features and get 3D pictures. You can use them for research or checking quality.
Here is a table to help you compare profiling and area-based techniques:
| Aspect | Profiling Techniques (e.g., Pin Profiler) | Area-based Techniques (e.g., SfM Photogrammetry, Smartphone LiDAR) |
|---|---|---|
| Measurement Approach | Contact, along a line | Non-contact, scans a large area |
| Surface Disturbance | May change the surface | No disturbance |
| Spatial Coverage | Limited to a line | Covers large, rough, or hard-to-reach areas |
| Resolution and Precision | Good for small spots | High, depends on scanner and settings |
| Data Collection Effort | Takes more time | Fast and less work |
| Sensitivity to Surface Types | Best for small or simple surfaces | Works well for many surfaces, even remote ones |
| Correlation and Accuracy | Matches well with area-based methods | High accuracy, especially with fine-resolution scanners |
| Practical Considerations | Hard to use on big or rough areas | Easy to use in many places, even with a smartphone |
| Limitations | Not good for showing roughness direction | High point cloud density can affect small-scale accuracy |
Tip: If you need to check a big or tricky surface, try area-based ways. For a quick check along a line, profiling is good.
These ways give you many choices to measure and understand surface roughness. You can pick the best one for your job and get the data you need to make smart choices.
How to Measure Surface Roughness

Measuring surface roughness shows if a material is smooth or rough. You need to follow steps to get good results. This section explains what to do, from getting your sample ready to looking at your data.
Preparation and Setup
First, get your sample and tools ready. Clean the surface to remove dust or oil. Wear gloves or hold the edges so you do not leave fingerprints. Keep your sample in a clean, dry place until you measure.
Industry rules say you should grind the sample flat and even. This stops it from moving or changing height when you measure. For most metals, use P400 grit for a good finish. If you want better results, polish to P1200 grit. This helps you avoid mistakes from uneven surfaces.
Secondly, Check your measurement tool before you start. Calibrate it with special standards each time. This makes sure your results are right for your industry, like aerospace or cars. Always check that your tool works well before you begin.
Next, choose the appropriate measurement parameters. Depending on your needs, choose to measure Ra, Rz, or Ry. We need to determine parameters based on the design drawings, product application, or industry standards, avoiding subjective judgment.
Tip: Good setup and cleaning help you get the best surface roughness measurements.
Measurement Process
Stylus Measurement (Most Common Method)
Stable placement
The workpiece and measuring instrument to be measured should be placed on a stable and shockproof platform to avoid external vibration affecting the accuracy of the measurement results.
Measurement Direction
The measurement direction should be perpendicular to the tool marks of the part when turned or milled to capture the true undulations of the peaks and valleys.
Actual operation
When you turn a cylindrical shaft, the tool will turn the surface along the axis (i.e., the axial direction) and the tool mark will be a spiral line around the circumference. At this time, you should move the stylus along the axial direction to measure, because this will intersect the spiral tool mark perpendicularly.
When milling a flat surface, the cutter leaves a series of parallel cuts on the workpiece surface. To measure the roughness, you should move the stylus perpendicular to the cuts. If the cuts are east-west, your measurement direction should be north-south.
Non-contact measurement (for special materials and high precision requirements)
Environmental Control
Optical measurements require a more stringent external environment because the effects of temperature, humidity, and vibration on the measurements must be considered. Therefore, it is recommended that the measurements be performed in a clean room with a constant temperature and humidity.
Focus adjustment
Accurate focus is the key to ensuring accurate measurement results.
Data Collection
When you finish measuring, you need to look at your data. Good data steps help you get results you can trust.
- Record All Measurement Details
Write down the tool type, settings, and sample info. Keep notes on where and how you measured. - Apply Proper Filtering and Processing
Use software to remove noise and unwanted features. Gaussian filtering is often used. Make sure you use the right tools for your data. - Calculate Surface Roughness Parameters
Use math to find Ra, Rz, and other values. Check the mean, standard deviation, and skewness. These numbers help you know the surface texture. - Check for Measurement Uncertainty
Look at how much your results change. If you see big changes, check your steps. Sometimes, scan area or data steps can cause mistakes. Picking the right scan size and fixing your data helps lower errors. - Store and Report Results Clearly
Save your data safely. Use tables or charts to show what you found. Clear records help you compare or share results.
Note: Good data steps are important in measuring surface roughness. They help you avoid mistakes and make smart choices from your results.
If you follow these steps, you can measure surface roughness well. Good setup, careful measuring, and smart data steps give you results you can trust.
Choosing a Measurement Method
Factors to Consider
When you choose a surface roughness measurement method, you need to think about several important points. Each factor helps you match the right tool to your job. Here are some things you should look at:
- Function and Use of the Component
Think about what the part does. If it moves or seals, the surface finish matters for performance. - Agreement on Parameters
Make sure you and the designer agree on which roughness values to check, like Ra or Rz. This keeps inspection fair and clear. - Application Needs
Pick a method that fits your job. Profiling techniques use high-resolution probes for small details. Area techniques measure bigger surfaces and give average results. Microscopy techniques help you see tiny features. - Types of Measurement Methods
You can use direct contact tools (like a stylus), non-contact tools (using light or sound), comparison methods, or in-process methods that work while making the part. - Design Requirements
Match your measurement method to the design. This helps you balance cost, function, and how easy it is to make the part. - Reference Charts and Guidelines
Use charts to see which manufacturing process gives the surface finish you need. This helps you pick the best method.
Tip: Always check the job’s needs before you choose a measurement method. The right choice helps you get results that matter.
Cost and Practicality
You need to think about cost and how easy it is to use each method. Some tools cost more but give better results. Others are simple and quick. Here is a table to help you compare:
| Method | Cost | Practicality | Best Use Case |
|---|---|---|---|
| Stylus Profilometer | Medium | Easy to use | Hard, flat surfaces |
| Optical Profilometer | High | Needs training | Soft, delicate, or shiny parts |
| Replica Tape | Low | Very easy | Large, curved surfaces |
| In-Process Sensors | Medium-High | Fast, real-time | Production lines |
If you work in a busy shop, you may want a method that is quick and easy. For research or high-tech jobs, you might need a tool that gives very detailed data. Always balance cost with what you need for your job.
Note: Simple methods save time and money. Advanced tools help you see more details.
Industry Standards
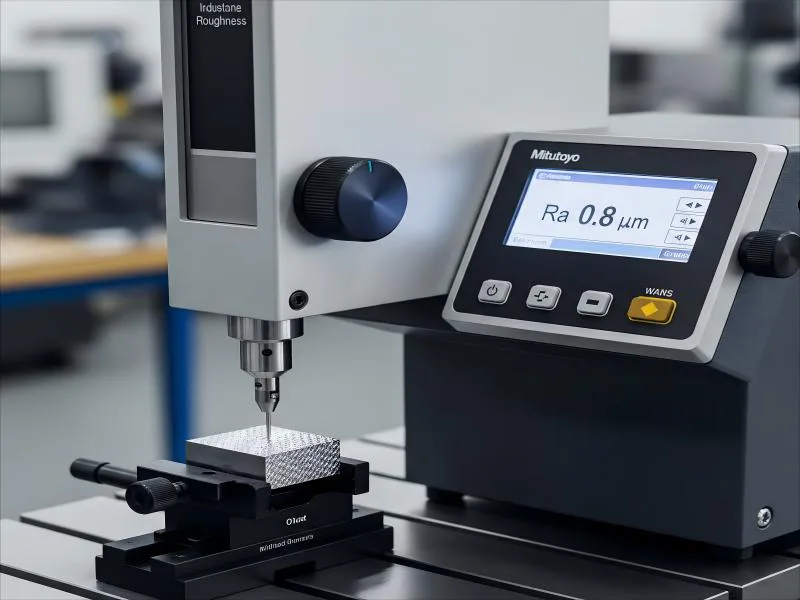
Industry standards help you measure surface roughness the right way. The ISO standard uses a conical stylus with a 60° or 90° angle and a tip radius of 2μm. This standard is common in many industries. You need precise tools to follow these rules. The ISO standard lists important parameters like Ra, Rv, Rp, Rt, and Rz. These numbers help you describe the surface and predict how the part will work.
You should always check which standards your industry uses. Following these rules helps you get results that others trust. It also makes sure your parts meet quality checks.
Tip: Use the right standards for your industry. This helps you make parts that work well and pass inspection.
Interpreting Results

Reading Values
When you measure surface roughness, you get numbers that describe the surface. These numbers tell you if a surface is smooth or rough. The most common value you see is Ra. Ra shows the average height of bumps and dips. You may also see Rz, which looks at the difference between the highest peaks and lowest valleys. Each value gives you a different view of the surface.
To read these values, look at the units. Most tools show results in micrometers (µm) or microinches. A lower number means a smoother surface. A higher number means a rougher surface. Always check the scale on your tool. Make sure you compare values using the same units.
You might see a chart or graph with your results. The graph shows the surface profile. Peaks go above the line, and valleys go below. If the line looks smooth, the surface is smooth. If the line jumps up and down, the surface is rough.
Tip: Always check the measurement direction. Some surfaces look different if you measure across or along the grain.
Selecting Parameters
Choosing the right parameter is important. Not every job needs the same value. Ra is simple and works for many uses. Sometimes, you need more detail. Rz helps you find deep scratches or tall peaks. Other parameters, like Rq or Rt, give you extra information.
You should think about what your part does. If you need a tight seal, you may want to look at Rz. If you care about how a coating sticks, Ra might be enough. Some jobs need special parameters. For example, if you study how oil moves on a surface, you might use volume parameters.
Many people face challenges when they pick parameters. Here are some common problems and ways to solve them:
- Picking the right tool and method can be hard. Each tool has strengths and limits.
- Understanding what each parameter means takes practice. Ra does not tell the whole story.
- Complex surfaces have many features, like bumps and grooves in different shapes and directions.
You can solve these problems by:
- Choosing your tool based on what you need, like speed, detail, and area size.
- Using advanced tools, such as laser scanning microscopes, for 3D images and high accuracy.
- Learning about different parameters and picking the ones that fit your job.
- Calibrating your tools with trusted standards.
- Using software that groups parameters by use, making it easier to understand your results.
Note: The right parameter helps you make better choices and improves your product’s quality.
Standards and Symbols
Standards help everyone speak the same language about surface roughness. You will see symbols and codes on engineering drawings. These symbols tell you which parameter to use and what value is needed.
The most common standard is ISO. It uses a symbol that looks like a check mark with a number next to it. The number shows the required roughness value, like Ra 0.8 µm. Sometimes, you see extra letters or numbers. These tell you the direction to measure or the method to use.
You should always follow the standards for your industry. Standards make sure your parts fit and work as planned. They also help you pass inspections and meet customer needs.
Tip: Learn the symbols and codes for your field. This helps you read drawings and share results with others.
Reporting
Reporting surface roughness results is very important for quality control. You must make your reports clear and easy to read. Good reports help your team know if a part meets the rules. They also help you watch quality over time and find problems early.
When you report surface roughness, use these best practices:
- Use Clear Parameters
Always write the exact parameter you checked, like Ra or Rz. Ra is used most and shows the average height of bumps and dips. This makes it simple to compare results. - Follow Industry Standards
Use standards such as ASME B46.1 to measure surface texture. These rules help everyone use the same way and stop confusion. - Show Tolerances and Units
Write the needed value and allowed range (tolerance) in your report. Use the right units, like micrometers (µm) or microinches. This helps stop mistakes when making parts. - Link to Customer Needs
Connect your surface finish needs to what your customer wants. CTQ reporting turns customer needs into clear numbers, like a certain Ra value. This keeps your work focused on what matters most. - Add Results to Drawings
Put surface finish symbols and values on your CAD drawings. Use GD&T to show where and how to measure. This helps lower errors and rework. - Keep Records for Traceability
Save your reports, logs, and measurement data. Good records help you prove quality and find problems if something goes wrong.
Here is a simple table you can use in your reports:
| Parameter | Value (µm) | Tolerance | Method Used | Standard | Location on Part |
|---|---|---|---|---|---|
| Ra | 0.8 | ±0.1 | Stylus Profilometer | ASME B46.1 | Top Surface |
Tip: Consistent reporting helps you control your process and improve. It also helps you meet customer and industry needs.
If you follow these steps, your surface roughness reports will be clear and helpful. You help your team, your customers, and your company reach better quality every time.
Accuracy and Challenges
Surface Preparation
How you get a part ready changes how accurate your measurements are. The way you drill, grind, or polish the part can change what you see. If you use center hole drilling with a steady feed, the surface gets smoother. This helps you get results you can trust. If you stop and start while cutting, or do not keep the feed steady, the surface changes more. This makes your measurements less correct.
After you ream a hole, the surface roughness becomes more even. It does not matter as much how you prepared it before. The reamer smooths out bumps and makes the results steadier. But, what you do before reaming still matters. Using a non-continuous feed often gives the smoothest surface. It also gives the least change in results. This means your measurements will be more reliable.
Different tools react to surface preparation in their own ways. A 2D stylus only checks one line and might miss details. A 3D laser scanner can see more of the surface and catch small changes. You need to think about both how you prepare the part and which tool you use. Both things affect the surface finish and how correct your results are.
Calibration
Calibration keeps your measurements right and trustworthy. Always check your tool before you use it. Use standards from trusted labs. Pick a standard that matches what you want to measure. This helps you know if your tool works well.
Follow these steps for good calibration:
- Check your tool with a standard that matches your range.
- Make sure the standard is certified and can be traced.
- Look at the stylus under a microscope to see if it is worn.
- If you find a problem, fix it before you measure.
- Adjust your tool if the readings do not match the standard.
- Use zero adjustments or offsets to fix any bias.
- Always follow the instructions from the tool maker.
If you keep your tool calibrated, your results will be right every time.
Operator Skill
How good you are at using the tool changes your results. If you have more practice, you make fewer mistakes. When different people measure the same part, the results can change. This is called reproducibility error. If this error is high, the operator may need more training.
Some tools, like old microscopes, need you to look and judge by eye. This can cause mistakes. Newer tools, like automated 3D optical profilometers, make things easier. You just put the part in and press a button. The machine does the rest, so even new users can get good results.
A good way to check skill is to have many people measure the same part. If everyone gets close results, your process is good. If not, you may need more training or better instructions.
Tip: Practice and training help you get better at measuring surface roughness. Automated tools can also help reduce mistakes.
Environmental Factors
When you measure surface roughness, things around you can change your results. Many things in your workspace can make your measurements less correct. If you want the best results, you should know what these things are and how to control them.
Here is a table that lists the main environmental factors, how they affect your measurements, and what you can do to control them:
| Environmental Factor | Impact on Measurement | Control Method |
|---|---|---|
| Vibrations | Can shake the tool and change readings | Use vibration-free setups and sensors |
| Mechanical Stress | Can bend tools or parts, causing errors | Monitor and reduce stress on tools and samples |
| Temperature Variations | Can make tools and parts expand or shrink | Use temperature sensors and keep room stable |
| Acoustic Noise | Can confuse sensors that listen for tool wear | Use noise-resistant sensor systems |
| Stylus Contact Pressure | Can change readings if too high or low | Control pressure during measurement |
| Surface Hardness | Can affect how the stylus moves on the surface | Check material properties before measuring |
Vibrations
Vibrations can come from machines, people walking, or cars outside. These shakes can make your stylus or sensor move. If your tool moves, your numbers will not be right. You should use a table that does not shake or put your tool in a quiet place. Some tools have sensors that tell you if there is too much shaking.
Mechanical Stress
If you push too hard on your tool or sample, you can bend them. This bending changes how your tool touches the surface. You might get numbers that are too high or too low. Always check that your tool and sample are flat and do not move. Try to keep the pressure the same every time you measure.
Temperature Variations
When the room gets hot or cold, metal tools and samples can get bigger or smaller. Even small changes in size can change your results. You should keep your room at the same temperature all day. Some tools use sensors to watch the temperature. These sensors help you know if the room is too hot or cold for good measurements.
Acoustic Noise
Loud sounds can confuse sensors that listen for tool wear. If you use these sensors, keep your workspace quiet. Some new sensors can ignore noise, but it is still best to keep the sound low in your room.
Stylus Contact Pressure
If you use a stylus, the pressure is important. Too much pressure can scratch the surface. Too little pressure can make the stylus skip. Always set the pressure the way the tool maker says.
Surface Hardness
Hard or soft surfaces can change how the stylus moves. Hard surfaces might wear down the stylus. Soft surfaces might get scratched. Always check what your part is made of before you start.
Tip: You can get better surface roughness measurements if you control your environment. Keep your workspace clean, quiet, and at a steady temperature. Use the right pressure and check your tools often. Small changes in your environment can make a big difference in your results.
Knowing about surface roughness helps you make better products. It also helps your products last longer. You need to pick the best way to measure and the right surface finish parameters for your job.
- Use special tools like profilometry and optical interferometry to get good surface finish data.
- Try using automation and AI to help you check surfaces quickly and control the process.
- Always look at more than one surface roughness parameter to get the full picture.
- Good surface finish steps help you waste less and use less energy.
Keep learning about new ways to check surface finish and study data. Find out how surface roughness changes how things work in cars, planes, and electronics.
FAQ
Surface roughness shows how smooth or bumpy a surface is. You measure it to see if a part will work well. You use numbers like Ra or Rz to describe it.
You measure surface roughness to check quality. Smooth surfaces help parts last longer and work better. Rough surfaces can cause problems like leaks or wear.
You pick a tool based on your part. Use a stylus profilometer for hard, flat surfaces. Try optical methods for soft or shiny parts. Replica tape works well for large or curved surfaces.
Tip: Always match your tool to your job for the best results.
Ra shows the average height of bumps and dips. Rz looks at the difference between the tallest peaks and deepest valleys. Both help you understand how rough a surface is.
Clean the surface to remove dust and oil. Hold the part by the edges. Make sure the part is flat and dry. Good preparation helps you get accurate results.
Yes, you can use in-process sensors. These tools check roughness while you make the part. You get fast feedback and can fix problems right away.
Note: Real-time checks help you keep quality high.
Vibrations, temperature changes, and tool pressure can change your results. You should control your workspace and check your tools often.