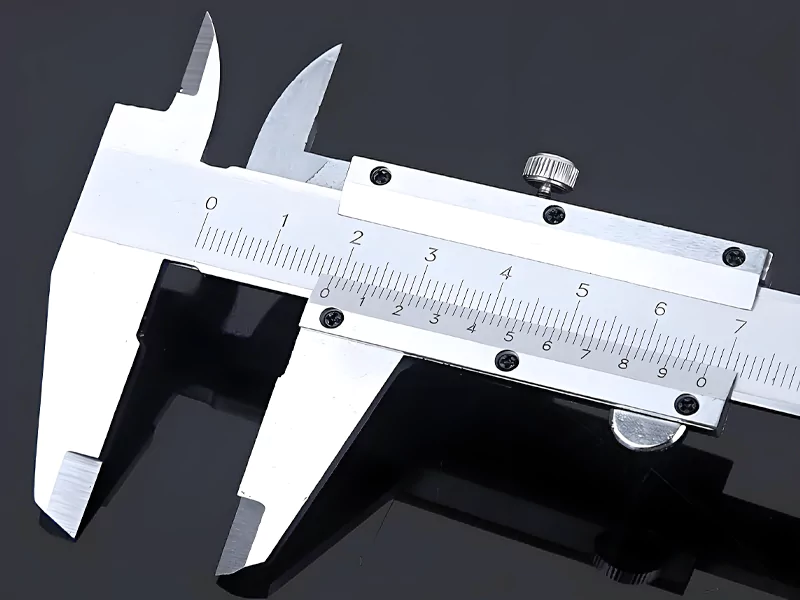
You can learn how to read vernier caliper reading by following simple steps. First, make sure to set the vernier caliper to zero for an accurate start. Next, observe the main scale located before the jaws. Then, check the vernier scale and identify the line that aligns perfectly. Add the readings from both scales to get your final measurement. Always verify the unit of measurement and handle the tool gently. This method applies not only to the vernier caliper but also to the Dial Caliper and Digital Caliper. Regular practice will help you improve and achieve precise results.
Tip: Be careful with each step you take. Stay focused and keep your hands steady for an accurate reading.
Key Takeaways
- Always set your vernier caliper to zero before you measure. This helps you get the right reading.
- First, read the main scale. Then, find the matching line on the vernier scale. Add both values to get your final measurement.
- Check for zero error often. Use the correction formula if you need to fix your readings.
- Handle your caliper with care. Keep it clean and store it safely. This stops damage and keeps it working right.
- Use the correct jaws or depth rod for each type of measurement. This helps you get exact results.
- Keep your eye level with the scale when you read measurements. This helps you avoid parallax error.
- Calibrate your caliper at least once a year. Do it more often if you use it a lot or after repairs.
- Practice reading the scales often. This will help you get better and get exact measurements.
Table of Contents
Type of caliper
When you measure things, you can use different caliper tools. Each caliper has its own special features and uses. Knowing these differences helps you pick the best tool for your job.
Vernier Caliper
You will see the vernier caliper in many classrooms and shops. This tool has two scales: the main scale and the vernier scale. You move the jaws to fit the object. Then you read both scales to find the measurement. The vernier caliper does not need batteries to work. It is strong and can handle rough use. Many people use it because it is cheap and gives good results. You need sharp eyes and steady hands to use it well. A 6-inch vernier caliper is usually accurate to about ±0.001 inch. You can use it to measure outside, inside, and depth. Students and workers like this tool to learn how to measure.

- Main features of the vernier caliper:
- No batteries needed
- Tough and can take bumps
- Gives exact readings with practice
- Low cost and easy to find
Dial Caliper
The dial caliper makes reading measurements easier. It uses a dial instead of a vernier scale. You move the jaws, and the dial shows the number. The dial caliper is very exact and easy to use. You can set the dial to zero for comparing sizes. But it can get damaged by dirt or drops. You should keep it clean and handle it gently. Like the vernier caliper, it can measure inside, outside, and depth. Many machinists like the dial caliper because it is quick and clear. This tool is good if you want easy and accurate measuring.

- Advantages of the dial caliper:
- Dial is simple to read
- Can set to zero for checks
- Very exact and correct
Digital Caliper
The digital caliper uses technology to help you measure. It shows the result on a screen, so it is fast and easy to read. You can switch between inches and millimeters with a button. The digital caliper helps you avoid mistakes and gives instant numbers. You can set it to zero at any spot for comparing. This tool needs batteries and is more fragile than manual types. Do not drop it or get it wet. Studies say the digital caliper is the most exact and gives the same results every time. In tests, the digital caliper’s readings only change by 0.0001 inches. This makes it the best choice for very careful work.

| Caliper Type | Resolution | Mean Intraoperator SD (mm) | Maximum Error (µm) | Measurement Bias | Repeatability |
|---|---|---|---|---|---|
| Digital Vernier Caliper | 0.01 mm | 0.127 ± 0.023 | ~70 | Minimal (2 ± 13 µm) | High, error independent |
| Manual Caliper (Castroviejo) | 1 mm | 0.094 ± 0.056 | Up to 500 | Overestimates (~300 µm) | Lower, more variable |

Note: The digital caliper is the most exact and gives the same results, but you must be careful and keep extra batteries ready.
You will see the vernier caliper, dial caliper, and digital caliper in many jobs, like making things, engineering, and airplanes. Each type has a special use. Pick the caliper that fits your skills and the accuracy you want.
Vernier Caliper Parts
Main Scale
You find the main scale on the body of the caliper. It has clear markings, usually in millimeters or inches. This scale gives you the first part of your measurement. The main scale is strong and does not move, so you can trust it for a steady reading. You start every measurement by looking at this scale. It sets the base for the final result, which the vernier scale will make even more exact.
Tip: Always check the main scale first before using the vernier scale for more detail.
Vernier Scale
The vernier scale slides along the main scale. It helps you read very small differences that the main scale cannot show. Most metric calipers have a vernier scale that divides each millimeter into ten parts, so you can measure down to 0.1 mm. Some imperial calipers let you read as fine as 1/128 inch or even 1/1000 inch. This extra detail makes your measurements much more precise.
Jaws and Depth Rod
You use the jaws and depth rod for different types of measurements. The lower jaws measure the outside of objects, like the width of a block or the diameter of a rod. The upper jaws measure the inside of things, such as the opening of a pipe. The depth rod slides out from the end of the caliper and lets you measure how deep a hole or slot is.
| Part | Function | Example Use |
|---|---|---|
| Lower Jaws | Measure outside dimensions | Checking the thickness of a board |
| Upper Jaws | Measure inside dimensions | Measuring the width of a groove |
| Depth Rod | Measure depth | Finding the depth of a drilled hole |
You can use calipers for many tasks because of these different parts. Each part works together to help you get a clear and accurate measurement.
Lock and Thumb Screw
- Lock Screw: The lock screw is used to secure the movable jaw and the vernier scale in place once you have the caliper positioned correctly on the object. Tightening it prevents any accidental movement, ensuring your reading is accurate and stable before you take it.
- Thumb Screw: Located on the movable jaw, the thumb screw allows for fine adjustments. You can use it to slowly and precisely move the jaws into the correct position on the object, which is especially useful when you need to take a very exact measurement.

Calibration and Zero Error
Calibration Steps
You need to check your vernier caliper before measuring. This makes sure your measurements are correct. Follow these steps to set up your caliper the right way:
- Wipe the caliper and calibration tools clean. Use a soft cloth and isopropanol to get rid of dust.
- Look at the caliper for any damage. Make sure the jaws are flat. The vernier scale should move smoothly.
- Put the caliper and tools in a room with steady temperature, about 20°C. The humidity should be between 30% and 40%. Leave them there for two hours.
- Write down the caliper’s type, model, and serial number. Also note the room’s temperature and humidity.
- Close the jaws gently. Check if the zero on the main scale matches the zero on the vernier scale. If they do not match, write down the zero error.
- Use gauge blocks or pin gauges to check outside measurements. Take three to five readings at different spots on the jaws.
- Use ring gauges for inside measurements. Repeat the readings.
- For depth measurements, use a surface plate and gauge blocks. Take several readings for each kind.
- Write all your readings on a worksheet.
- Compare your results with the biggest error allowed by standards like ISO 13385. If your caliper does not pass, fix or recalibrate it.
Tip: Check your vernier caliper before you use it for the first time, after fixing it, and at least once a year. If you use it a lot, check every six months.
Zero Error Types
Zero error happens when the zero on the vernier scale does not line up with the zero on the main scale when the jaws are closed. This mistake changes every measurement you make. Always check for zero error before you use the caliper.
Positive Zero Error
A positive zero error is when the zero on the vernier scale is to the right of the main scale zero. The caliper shows a number even when it should show zero. For example, if the vernier scale is 0.02 mm to the right, your measurements will be too high by 0.02 mm.
Negative Zero Error
A negative zero error is when the zero on the vernier scale is to the left of the main scale zero. The caliper shows a negative number when the jaws are closed. For example, if the vernier scale is 0.03 mm to the left, your measurements will be too low by 0.03 mm.
| Zero Error Type | Vernier Scale Position | Example Error | Effect on Reading |
|---|---|---|---|
| Positive Zero Error | Right of main scale zero | +0.02 mm | Reading too high |
| Negative Zero Error | Left of main scale zero | -0.03 mm | Reading too low |
Correction Formula
You need to fix every measurement if you find a zero error. Use this formula:
Correct Measurement = Observed Measurement - Zero Error
- If you have a positive zero error, take away the error from your measurement.
- If you have a negative zero error, subtract the negative number. This is the same as adding the error.
Example: If your measurement is 15.50 mm and you have a positive zero error of 0.02 mm, your correct measurement is 15.48 mm. If you have a negative zero error of -0.03 mm, your correct measurement is 15.53 mm.
Always check for zero error before you measure anything. This habit helps you get the best results with your vernier caliper.
How to Read Vernier Caliper Reading
Learning to read vernier caliper reading is important. It helps you measure things very exactly. You can get good at this by following easy steps. This part will show you how to read the main scale and the vernier scale. You will also learn how to add both readings for a correct answer.
Main Scale Reading
First, look at the main scale on the vernier caliper. This scale gives you the whole number for your measurement. Here are the steps:
- Close the jaws around what you want to measure.
- Look at the main scale on the caliper’s body.
- Find the last whole mark before the zero on the vernier scale.
- Write down this number. This is your main scale reading.
Tip: Keep your eyes level with the scale. This stops mistakes called parallax error. You will get a better measurement this way.
Vernier Scale Reading
The vernier scale gives you the small part of your measurement. This scale makes your caliper more exact. To read it, do these steps:
- Look at the vernier scale that slides on the main scale.
- Find the vernier mark that matches up with any main scale mark.
- Write down the number of this matching vernier mark.
- Multiply this number by the least count of your caliper. The least count is the smallest amount your caliper can measure.
The table below shows why the vernier scale is important for exact measuring:
| Aspect | Explanation |
|---|---|
| Determination of Vernier Scale Reading | Line up the vernier scale with the main scale. Find the vernier mark that matches a main scale mark. This shows the small part between main scale marks. |
| Least Count (Vernier Constant) | The least count is the smallest step your caliper can measure. It is found by subtracting the length of a vernier scale mark from a main scale mark. This shows how exact the tool is. |
| Principle of Operation | The vernier scale works by having marks spaced a little differently than the main scale. This lets you see small differences by matching up the marks. |
| Significance in Precision Measurement | Vernier scales help you measure very small amounts. They use your eyes’ skill to see tiny alignments. This lets you measure things very closely in calipers and other tools. |
| Practical Applications | Vernier scales are used in calipers, micrometers, and other science tools. They help measure lengths and angles very exactly. |
You can see the vernier scale is very important. It helps you use the vernier caliper to measure length very closely.
Note: Most vernier calipers have a least count of 0.02 mm. This tells you the smallest difference you can measure. A smaller least count means you can measure more exactly.
Combining Readings
After you have both readings, you need to add them together. Here is how you do it:
- Write down the main scale reading you found before the zero on the vernier scale.
- Find the vernier scale reading by seeing which vernier mark matches a main scale mark.
- Multiply the matching vernier mark by the least count to get the small value.
- Add the main scale reading and the vernier scale reading.
For example, if your main scale reading is 2.6 inches and your vernier scale reading is 0.014 inches, your final answer is 2.614 inches. If your main scale reading is 0.85 cm and your vernier scale reading is 0.012 cm, your total is 0.862 cm.
Remember: Always check what unit your caliper uses before you start. Some calipers show millimeters, others show inches.
Knowing how to read vernier caliper reading helps you measure things very exactly. Practice these steps often to get better and feel sure when using the vernier caliper.
Measurement Techniques
External Measurement
A vernier caliper helps you measure the outside of things, like width or diameter. To get a good measurement, do these steps:
- Wipe the vernier caliper clean and check if it works right. Dirt or damage can mess up your reading.
- Put the object between the outer jaws. Do not press too hard. Too much force can change the length.
- Hold the caliper still. Make sure the jaws line up with the object.
- Look at the scale straight on. This stops mistakes and gives a true reading.
- Know where zero is on your caliper. Always check for zero error before you start.
- Check the caliper often with a known size. Fix any mistakes if you find them.
- Clean the jaws after using. Keep the caliper in its case to stop dust and damage.
- Look for damage or wear before you use the caliper.

Tip: Be gentle with the caliper. Do not twist or press the jaws too much. This helps you get a good reading every time.
Internal Measurement
You use the smaller jaws to measure inside things, like the size of a hole. Put these jaws into the space and open them until they touch both sides. The vernier caliper gives a close reading, usually to 0.001 inches or 0.02 millimeters.
Vernier calipers have two jaw sets. The big jaws measure outside. The small jaws measure inside. You read the main scale and the vernier scale. Inside measurements are sometimes less exact than outside ones. How you use the tool and how well it is checked matters a lot. Mistakes can happen if you use it wrong, if it is worn out, or if it is not checked. If you need very exact numbers, use a better tool. You might need to fix the caliper or get a new one if it is not good enough.

Note: Always look at the caliper’s calibration paper. If you see damage or wear, fix or replace the caliper to keep it working right.
Depth Measurement
The depth rod on the vernier caliper helps you measure how deep a hole is. Do these steps for a good reading:
- Put the flat end of the caliper on top of the hole.
- Push the depth rod down until it touches the bottom.
- Keep the caliper straight with the hole. This stops wrong readings.
- Read the main scale just before the zero on the vernier scale.
- Find where the vernier scale lines up and add this to the main scale.
For example, if the main scale says 21 mm and the vernier scale lines up at 0.40 mm, your total is 21.40 mm.

Callout: Always check that the caliper is straight with the surface. This easy step helps you avoid mistakes in your reading.
| Measurement Type | Jaws/Feature Used | Typical Accuracy | Common Errors |
|---|---|---|---|
| External | Outer jaws | ±0.001 in | Parallax, misalignment |
| Internal | Inner jaws | ±0.001 in | Wear, calibration |
| Depth | Depth rod | ±0.001 in | Not parallel, dirt |
You can use a vernier caliper to measure length, diameter, and depth. Practice these ways to get better and always get good readings.
Common Reading Mistakes
Misalignment
Misalignment happens a lot when using a vernier caliper. If the jaws or the vernier scale are not lined up right, you will get a wrong measurement. Bent jaws or a broken vernier scale can make the jaws sit in the wrong spot. This causes mistakes in your reading and makes your results not trustworthy.
You might cause misalignment if you drop the caliper or put heavy things on it. Always handle the caliper gently and keep it in a safe place. Clean the jaws and the vernier scale after each use to stop dirt from causing misalignment. Check the caliper often to find and fix problems with the jaws or the vernier scale.
Here are some easy ways to avoid misalignment and keep your readings correct:
- Be careful with the caliper so you do not break the jaws or the vernier scale.
- Clean the caliper every time you use it to get rid of dirt.
- Put the caliper in a dry, flat spot so it does not bend.
- Check the caliper often to make sure the jaws and the vernier scale are lined up.
Tip: Always look at the jaws and the vernier scale before you start measuring. This quick check helps you avoid mistakes and keeps your measurements right.
Parallax Error
Parallax error happens if your eye is not straight above the vernier scale. If you look from the side, the marks will look like they moved, and your reading will be wrong. Parallax error makes your reading less exact, especially when you need to match the lines on the vernier scale with the main scale.
To stop parallax error, you should:
- Make sure your eye is straight above the vernier scale.
- Close one eye and look down at the vernier scale for the best reading.
- Use digital calipers if you can, because they show the number on a screen and help stop parallax error.
- Take a few readings from different spots and use the average if you are not sure about the lines.
- Check your caliper often to make sure the scales are in good shape.
Note: Parallax error can happen with any tool that uses a vernier scale. Train yourself to look straight at the vernier scale to get the best reading.
| Error Type | Cause | How to Avoid |
|---|---|---|
| Parallax Error | Eye not straight above vernier scale | Line up eye, use digital caliper, check caliper |
Ignoring Zero Error
Ignoring zero error is a big mistake that can mess up your reading. Zero error happens when the zero on the vernier scale does not match the zero on the main scale when the jaws are closed. If you do not fix this error, every reading you take will be wrong by the same amount. This can make your results not trustworthy.
Zero error can make your reading too high or too low, depending on where the vernier scale is. Always check for zero error before you start measuring. If you find zero error, use the correction formula to fix your reading:
Correct Measurement = Observed Reading - Zero Error
You can use calibration to fix zero error in your reading. Collecting extra data and checking with calibration helps you make your reading better. Sensitivity analysis is another way to see how zero error changes your reading.
Callout: Always check for zero error before you start measuring. Fixing zero error keeps your vernier scale reading correct and reliable.
Ignoring zero error can make your reading wrong and your results not useful. Use calibration, correction formulas, and extra data to keep your reading right. This habit helps you get the best results from your vernier scale.
Handling Tips
Taking care of your vernier caliper helps you avoid mistakes. It also keeps your measurements right. You should always be careful with the tool. Follow these easy tips every time you use it to get the best results:
- Hold the caliper gently. Use a soft grip so you do not bend the jaws. Do not press hard or you might damage the scale. Too much force can make your measurement wrong.
- Keep the caliper clean. Wipe the jaws and scale with a soft cloth before and after you use it. Dust and oil can make your reading wrong.
- Store the caliper safely. Put it in its case when you finish using it. This stops scratches and keeps the tool straight.
- Check for damage. Look at the jaws and scale for any wear or bending. If you see a problem, fix or replace the caliper.
- Avoid dropping the tool. If you drop the caliper, the jaws can move out of place. The scale can also get ruined. Always put it down gently on a flat table.
- Use the right part for each measurement. Use the outer jaws for outside sizes. Use the inner jaws for inside sizes. Use the depth rod for measuring how deep something is.
- Calibrate regularly. Test the caliper with a known size before you measure important things. This helps you know your tool is correct.
- Keep your hands dry. Wet hands can make the caliper slip. Dry your hands before you start.
- Read the scale at eye level. Put your eyes right above the scale. This helps you avoid parallax error.

Tip: Always check your measurement twice before you write it down. This easy step helps you find mistakes early.
You can look at this table to remember the most important tips:
| Handling Tip | Why It Matters | How It Helps Accuracy |
|---|---|---|
| Gentle grip | Stops bending and damage | Keeps jaws lined up |
| Clean before/after use | Gets rid of dust and oil | Stops wrong readings |
| Safe storage | Stops scratches and bending | Keeps tool working right |
| Inspect for damage | Finds problems early | Makes results better |
| Use correct jaws/rod | Uses the right part | Makes measuring better |
| Calibrate regularly | Checks for zero error | Makes sure it is right |
You can also use this simple checklist to help you remember:
- Hold gently
- Clean before and after use
- Store in case
- Inspect for damage
- Use correct jaws/rod
- Calibrate before use
- Keep hands dry
- Read at eye level
Callout: Careful use of your vernier caliper keeps your tool safe and your results good. You build strong habits by following these tips every time you measure.
When you handle your vernier caliper with care, you get better at measuring. Practice these tips often to feel sure and get exact results in your work.
Practice and Examples
Sample Readings
You can master vernier caliper practice by working through real examples. Follow these steps to get an accurate reading every time:
- Start by closing the jaws and checking for zero error. If you see a mismatch, record the error.
- Place the object between the jaws and look at the main scale. Find the last whole number before the zero on the vernier scale.
- Read the tenths and hundredths from the main scale. For example, you might see 1 inch and 0.3 inch.
- Look at the vernier scale. Find the line that matches up with a line on the main scale. This gives you the extra hundredths or thousandths.
- Add all the parts together. For example, 1 + 0.3 + 0.050 + 0.006 = 1.356 inches.
Tip: Always check the alignment of the vernier scale with the main scale for the most precise reading.
Here is a table showing another sample reading:
| Step | Description | Reading/Value | Explanation |
|---|---|---|---|
| 1 | Locate 0 mark of vernier scale on main scale | Between 1.1 and 1.2 cm | The main scale reading before the vernier zero is 1.1 cm |
| 2 | Find vernier scale mark aligning with main scale | 6.5 (vernier scale) | This corresponds to 0.065 cm (6.5 hundredths of cm) |
| 3 | Add main scale and vernier scale readings | 1.1 cm + 0.065 cm = 1.165 cm | Total measurement combining main and vernier scales for precise reading |
You can see that each reading combines the main scale and vernier scale values. This method helps you get the most accurate result during vernier caliper practice.
Practice Problems
You can improve your reading skills by solving practice problems. Try these exercises to build confidence with the vernier scale:
- Read the main scale and vernier scale for three different objects. Write down each reading.
- Measure the external diameter of a coin using the vernier caliper. Record the main scale and vernier scale readings.
- Use the depth rod to measure the depth of a small box. Write the main scale reading and the vernier scale reading.
- Check for zero error before each measurement. If you find a positive or negative error, adjust your reading using the correction formula.
- Repeat each measurement three times. Compare your readings to see if you get the same result.
Note: Regular vernier caliper practice helps you avoid mistakes and improves your reading accuracy.
Solutions
You can check your answers and learn from each reading. Here are solutions for the practice problems:
- You measure a coin and see the main scale at 2.4 cm. The vernier scale aligns at 0.06 cm. Your total reading is 2.46 cm.
- You measure the depth of a box. The main scale shows 1.8 cm. The vernier scale matches at 0.04 cm. Your reading is 1.84 cm.
- You find a zero error of +0.02 cm. Your observed reading is 3.12 cm. Use the correction formula: 3.12 cm – 0.02 cm = 3.10 cm.
- You repeat the measurement three times. Your readings are 2.46 cm, 2.46 cm, and 2.46 cm. This shows you have consistent reading skills.
Callout: Always combine the main scale and vernier scale readings. Adjust for zero error to get the correct measurement during vernier caliper practice.
You can use these examples and problems to strengthen your reading skills. Practice with different objects and keep checking your vernier scale alignment. This approach helps you master vernier caliper practice and ensures you get reliable readings every time.
Summary
Key Steps Recap
You can get good results with your vernier caliper if you follow simple steps. The main scale and the vernier scale work together to show the measurement. The main scale gives you the big number and the first decimal. The vernier scale adds the second decimal, so you need to look at both scales closely to avoid mistakes.
Start by cleaning your caliper. Dirt or oil can mess up your reading. Always close the jaws and check the zero before you start. The zero on the vernier scale should match the zero on the main scale. If they do not match, write down the zero error and fix your reading. Use special gauge blocks to check if your caliper is right for different sizes. Test all ways to measure, like outside, inside, and depth. Write down when you calibrate and put a label on your tool so you can track it.
Follow these steps every time you measure:
- Clean the caliper and look for dirt.
- Close the jaws and check the zero on the vernier scale.
- Put the object between the jaws and make sure the caliper is straight.
- Read the main scale, then find the matching line on the vernier scale for your answer.
- Do the reading again to make sure it is right.
- After you finish, check the zero again to see if it moved.
Tip: Doing things the same way each time helps you avoid mistakes.
Final Tips
Experts say you should build good habits to keep your vernier scale readings correct. Always set the caliper to zero before you measure. Clean the jaws before you set zero so dirt does not cause mistakes. Take more than one reading, especially for inside measurements, to find the real value. Do not use too much force when you close the jaws. Pushing too hard can bend the tool and change your reading.
Pick good calipers for the best results. Brands like Starrett or Mitutoyo are very exact. Check your caliper for damage or wear before you measure. The vernier scale and main scale should be easy to see. Make sure the moving jaw slides smoothly. Clean your caliper with a soft cloth and isopropanol. If you see dents, use an Arkansas stone to fix them.
Keep your room steady when you calibrate and measure. Try to keep the temperature near 68℉ and humidity between 30-50%. Calibrate your caliper often with gauge blocks. Write down the dates and results to keep track. Set the caliper to zero before each reading, especially if you use a digital one. Checking and calibrating often helps your readings stay within the allowed error.
You can use this table to remember the best ways to use your caliper:
| Step | Why It Matters |
|---|---|
| Zero before every reading | Makes sure your reading is right |
| Clean jaws and scales | Stops dirt from causing mistakes |
| Take multiple readings | Helps you find the true size |
| Avoid excess force | Keeps the tool from bending |
| Inspect for damage | Makes the scales easy to read |
| Calibrate regularly | Keeps your readings correct |
Note: Paying close attention to each reading and the vernier scale will help you get really good at using this important measuring tool.
You can get good at reading a vernier caliper by using simple steps. First, learn what each part does. Next, look at the main scale and the vernier scale. Wipe the jaws clean before you measure anything. Always check for zero error before you start. When you measure, read the main scale first. Then check the vernier scale. Add both numbers to get your answer. Take your time and be careful with each reading. Watch the vernier scale closely every time. Check and fix errors often to keep your readings right. If you pay attention, you will make fewer mistakes. With practice, you will read the vernier scale quickly and correctly.
FAQ
You find the least count by subtracting the value of one vernier scale division from one main scale division. Most calipers have a least count of 0.02 mm. Always check your tool’s manual for the exact value.
AccordioYou must record the zero error before measuring. Use the correction formula:Correct Measurement = Observed Measurement - Zero Error
This step ensures your results stay accurate.n content.
Yes, you can measure round objects like pipes or rods. Place the object between the outer jaws. Hold the caliper straight. Read both scales for the diameter. Always check for zero error first..
You should calibrate your caliper at least once a year. If you use it daily or for critical work, calibrate every six months. Always calibrate after any impact or repair.
Parallax error happens when you look at the scale from an angle. Always keep your eye level with the scale. This habit helps you avoid mistakes and get the correct reading.
Your measurement may change if you use too much force, misalign the jaws, or do not hold the caliper steady. Always use gentle pressure and check alignment for consistent results.
Yes, you can use the depth rod to measure how deep a hole or slot is. Place the base flat on the surface. Extend the rod until it touches the bottom. Read both scales for the depth.
A vernier caliper uses scales you read by eye. A digital caliper shows the measurement on a screen. Digital calipers are faster and easier to read, but they need batteries.